
Ultimate Guide on Gionee F3 Pro FRP Bypass
Ultimate Guide on Gionee F3 Pro FRP Bypass

FRP (Factory Reset Protection) is an Activation Lock system for preventing unauthorized Factory Resetting on your Gionee phone. But if you forget your Google Account credentials, you might want to learn a few Gionee F3 Pro FRP bypass techniques. So this 3-minute read discusses the most effective Gionee FRP bypass methods. Note that these methods apply to all Gionee phone models, including Spark, Comon, Pop, etc.
Part 1: What Will You Get After Gionee F3 Pro FRP Bypass Android 11?
FRP is a mandatory security system embedded in Android 5.1 (Lollipop) or newer. But there are many reasons why you may want to bypass Gionee FRP. Here are some of them:
You’re the new owner and get whole control of your Gionee phone
Did your cousin or parent send you their Gionee phone but forget to Factory Reset it? If that person is living far from you, that can be a real challenge. So, unless they give you their Gmail credentials, you might be stuck and unable to use the phone. If you bypass FRP, you’ll reset the phone and restore it to its brand-new state.
Remove viruses and malware
Although uncommon, your Android phone can start malfunctioning due to a virus or malware infection. You can get these unwanted programs from unknown email attachments, file downloads, website links, etc. So, because merely deleting these files won’t resolve the issue, you’ll need to bypass Gionee FRP to Factory Reset the phone and erase everything. Fortunately, you don’t need a phone technician to help you with that.
Increase the resale value
Sometimes you may need to do away with your old Gionee phone after purchasing a brand-new one. So, instead of keeping or gifting it out, you can sell it and recoup a few coins. Unfortunately, most buyers will want the phone in its brand-new state so that they can install their own apps, add music, movies, etc. If you don’t Factory Reset the phone, your bargaining power also reduces. I’m sure you don’t want that.
Important note: Bypassing FRP is absolutely legal and easy too. But some users may look to bypass FRP on a stolen phone. That’s why we clarify that this post is strictly for educational purposes. Get the consent of the original owner of the phone before bypassing FRP.
Part 2: How to Bypass Google FRP on Gionee Android 11 without PC
Now that you have all the reasons to bypass FRP on Gionee F3 Pro or any other model, let me introduce you to the best method to avoid this feature without a PC. TechnoCare APK is an Android software that allows Gionee users to bypass FRP on any Gionee brand. It’s straightforward; this app lets you create another Google Account on your locked Gionee phone without unlocking it. In short, you’ll link a new Google Account with a password that you can easily remember.
TechnoCare APK Features
- Safe and straightforward Android APK.
- Install custom ROMs on Gionee.
- No registration is required.
- No age restrictions to use.
- User-friendly and quick FRP unlock.
Steps to bypass Gionee F3 Pro FRP with TechnoCare APK
- Step 1: Start by enabling the Talkback feature on your phone. To do that, tap the Home key three times consecutively on the welcome screen.
- Step 2: Now go to the Talkback Menu and then open Talkback Settings. Then, click the Search icon and enter “Getting started with Talkback.”
- Step 3: Play the video on the “Getting Started” screen. Then, tap the three dots before clicking the Share > Google Plus icon.
- Step 4: YouTube will open where you’ll tap “Terms and Privacy Policy” to open the Google browser. Here, click Bookmarks and then tap History.
- Step 5: The Download History will open with File Manager, where you’ll click My Files and then choose SD card.
- Step 6: After opening the SD card directory, tap Apex Launcher APK and install Apex Launcher. The menu will automatically transform to the Apex Launcher interface.
- Step 7: Now click Settings and then tap Lock Screen and Security. Then, tap Other Security Settings > Device Administrators. After that, disable the Find My Device option.
- Step 8: Navigate back to the Gionee F3 Pro device Settings and choose App. Then, tap the Ellipsis icon and tap “Show system apps.” From the list, choose Google Account Manager and disable it. Do the same with Google Play Services.
- Step 9: Open the downloaded TechnoCare FRP APK and install the Technocare app. After installing it, tap Next and then tap Settings > Accounts. Now choose Add account to add another Google Account.
- Step 10: Go to Device Administrator and enable Android Device Manager.
- Step 11: Navigate back to Settings, click Apps, and enable Google Play Services and Google Account Manager.
- Step 12: Lastly, restart the locked phone and enjoy the services.
Part 3: How to Bypass All Gionee Locked Screens without Password
Unlocking FRP using TechnoCare APK is free, quick, and exciting. However, sometimes you may want to unlock your PIN, password, pattern, and other lock systems that you might have forgotten. In that case, use Wondershare Dr.Fone . It’s a desktop program that lets you unlock passwords, PINs, and patterns on Gionee, Samsung, Nokia, OPPO, Xiaomi, and other Android phone brands.
![]()
Dr.Fone - Screen Unlock (Android)
Get into Locked Gionee Locked Screens without Password
- Pattern, PIN, password, fingerprints & face screen lock can all be unlocked.
- Unlock 20,000+ models of Android phones & tablets.
- Everybody can handle it without any technical background.
- Provide specific removal solutions to promise good success rate.
4,008,669 people have downloaded it
Let’s walk through the simple steps:
- Step 1: Install and run Dr.Fone on your PC and connect your Android phone to the PC using USB.
- Step 2: Then, click Screen Unlock > Android and tap Unlock Android Screen.

- Step 3: Select the Gionee F3 Pro device brand Gionee that you want to unlock the screen.

- Step 4: Lastly, follow Dr.Fone’s on-screen instructions to enter the specific mode and unlock your phone. That’s it!
You can watch the video below to unlock Gionee patterns, passwords, PINs, and fingerprints with Wondershare Dr.Fone
Part 4: How to Disable Google FRP Feature on Gionee
You don’t always need to Factory Reset your phone before selling it or handing it over to someone else. Instead, you can manually disable the Activation Lock feature and let the new owner Factory Reset it by themselves. Follow me:
- Step 1: Open Settings and then click Accounts.
- Step 2: Tap Google, and then you’ll see all the linked Google Accounts.
- Step 3: Tap the Google Account you want to remove and tap the Ellipsis icon on the upper-right corner.
- Step 4: Click Remove Account and press Ok to erase the Gmail account. You can remove all the linked accounts if you want.
Conclusion
And that’s the best Gionee Android 11 FRP bypass method. With TechnoCare APK, you can quickly bypass APK by adding a different Google Account with an easy-to-remember password. Also, use Dr.Fone to unblock PIN, password, pattern, TouchID, and FaceID on Gionee and other Android brands. And another thing, you can manually disable FRP before selling or gifting your phone away. I hope this helps!
 safe & secure
Best Gionee FRP Bypass Guide
Gionee devices have long proven their value in the mobile market by releasing new models with cutting-edge functionality. With the latest security update in its releases, the android operating system has made it more challenging to overcome Gionee c11 FRP bypass on handsets automatically. Due to Google’s recent Android Security updates, Gionee F3 Pro FRP Bypass is now extremely tough. FRP is a novel security mechanism implemented in contemporary Android smartphones. To authenticate the valid owner, Android will prompt you to input the last Google account active on the phone before executing the hard reset.
So, this tutorial is for you if you’ve lost your existing Gmail account and your smartphone is stopped at the Google verification screen. This guide will show you the most recent technique for **Gionee F3 Pro FRP Bypass-**Google Account Unlock. So attentively adhere to the simple method outlined below.
Am I able to bypass Gionee FRP?
What is FRP?
Factory Reset Protection (FRP) is a safety measure available on Android smartphones. When you establish a Google Account on your smartphone, FRP is felt most strongly. When FRP is enabled, it stops a device from being used after a factory data reset unless you log in with a Google identity.
How it works?
Factory Reset Protection is an enhanced security feature that is accessible on the bulk of Android smartphones. When you reset your Android phone, you’ll need your phone’s Login details to gain entry to it. But now, we’ll go through the free FRP tools that can bypass your Google FRP.
FRP will be triggered immediately after the Google accounts have been connected to the Android smartphone. If FRP is enabled, the Samsung smartphone cannot be used after a factory reset unless you connect using your Google login and username that you previously made on the Samsung device.
If you want to restore the factory reset on your Android phone, make sure you’re in the options, navigate to your Account Settings, head to your accounts and clouds, and remove the Gmail email account on your Android smartphone. This should activate the FRP feature on your Android device.
Requisite: Before attempting this method on your device, ensure that your cellphone has at least a 50-60% rechargeable battery to finish the upgrading process properly.
A simple list of solutions
To solve your problem, we have provided these three solutions you can have to unlock your android.
- Retrieve your Google account on another device
- Delete Google account from Settings
- Bypass Gionee FRP through PC by using a USB Cable
Solutions to Bypass Gionee FRP?
Retrieve your Google account on another device
The fundamental and most innovative way to do the Factory Reset is to recover a Google account. You can restore your Email ID or password from another device or computer before attempting FRP bypassing Gionee F3 Pro .
You may also include an alternate email or phone number for the account you would like to restore. Google will email you a verification Gionee FRP bypass code, which you can use to create a new password for your Google account.
Once you change your password, it will require 24 to 72 hours for the reset password to synchronize with all gadgets connected to the account. After you’ve synced, you may do a factory data reset by entering your email address and a new password. You may factory reset your device by using this approach.
If you enter the incorrect password throughout this procedure, the time will be reset for the following 24-72 hours to synchronize. So, use caution while putting your email and password into the gadget. To finish the process, link your Gionee F3 Pro to a connection and leave it on for the moment.
Delete Google account from Settings
Whenever we erase the Google account from the C11, we disable the FRP of the computer system Android 11, Realme. However, it is a prevention that ties the Gionee F3 Pro to a Google account such that when it is restarted or prohibited due to loss or theft; it asks for the Google account login and password.
First step:
To remove your Google account, navigate to the settings icon on your Realme, which should be on the home screen or in the phone menu. You can reach the main menu by moving your fingertip from the bottom to the top of your screen.
Second step:
We browse through the C11 options and seek for the “Accounts” area, where you have to click to enable.
Third step:
All accounts associated with this Gionee F3 Pro will be displayed, including Google accounts and other social media accounts such as Instagram, Facebook, TikTok, Twitter, etc. Choose the profile you wish to disconnect from this device.
Fourth step:
It will show the data associated with this Google account and the Gionee F3 Pro . To proceed, click “Remove account.”
Fifth step:
To avoid accidentally disconnecting an account from the Gionee F3 Pro , tap “Remove account” once more to verify. It will clear the Gionee F3 Pro device of any data associated with this account.
Bypass Gionee FRP through PC by Using USB Cable
If you want to use your PC to bypass Gionee FRP, then here is another useful solution with the following steps:
Step 1:
The first step is to download and install a tool called “SideSync apk.” Once it is installed, run and connect your Gionee F3 Pro with your PC by using a USB cable.
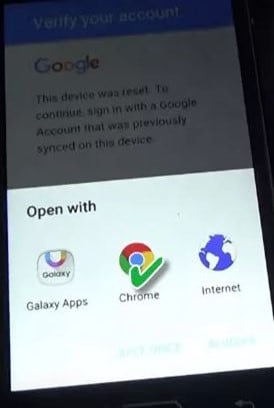
Step 2:
A pop-up screen will be shown asking you what Application you would like to use for opening the tool. Here you can select Chrome to open this too.

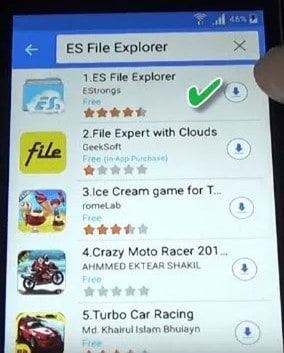
Step 3:
Your file will be downloaded through the Chrome browser. Then install ES File Explorer so that you can find and open the apk file.
Step 4:
Once the ES File Explorer is installed on your phone, find the APK file downloaded to your device, and install it. This will pop up in the settings menu, where you must choose the option of Backup and reset. Then select Factory data reset to rest your Gionee device. Here you go, you have bypassed the FRP of your device.
Conclusion
That’s it, guys. We hope this guide was helpful to you in order to bypass the Gionee F3 Pro FRP. However, you can have the best option for the bypass as per your choice and convenience.
A Quick Guide to Gionee F3 Pro FRP Bypass Instantly
FRP locks are a security feature that prevents unauthorized access after a factory reset. While these locks protect user data, they can become a hindrance when trying to regain access to the Gionee F3 Pro device. Likewise, bypassing FRP locks provides users with the flexibility to overcome these restrictions.
In this article, we’ll learn about the Gionee F3 Pro FRP bypass process. We will also list out the things that you must keep in mind before trying this process. Read this guide till the end to find the best Gionee F3 Pro FRP unlock tool.

Part 1. Things To Keep in Mind Before Bypassing Gionee F3 Pro
Bypassing the security measures on a Gionee F3 Pro should be approached with caution. There are many considerations that users should keep in mind before the Gionee F3 Pro FRP bypass. Below, we have listed some considerations to help users avoid any hassle:
1. Legal Implications
Bypassing device security could potentially breach the terms of service and warranty agreements. Moreover, it may even be illegal in certain jurisdictions. It is recommended to avoid bypassing unless users are certain it is legally permissible in their region.
2. Data Loss
When resetting the Gionee F3 Pro device, bypassing security measures often comes into play. This sometimes results in the loss of stored data. Prioritize data backup before attempting Gionee F3 Pro FRP bypass. If data preservation is a top priority, exploring alternative solutions is preferable.
3. Security Risks
Your device might be exposed to potential vulnerabilities due to security FRP bypass. This makes it more susceptible to unauthorized access. Users should prioritize safeguarding their data and personal information.
4. Manufacturer Support
Gionee F3 Pro FRP bypass can void the manufacturer’s warranty and limit future support options. You should know that bypassing security could result in losing access to updates. It is advisable to explore other solutions before considering bypassing.
5. Technical Skill Requirements
Technical knowledge and skills are highly demanded when bypassing FRP locks. Only users possessing advanced technical skills should attempt a bypass. For those lacking expertise, seeking professional assistance is advisable to avoid consequences.
6. Device Functionality
Bypassing security measures may impact the Gionee F3 Pro device’s normal functionality. Users should be prepared for potential device performance or functionality issues post-bypass.
Part 2. Bypass FRP Lock Gionee F3 Pro Using SIM Card Method
Using the SIM card process for Gionee F3 Pro FRP bypass is a viable option for many users. Still, proceeding with caution and adhering to the specific instructions is necessary. Users only need to insert a PUK-enabled SIM card and set up their device. Consider using the steps guided below to carefully bypass your Gionee F3 Pro without any risks:
- Step 1. Power on your Gionee F3 Pro device, set it up, and connect it to the Wi-Fi network. Agree to any terms or policies and wait until your phone gets ready. When you reach the verification screen, tap the “Use my Google Account Instead” option.


- Step 2. Once you are required to sign in to your Google account, return to the screen where you have to select the language. Then, insert the SIM card into your phone and ensure you have saved a contact. To enter the SIM PIN, tap on the “Emergency” option. Next, tap “Emergency Information” and click the “Edit” icon at the top-right corner.

- Step 3. Enter the PIN for the SIM card to proceed further. Under the “Emergency Information” section, tap on the “Add Contact” option and access it. Dial the call to that number, and once the call timer appears, choose the “Contacts” option on the dialer screen.

- Step 4. Tap on “three-dots” at the top-right corner and select the “Share” option followed by “Send as text.” On the following screen, send via XShare MI and allow the necessary permission. Download Google Account Manager and Account Login/FRP Bypass APKs on your other device. Also, download the Activity Launcher app from the Play Store.

- Step 5. Set up XShare on another device and allow all the permissions. Choose the “Receive” option to receive the contact from your Gionee F3 Pro device via a QR code scan. Afterward, disconnect and exit the current connection. On the main screen, tap the “Receive” option on your Gionee F3 Pro and scan the QR code using the Gionee F3 Pro device. You are required to share all three of the apps that you just downloaded.

- Step 6. As soon as the apps are received, install them and “Open” the Account Login/FRP Bypass tool. When it requires a password for sign-in, hit the “three-dots” and choose the “Browse Sign-In” option. Provide your Email and Password to sign in to your Google account.

- Step 7. After Google signs in, “Open” the Activity Launcher app and wait until the package is loaded. From the appearing menu, select “Android Setup” and then choose the following option:
Android Setup (com.google.android.setupwizard/.predeferred.PreDeferredSetupWizardActivity)
Once setup ends, the Gionee F3 Pro FRP bypass Android 11 process will be completed successfully.

Part 3. How to Easy Gionee F3 Pro FRP Bypass With Wondershare Dr.Fone
Facing FRP lock on your Gionee F3 Pro can be daunting, especially when you need to access your phone urgently. In this case, using the above-discussed SIM card method can be time-consuming. Users looking for an alternative and quick option can use Wondershare Dr.Fone – Screen Unlock (Android). This tool can help bypass FRP lock on your Android without requiring any PIN or Google account.
Moreover, users don’t need technical knowledge as this tool offers one-click removal. Dr.Fone also adopts a user-friendly interface, ensuring accessibility for every user. Apart from Gionee F3 Pro FRP bypass Android 11, this tool also unlocks Samsung and LG devices without data loss.
Salient Features of Wondershare Dr.Fone
- Fone supports over 2000 Android devices across 18+ brands for screen unlock.
- This tool extends the opportunity to recover data from Android devices with broken screens.
- When it comes to recovering device data, Dr.Fone offers a dedicated Data Recovery tool to recover all important lost files.
Steps To Perform Gionee F3 Pro FRP Bypass Using Wondershare Dr.Fone
By bypassing the FRP lock, Dr.Fone allows users to gain access to their devices promptly. To start learning about using this tool, follow the steps below for Gionee F3 Pro FRP bypass:
Here is a video for you to learn how to bypass FRP:
- Step 1. Connect the Gionee F3 Pro device and Navigate to the Toolbox
Connect your Gionee device to your computer and launch Wondershare Dr.Fone. Within the toolkit window, navigate to “Toolbox” and select “Screen Unlock.” This will open a new window; choose the “Android” option to access the FRP Lock function.

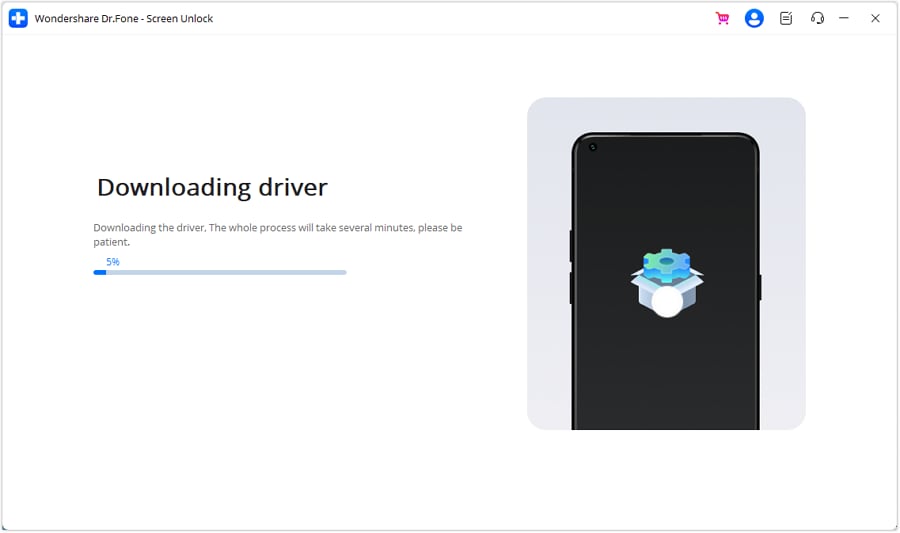
- Step 2. Choose the Required Device and Android Version
Afterward, click “Remove Google FRP Lock” and select your appropriate device brand from the options. This will trigger Dr.Fone to download the relevant driver for the selected brand.
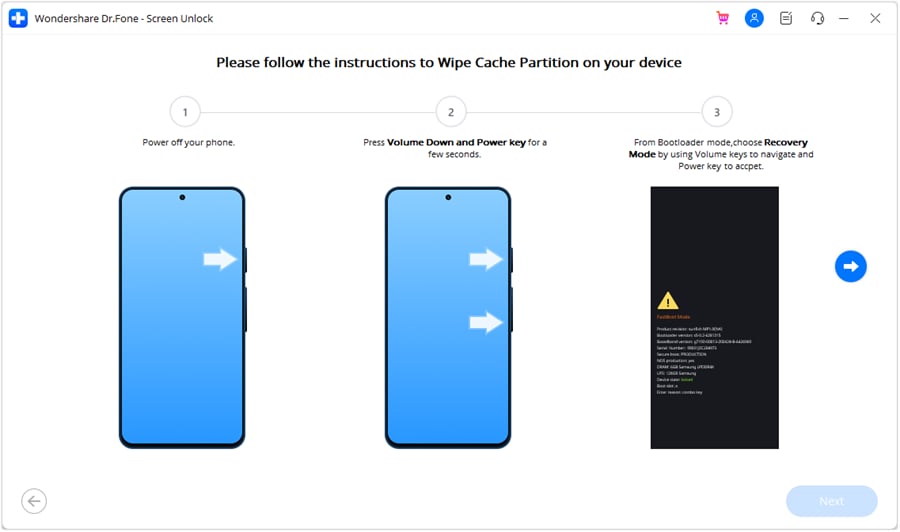
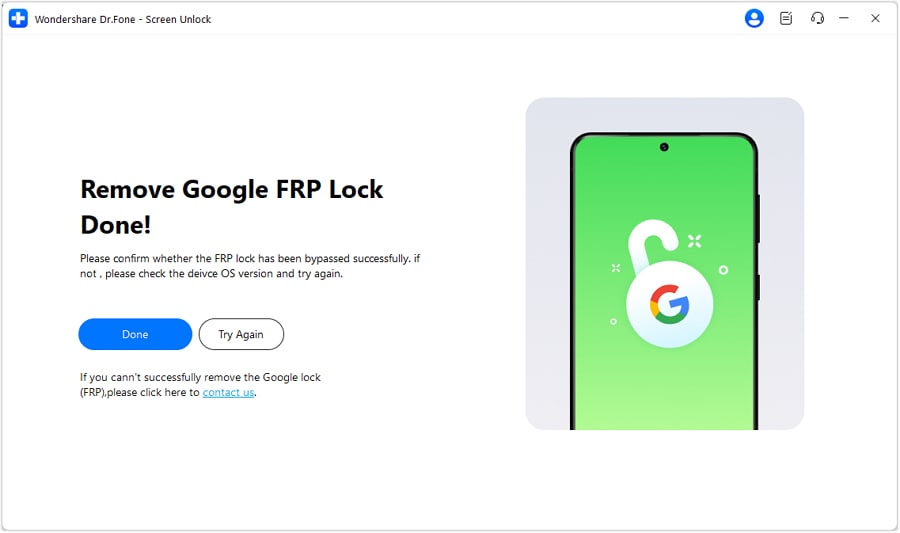
- Step 3. Access Emergency Call and Enable USB Debugging
After downloading the necessary drivers, power off your smartphone and connect it to the computer. Press the “Volume Up” and “Volume Down” buttons simultaneously for almost 3 seconds as it connects. This initiates the FRP unlocking process. If everything went smoothly with the unlocking, click “Done.”
Read More About Tecno:
Gionee Master Reset Code: The Ultimate Guide to Restoring Factory Settings
Ultimate Guide on Gionee Spark FRP Bypass
How can I Unlock Gionee Network by Myself?
Conclusion
We can conclude that bypassing the FRP lock can be difficult if one does not follow the proper steps. This guide has provided users with two of the best Gionee F3 Pro FRP bypass methods. Overall, Wondershare Dr.Fone offers the most advanced methods to let users bypass FRP locks easily. Its ability to support a wide range of Android devices makes it more recommended.
Tips: Are you searching for a powerful FRP Bypass tool? No worries as Dr.Fone is here to help you. Download it and start a seamless unlock experience!
- Title: Ultimate Guide on Gionee F3 Pro FRP Bypass
- Author: Liam
- Created at : 2024-07-14 15:27:17
- Updated at : 2024-07-15 15:27:17
- Link: https://android-frp.techidaily.com/ultimate-guide-on-gionee-f3-pro-frp-bypass-by-drfone-android/
- License: This work is licensed under CC BY-NC-SA 4.0.