
Latest Guide How To Bypass Nokia C12 FRP Without Computer
Latest Guide: How To Bypass Nokia C12 FRP Without Computer
Smartphones, whether iPhone or Android, are really important in our daily lives these days. They store a lot of professional and private information. To keep their users safe, smartphone companies have added different security measures. One of these security features is called Factory Reset Protection (FRP). It stops unauthorized people from getting into a phone after resetting it.
Even though this is an important security measure, it can sometimes be annoying. This is true for Nokia smartphone users who can’t access their phones because they forgot their login details. Fortunately, there are ways for Nokia C12 FRP bypass without a PC. This article will present you with the latest guide on how to bypass Nokia C12 FRP .
- Part 1: What’s Nokia C12 FRP Code and How To Use It
- Part 2: How To Bypass Nokia C12 FRP With Other Methods

- Part 3: How To Disable Nokia C12 FRP Easily
Part 1: What’s Nokia C12 FRP Code and How To Use It
Nokia smartphones incorporate a security measure called the FRP (Factory Reset Protection) code. It is also called a bypass or Google account verification code. This feature is implemented to safeguard the Nokia C12 device from unauthorized access. The code usually activates following a factory reset. To regain full access to the Nokia C12 device, users are required to input the Google account credentials associated with the Nokia C12 device.
The Nokia C12 FRP code serves as a protective barrier. It prevents unauthorized individuals from utilizing the Nokia C12 device after it has been reset. By requesting the Google account credentials tied to the Nokia C12 device, it acts as an extra layer of security. This ensures that only authorized users can access and operate the Nokia C12 device. In essence, the Nokia C12 FRP code is an integral security feature that reinforces user authentication.
It prevents unauthorized access to the Nokia C12 device, providing additional protection. Each Nokia device possesses a distinct FRP (Factory Reset Protection) code. It is linked to the Google account that was previously synchronized with the Nokia C12 device. It activates when you perform a factory reset on your Nokia smartphone without signing out of the associated Google account.
Usage of Nokia C12 FRP Code
To use the Nokia C12 FRP code effectively on your FRP-locked Nokia smartphone, follow these simplified steps:
Get the FRP Code
There are a few methods to get the FRP code. You can reach out to Nokia customer support for help and guidance. They can help you obtain the specific FRP code for your Nokia model. You can also search online to find reliable sources that share FRP codes. Several online platforms and forums cater to users sharing FRP codes. It ensures you find the appropriate code for your device.
Enter the FRP Code
Once you have obtained the FRP code, such as *#812#, power on your Nokia smartphone and proceed through the initial setup steps until you encounter the FRP lock screen. At this point, the Nokia C12 device prompts you to enter your Google account credentials. However, enter the FRP code you obtained instead of inputting your credentials. Typically, the FRP code comprises a numeric sequence specific to your device.
Complete the Setup
After entering the FRP code, the Nokia C12 device undergoes a verification process. It will authenticate the code and unlock the FRP lock. Once the authentication is successful, you can proceed with the setup process. This includes signing in with your Google account or creating a new one.
Limitation of Nokia C12 FRP
Remember that FRP codes can differ based on your Nokia smartphone model and software version. Recognizing that using an FRP code obtained from unofficial sources can pose security risks is crucial. To ensure the safety of your device, it is recommended that you get the FRP code from trusted sources.
Part 2: How To Bypass Nokia C12 FRP With Other Methods
Apart from the Nokia C12 FRP bypass code, other methods are available to bypass the FRP lock. These methods range from using built-in tools within Nokia phones to using third-party software. Given below are three alternative ways to bypass Nokia C12 FRP:
Method 1: Using Official Google Account
The FRP lock on your Nokia smartphone is closely linked to the Google account. The whole reason you are facing this situation is that you don’t remember your Google account password. It means the FRP lock can be bypassed if you can recover your Google account. To recover your Google account, you can use the following steps:
- Step 1: On your computer, use a browser to access the Google Sign-in page. Here, type your Google account email, and when it comes to password, choose “Forget Password.”
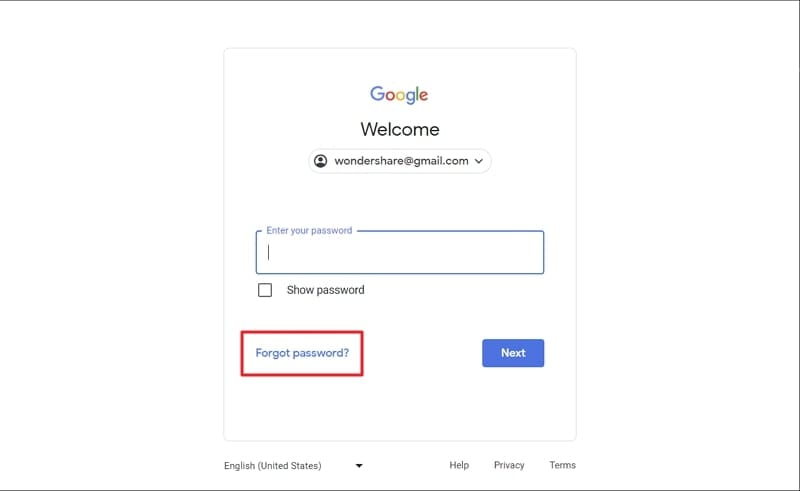
- Step 2: Now, use the recovery phone number or email associated with your Google account to receive the verification code. Afterward, create a new password and wait for around 24 hours. Once Google has synced the new password across devices, you can sign in and bypass the FRP lock.

Method 2: Using Third-Party FRP Bypass Apps
There are many third-party tools available that can help you bypass the Nokia C12 FRP lock. One of these tools is Dr.Fone - Screen Unlock (Android) . This tool is considered to be the best when it comes to bypassing FRP lock. It provides a powerful screen unlock feature that can bypass many locks on Android devices. These locks include passwords, PINs, patterns, fingerprints, and face locks.
Wondershare Dr.Fone also supports over 2000 Android devices from 15+ brands for screen unlocking. These include all major brands like Samsung, Xiaomi, Nokia, OPPO , and others.
Dr.Fone - Screen Unlock (Android)
New method Bypass Google Account All VIVO Devices
- Pattern, PIN, password, fingerprints & face screen lock can all be unlocked.
- Bypass Android FRP lock without a PIN or Google account.
- Unlock mainstream Android brands like Samsung, Huawei, LG, Xiaomi, etc.
- No tech knowledge required, Simple, click-through, process.

3,981,454 people have downloaded it
Here are the detailed steps to bypass the Nokia C12 FRP lock:
- Step 1: Choose Screen Unlock in Wondershare Dr.Fone
After launching Wondershare Dr.Fone on your computer, move to the “Toolbox” tab. Here, choose “Screen Unlock,” and on the next screen, select “Android.”
- Step 2: Select Nokia as the Brand
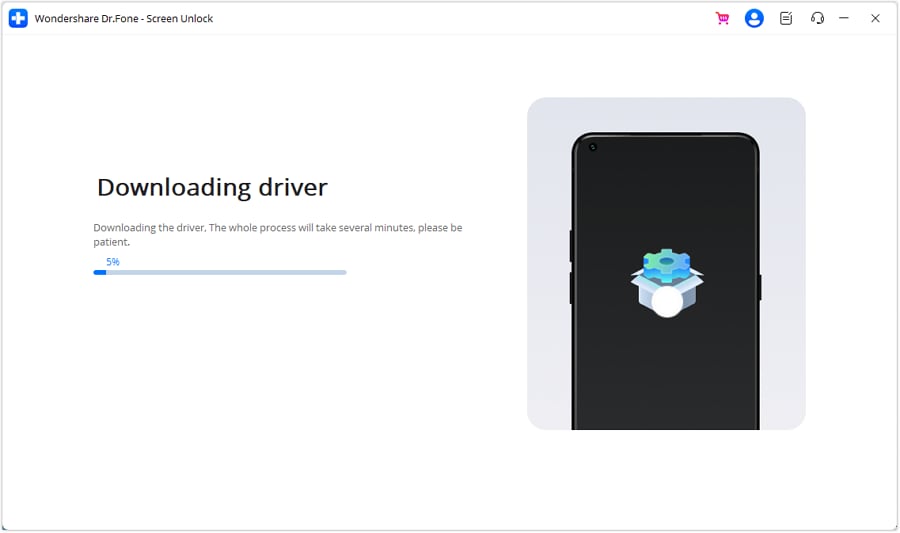
The next option you need to select is “Remove Google FRP Lock”. Afterward, choose “Nokia” as the brand and click “Start”. Now the program will download the relative driver.

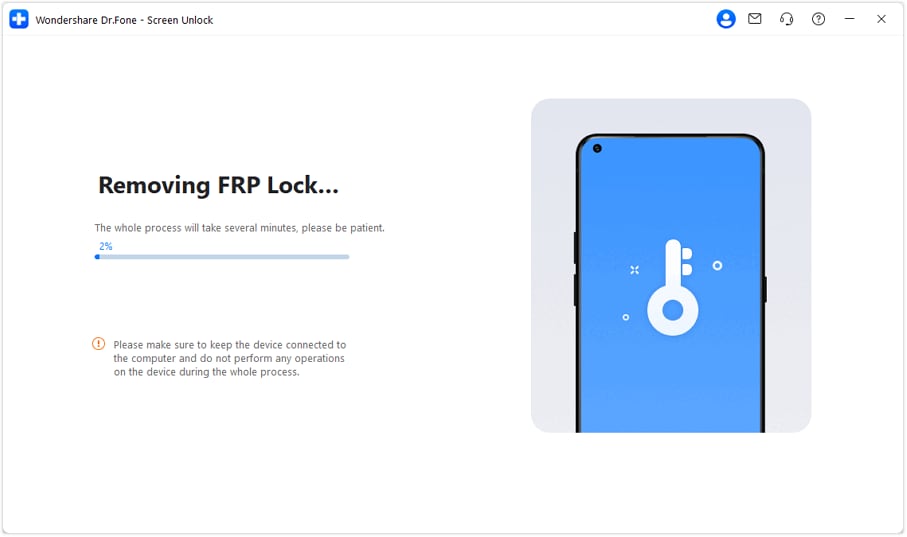
- Step 3: Bypass the Nokia C12 FRP Lock
Once the driver is downloaded, switch off your Nokia device. Now connect it to the computer, and while connecting, press and hold the “Volume Up” and “Volume Down” buttons simultaneously. Release the buttons after 3 seconds. Now the process of bypassing FRP will start, and it will take a few minutes to complete.
 safe & secure
Part 3: How To Disable Nokia C12 FRP Easily
Factory Reset Protection (FRP) is an important security feature that safeguards your data. However, there may be instances where you find it necessary to disable FRP. Disabling FRP can be helpful if you want to have complete control over your device. It will help you avoid any potential complications that may arise from FRP activation.
In this section, we will guide you through the process of disabling Nokia C12 FRP easily. Thus, allowing you to have more control over your device. Given below are the steps to disable Nokia C12 FRP:
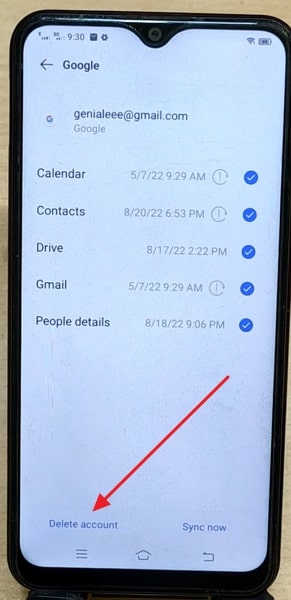
- Step 1: On your Nokia smartphone, access Settings and scroll down to the last option, “Account & Sync.” Tap “Accounts & Sync,” and on the following screen, find the Google Account you want to remove.

- Step 2: Here, tap the Google account and choose “Delete Account” on the next screen. Confirm your action by tapping “OK,” and the Google account will be removed.
Conclusion
In this comprehensive guide, we have explored various methods for Nokia C12 FRP bypass without a PC. We discussed the Nokia C12 FRP code method, followed by three alternative techniques. These included built-in Nokia tools, an official Google account, and Wondershare Dr.Fone. These methods provide viable options for Nokia smartphone users locked out of their devices.
Each method has its own merits and limitations. However, we recommend considering Wondershare Dr.Fone - Screen Unlock (Android) as the best choice for bypassing Nokia C12 FRP. Wondershare Dr.Fone is a trusted and reliable Nokia C12 FRP bypass tool. It offers extensive device compatibility and reliable FRP bypass capabilities.
Easy Guide to Nokia C12 FRP Bypass With Best Methods
The Google Factory Reset Protection (FRP) lock is a security measure in Android smartphones. By default, FRP Lock is active on all Android devices after the Android 5.1 release and triggers upon the execution of a hard reset. Despite its undeniable importance as a security feature, there are two specific instances when dealing with FRP lock can be difficult.
The first one is forgetting your Google ID details. The other situation is buying a second-hand device locked with the previous owner’s Google ID. This article deals with Nokia C12 FRP bypass Android 11. It provides three methods to bypass FRP, allowing you to access your Nokia C12 again.

Part 1: [Direct Solution] Nokia C12 FRP Bypass Android 11 With Wondershare Dr.Fone
For the first and foremost remedy of Nokia C12 LTE FRP bypass, you can use effective software. While other methods are not as versatile and simple, you can take a few steps to unlock your device. The best software solution to bypass FRP on Nokia devices currently available is Wondershare Dr.Fone. It is a comprehensive solution that offers functions ranging from bypassing screen locks to FRP locks.
Dr.Fone – Screen Unlock (Android) goes beyond Nokia, extending its capability to bypass FRP locks on devices from diverse brands like MI, Samsung, OPPO, and more. Additionally, it streamlines the unlocking process for various screen locks, covering passwords, PINs, fingerprints, and facial recognition. Dr.Fone is designed with a user-centric approach, ensuring accessibility for users of all types to unlock their devices effectively.
Key Features of Wondershare Dr.Fone
- If your locked device is Samsung or LG brand, you can remove the screen lock without any data loss.
- Wondershare Dr.Fone supports over 2000 Android devices for over 18 Android brands, making it a diversely compatible tool.
- With the help of this Nokia C12 FRP unlock tool, you can recover your data from a broken Samsung Device.
Steps for Nokia C12 FRP Bypass Android 11 With Wondershare Dr.Fone
By eliminating the FRP lock, Dr.Fone facilitates the option of having complete access to your device. Below are the steps required to Nokia C12 FRP bypass using Dr.Fone – Screen Unlock (Android):
- Step 1. Access Remove Google FRP Lock in Dr.Fone
You can begin with installing and launching Wondershare Dr.Fone. Go to the “Toolbox” tab and press “Screen Unlock.” On the following screen, choose “Android” as the Nokia C12 device type and click “Remove Google FRP Lock.” Now, you will be asked to choose the Nokia C12 device brand, after which you need to continue by clicking “Start.”
- Step 2. Successfully Bypass Nokia C12 FRP Lock
It will lead to the downloading of the required driver for your Android. Upon downloading, turn off your device and establish a connection with the computer. While connecting, press and hold both “Volume” buttons for 3 seconds. This action will commence the FRP bypassing process, requiring a brief moment for completion.
Part 2: Nokia C12 FRP Bypass Without PC Using SIM Card Method
While the software solution is the best option for Nokia C12 Pro FRP bypass, other options can also feature an unlocking service. These conventional methods are complex; however, they offer a solution to unlocking FRP.
The SIM card method is a favored FRP lock bypass approach among Nokia C12 users. Here is a comprehensive guide on employing this method to bypass the FRP lock on Nokia C12:
- Step 1. To start, turn on your Nokia C12 and confirm it is FRP-locked by going up to the screen where it demands Google ID. Afterward, return to the language screen and enter a PIN-locked SIM card into the Nokia C12 device.

- Step 2. Before inserting the SIM card, ensure at least one contact is saved on the card. It could be any random number, and you can do it by inserting the SIM card into another device. After inserting the SIM card, tap “Emergency,” where the Nokia C12 device asks you for the PIN of the SIM card.

- Step 3. After pressing “Emergency,” tap “Emergency Information” on the next screen. On the “Owner” screen, tap the icon at the top right corner, enter the SIM PIN code, and when asked, choose “Add contact.”

- Step 4. Add the contact you saved as the owner’s contact and make a call. During the call, tap “Contacts” to access your saved contacts, and select the one you saved. On tapping the three dots on the top, select “Share” and choose “Share as text.”

- Step 5. Choose “XShare Mini” as the sharing option, grant the necessary permissions, and leave the Nokia C12 device on the “QR Code.” Move to another device and access a web browser. Go to mobileteamofficials.com and download two apps: “Google Account Manager” and “Account Login/ FRP Bypass.”

- Step 6. On the other device you’re using, download the two apps from the Google Play Store: “Activity Launcher” and “XShare.” Now open the XShare app and grant all the required permissions. Tap “Receive” and scan the QR code from the Nokia device to complete the contact transfer process.

- Step 7. Now, select three apps: “Google Account Manager,” “Account Login/ FRP Bypass,” and “Activity Launcher” within XShare on the second device. On the Nokia device, tap “Receive” and scan the QR code to complete the process.

- Step 8. Once received, install all three apps on the Nokia device. Now, first open “Account Login/ FRP Bypass” and tap “three dots” from the top right corner to select “Browser Sign In.” When it takes you to the Google sign-in page, log in using any Google ID.

- Step 9. After signing in, return to the apps and open the Activity Launcher app. Within the app, tap “Android Setup” on the following screen and scroll down to press the “Android Setup” entry. This will perform the Nokia C12 Lite FRP bypass successfully.

Here is a video for you to learn how to bypass FRP:
Part 3: Nokia C12 FRP Bypass With APK
While you consider other FRP bypassing methods instead of Wondershare Dr.Fone, there is another option that you can go with. If you prefer a method that doesn’t involve a PC or SIM card, Nokia C12 Pro FRP bypass using an APK is a viable option. You can follow the steps given below to complete this Nokia C12 Lite FRP unlock tool process:
- Step 1. To begin, turn on your Nokia Android 11 Phone. Press “START” and link your phone to a Wi-Fi connection. Return to the Welcome Screen, then press “Start” and choose the option to “Add a New Network.”

- Step 2. Touch the “Microphone” icon and choose “Deny” across the pop-up. Go for the “Microphone” icon again, and opt for “Deny.” Lastly, touch the same icon again and opt for “Allow.” This will take you to the Gboard App information screen.

- Step 3. Choose “Permissions” and tap the “Search” icon at the top-right corner of the follow-up screen. Search for “Settings” and pick the respective app from the results list. Tap “Open” to access the Settings application. This action will direct you to the “Settings” interface.

- Step 4. Navigate to “App management” and select “App settings.” Access the XShare APK, launch it, and ensure you have a secondary Android device available. Open the Play Store on the second device, and download and install the XShare App for further processing.

- Step 5. Next, open the Chrome Browser on the second device. Enter one of the following URLs in the browser and download “FRP Bypass APK” and “Google Account Manager 9.0 APK”:
https://tiny.cc/frptools or https://bit.ly/2NkxXYs

- Step 6. Open the XShare APK on your second Android device. Navigate to the downloaded apps and tap “Send.” Return to the FRP phone and select “Receive” on it. Scan the QR code to establish a connection between the Nokia C12 devices. Verify on your FRP phone that both FRP APK files have been received and proceed with the installation.

- Step 7. Close and exit the XShare APK on the FRP phone to return to the “App settings” screen. Launch the FRP Bypass APK, tap the “three dots” upon opening, and choose “Browser Sign-In.” Sign in with your Google Account ID and password.

- Step 8. Return to the “App settings” Screen and uninstall the Google Account Manager APK. Proceed to the initial “Welcome” screen by tapping the back key repeatedly. Initiate the Nokia C12 device setup procedure by tapping “Start.” You should now observe “Account Added,” indicating successful FRP bypass on your Nokia C12 FRP bypass Android 11.

Conclusion
In conclusion, the Nokia C12 LTE FRP unlock tool demands varied approaches catering to user preferences. While methods like SIM cards and APK offer alternatives, Wondershare Dr.Fone - Screen Unlock (Android) is the optimal solution. Dr.Fone simplifies the Nokia C12 LTE FRP process with its user-friendly interface and security assurance.
Tips: Are you searching for a powerful FRP bypass tool? No worries as Dr.Fone is here to help you. Download it and start a seamless unlock experience!
Full Guide to Bypass Nokia C12 FRP
I updated my Nokia C12 to the latest Android, and now it’s stuck on FRP lock. I don’t know how to Bypass the Pixel FRP lock, which is annoying because I have to finish an assignment. How should I do it?
The FRP lock is one of Google’s security methods for Android devices. It keeps unapproved people from erasing your phone data. However, an update or unidentified issue may sometimes lock your phone without warning. Just like the case above, it can be an unpleasant experience. Therefore, this Nokia C12 FRP bypass article will show you some ways to bypass it.
The Google FRP lock is not a new issue and can occur to almost any Android user. If you neglect to disable the Factory Reset Protection before a reset, Google will lock your phone. Therefore, you will have to bypass the Google account to resolve it.
Part 1: 3 Ways to Bypass Nokia C12 FRP
1. Download FRP Bypass APK (OTG Cable Needed)
The use of OTG for bypassing the Google FRP lock on Nokia C12 after a hard reset is a great technique to bypass the Google account lock.
Before we get to the guide, you need an Android OTG cable, fast Wi-Fi, and a PC.
![]()
If you do, follow these steps to start bypassing your Google account:
Step 1. Download the FRP bypass APK on your PC.
Step 2. Move (by copying) the APK document to your flash drive.
Step 3. Utilize the OTG cable to connect your Pixel phone and flash drive.
Step 4. Install the APK document on your Pixel device when the file manager application springs up.
Step 5. The phone Settings will presently be accessible for you to open.
Step 6. Look for and select the “Backup and Reset” choice.
Step 7. Select the “Factory Data Reset and then Reset everything from the phone. That will delete all the phone’s media files, settings, apps, and accounts.
Step 8. Your Pixel phone will reboot, and you won’t see the FRP lock.
![]()
2. Use Pin Lock Sim to Access Chrome
Step 1: Start the cycle by eliminating the SIM card from your Pixel device. Presently connect it to Wi-Fi.
Step 2: Insert the SIM card once more. Mistype your PIN code multiple times.
Step 3: You will be approached to give your PUK code straightaway. Continue to type wrong PUK numbers until the SIM card becomes unusable.
Step 4: Tap the padlock symbol on the lock screen to open another menu choice. You will see the warning setting choice at the top corner of the screen.
Step 5: Select the See All options. Search for the YouTube App and afterward go to Settings and open History and Privacy to access the Youtube ToS.
![]()
Step 6: This will open the Chrome Browser, where you select Accept and Continue. Then, at that point, pick Next > No Thanks.
Step 7: Find a dependable FRP bypass tool to unlock FRP on the program. Go to Security from Setting and open Pin Windows. Then use the Screen lock type to Unpin the SIM.
Step 8: Restart your device after setting up a PIN code. You can utilize your Pixel without marking into your underlying Google account.
Bonus Tip. Use Dr.Fone-Screen Unlock (For Other Android phones)
We have presented numerous FRP methods in this guide. Nonetheless, they might fail to tackle the issue some of the time. There is no question that a bypass tool will be a lot more straightforward and speedier. Therefore, we strongly recommend you use the Wondershare Dr.Fone Bypass FRP tool for a less complex and quicker strategy. Dr.Fone - Screen Unlock (Android) is a speedy, easy-to-use FRP bypass for you to get rid of the Google issue. It lets you access your home screen once more. Here are the needed steps for bypassing the Google FRP lock:
Step 1: Open the software, connect your phone and PC and pick Screen Unlock. Then click on Screen Unlock > Android > Remove Google FRP Lock.

Step 2: Pick your device’s brand and click Start.
Step 3: Once you choose the Nokia C12 device brand, Dr.Fone will commence the download of the necessary driver.
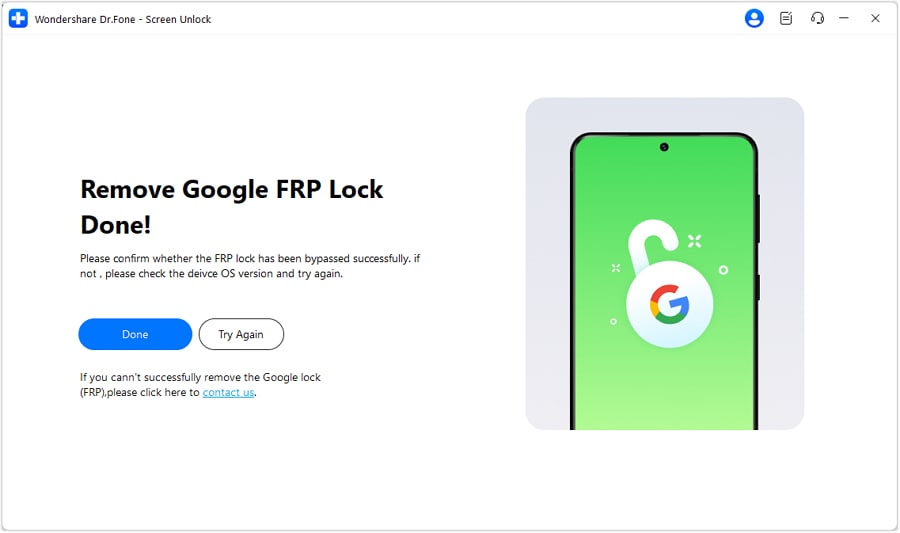
Step 4: After the download is complete, the procedure to eliminate the FRP lock will initiate, requiring a few minutes. Once the lock is successfully removed, tap Done to finalize the process.
safe & secure
Part 2: Definition of Nokia C12 FRP
Factory Reset Protection (FRP) includes security on Android gadgets with OS Version 5.1 and higher. The FRP gives an underlying security highlight you can utilize that safeguards your gadget and data, including screen locks and data encryptions. The FRP automatically works once a Google account has been logged in on the phone. However, it will stop working when the Google account is removed from the Pixel phone preceding the Factory Data Reset. When the FRP has been enacted, it will not let others use your phone after a Factory Reset in an untrusted environment. It implies that the FRP Lock will come into play if your Pixel gets Factory Reset in an unrecognized way.
![]()
Part 3: Can factory reset really remove FRP?
To remove FRP, you must remove all Google accounts from your Pixel phone. After doing so, you can factory reset it to clear all your data. So technically, you need to remove all the accounts, and yes, a factory reset will work.
The Bottom Line
This Nokia C12 FRP bypass article gives an insight into the methods you can use to remove the FRP lock. However, if you have a other Android brand phone, the best one of all methods is using Dr.Fone - Screen Unlock (Android) . It delivers solutions for those who don’t know the OS variant of their phone. Its interface is easy to understand and has clear instructions. Moreover, bypassing the FRP lock is just a matter of a few minutes for it.
Also read:
- [New] 2024 Approved Unveiling YouTube Shorts Money-Making Mechanisms
- [Updated] Exploring Screen Capture Bandicam Versus Camtasia for 2024
- About OnePlus Nord CE 3 Lite 5G FRP Bypass
- In 2024, AddROM Bypass An Android Tool to Unlock FRP Lock Screen For your Motorola Edge 40 Neo
- In 2024, Easy Guide to Oppo Reno 11F 5G FRP Bypass With Best Methods
- In 2024, Tips and Tricks for Setting Up your Xiaomi Civi 3 Disney 100th Anniversary Edition Phone Pattern Lock
- Latest Guide How To Bypass Lenovo FRP Without Computer
- Locate Apple's Official Guides: Accessing iPhone Manuals by Model Number
- Resolving PortAudio Faults in Audacity for Windows 11/11 OS
- Title: Latest Guide How To Bypass Nokia C12 FRP Without Computer
- Author: Liam
- Created at : 2025-01-10 17:00:44
- Updated at : 2025-01-12 17:10:27
- Link: https://android-frp.techidaily.com/latest-guide-how-to-bypass-nokia-c12-frp-without-computer-by-drfone-android/
- License: This work is licensed under CC BY-NC-SA 4.0.