
In 2024, The Updated Method to Bypass Nokia C12 Pro FRP
The Updated Method to Bypass Nokia C12 Pro FRP

Android smartphones have a security feature called FRP (Factory Reset Protection) that shields user data from theft or loss. Like other manufacturers, Nokia uses FRP as a security feature to make sure that, in the event of a factory reset, only the original owner with the Google account credentials linked with the Nokia C12 Pro device would be able to access the Nokia C12 Pro device. This aids in preventing the Nokia C12 Pro device’s theft or unauthorized use.
FRP, however, can also be a problem if a user forgets their Google account login information or loses access to their device. Our step-by-step method will walk you through the most effective ways to bypass FRP on Nokia C12 Pro devices in 2023, ensuring you can regain access to your device without any hassle. Say goodbye to FRP Xiaomi and Nokia C12 Pro FRP challenges with our complete method.
We have included more than two ways to unlock your mobile without any hassle and complication. Just follow this guide, and you will regain access to your device in no time.
Part 1: Precautions To Take Before and After FRP Bypass?
Precautions are necessary for a safe and effective process when overcoming FRP (Factory Reset Protection) on your Nokia C12 Pro device. In order to safeguard your data, guarantee device performance, and maintain device security, we’ll highlight the essential steps you should take before the Nokia FRP bypass.
Precautions:
- Backup Your Data: In order to prevent data loss during FRP bypass, be sure to back up all vital information from your smartphone, including contacts, pictures, videos, and documents, to a secure location.
- Charge the battery: To prevent any delays during the FRP bypass procedure, ensure your device has enough battery life or is connected to a charger.
- **Conduct Thorough Research:**To prevent any potential threats or damage to your device, conduct thorough research and follow instructions from reliable sources or respected guidelines.
Part 2: How to remove Nokia C12 Pro FRP with the most reliable software - Dr.Fone?
Wondershare Dr.Fone - Screen Unlock (Android) is well-known for its ease to use and data-security. The Unlock Android Factory Reset Protection feature helps you enter home screen without effort. Dr.Fone not only supports Nokia FRP bypass, it also supports other device brands, such as Samsung , OPPO , etc.
Dr.Fone - Screen Unlock (Android)
Nokia C12 Pro FRP Lock Removal Made Easy
- Pattern, PIN, password, fingerprints & face screen lock can all be unlocked.
- Bypass Android FRP lock without a PIN or Google account.

- Unlock mainstream Android brands like Samsung, Redmi, Xiaomi, etc.
- No tech knowledge required, Simple, click-through, process.

3,981,454 people have downloaded it
Check the following steps to see how to bypass Nokia FRP with Wondershare Dr.Fone.
Step 1: Launch Wondershare Dr.Fone first and choose Toolbox > Screen Unlock > Android.
Step 2: Select Remove Google FRP Lock.

Step 3: Choose Nokia among the Nokia C12 Pro device brands.

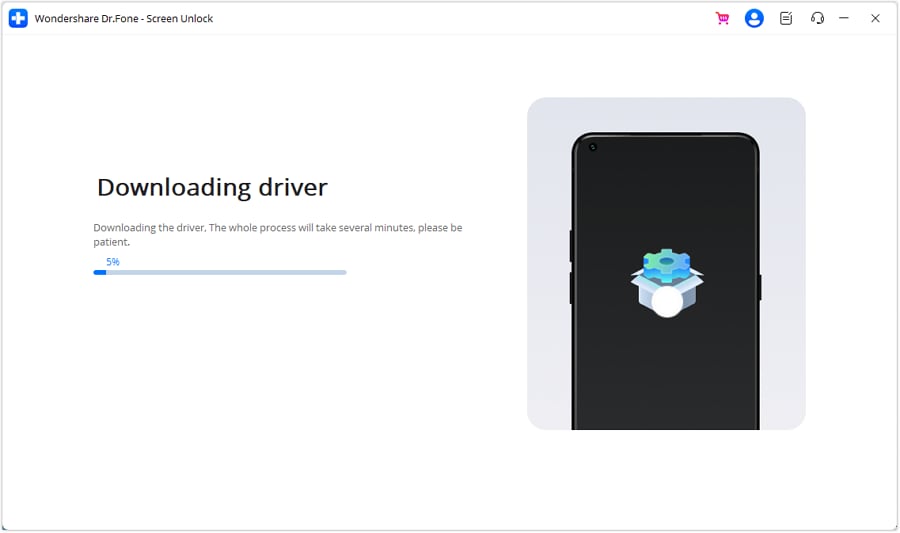
Step 4: Dr.Fone will start to download driver. And then turn off the Nokia C12 Pro device and connect to the computer. During the connecting process, please keep pressing Volume Up and Down button simultaneously for around 3 seconds.
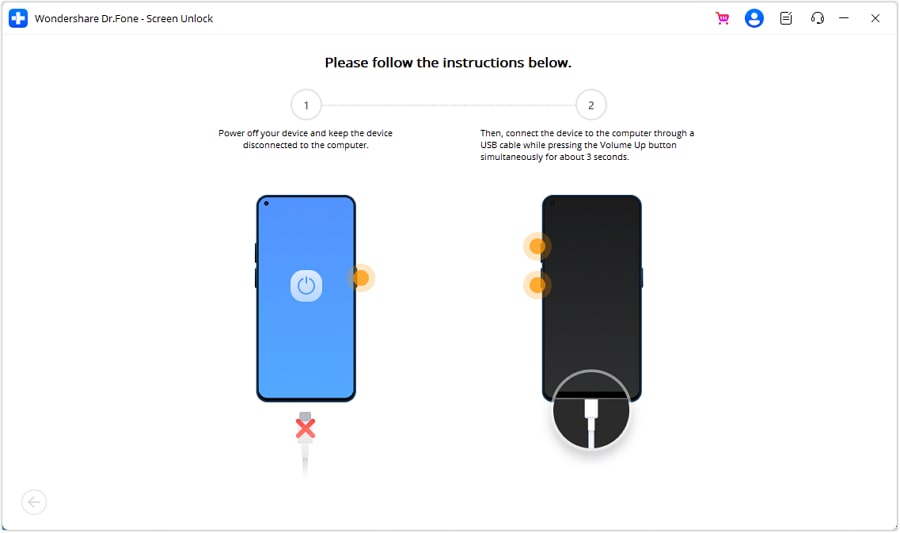
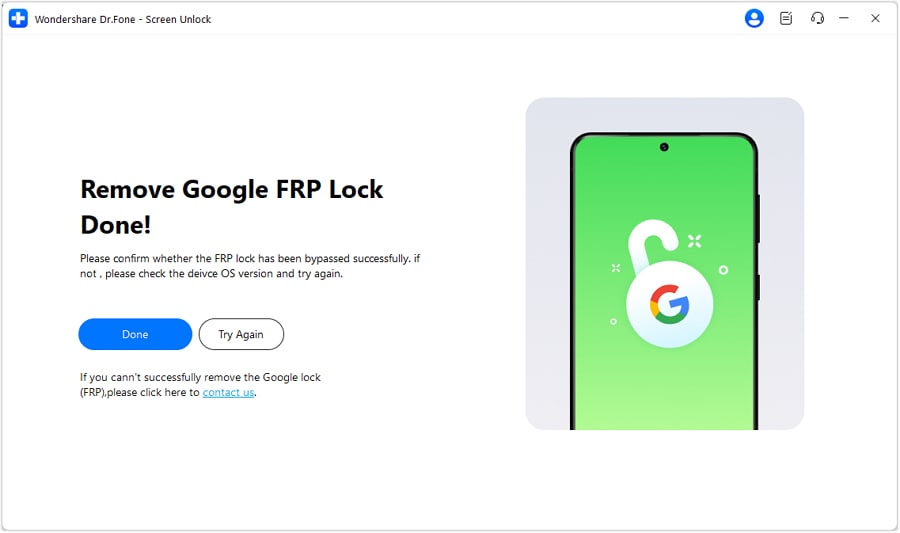
Step 5: Wait for a few minutes and when it’s done, click Done button.
Part 3: How To Bypass Nokia C12 Pro FRP in Traditional Method
With each phone, operating system, and version of Android having its own technique, bypassing Nokia FRP on the most recent versions of Google’s operating system is becoming increasingly challenging. You can use the FRP bypass software that works with your device to employ the free FRP bypass approach.
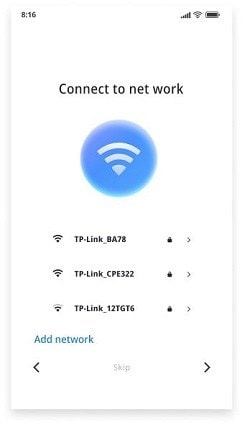
- Click Add Network at the bottom of the screen in network settings.
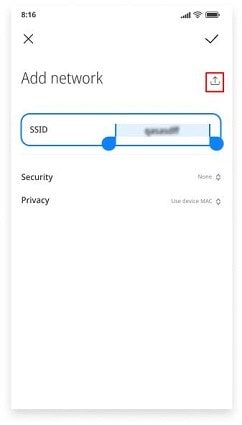
- In the SSID field, type any random text you like and long-press to pick it. To share it with Gmail, tap the share icon. Tap Notifications > Additional Settings on the App Info screen.
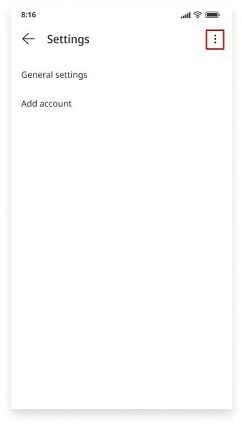
- Click the three dots in the top right corner and select “Help and Feedback.”
- Open the search bar and type “Delete and disable apps on Android.” Tap “Tap to go to Application Settings” on the following screen.

- Enable the Accessibility Menu Shortcut by selecting Settings > Additional Settings > Accessibility > Accessibility menu.

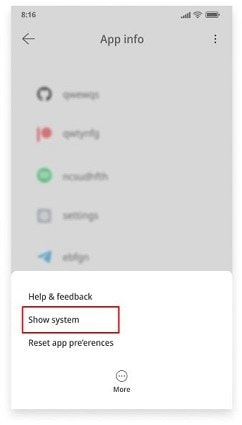
- Repeat the back button to go back to the App info screen. Click More, then select Show System.
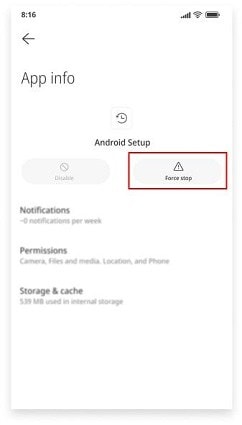
- Tap Disable and Disable app after choosing Android setup, then tap Force stop and OK.
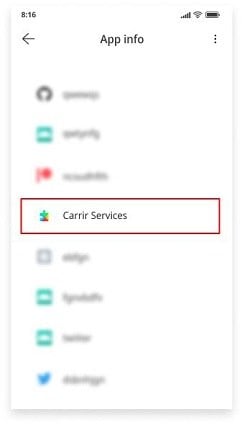
- Return to the App info screen and select Carrier Services. Then, select Disable and Disable app. Finally, select Force to stop and OK.
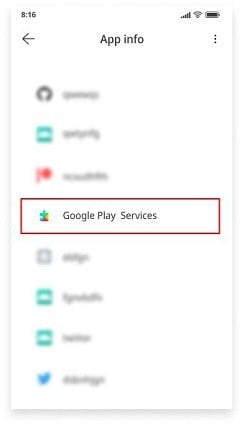
- Go back to the App info screen, choose Google Play Services, and then touch Disable to remove the app. Click OK after tapping Force Stop.
- To get back to the Connect to the Network screen, press the back button and the Next icon.
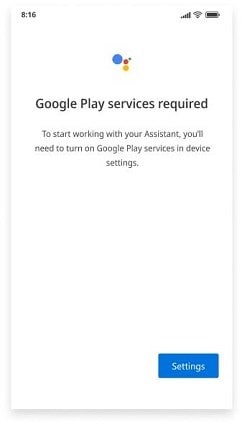
- Tap the person icon in the lower-right corner of the screen to access Google Assistant > Settings on the Checking for Updates page. To access the Google Play services App information page, repeat this process numerous times. To enable Google Play Services, select Enable.
- Wait until the procedure is finished before going back to the Checking for Updates page. When the procedure is finished, select More, then select Accept.
- You can finally disable Xiaomi’s Google account verification when the Setup Complete page appears.
Part 4: How To Bypass Nokia C12 Pro FRP With ADB Command on a PC?
ADB and Fastboots, which stand for Android Debug Bridge and Android Debug Bridge, respectively, are two ways that a computer can communicate with an Android smartphone. The commands and actions delivered by the system are carried out on your Android device using this technique.
Depending on the OS version, the Google FRP lock can be removed using a variety of commands using the flexible ADB command-line tool and Fastboots. This software uses a client-server architecture and a client that transmits commands.
- Download the ADB installed setup file first, and then extract the toolkit files to a folder on your computer.
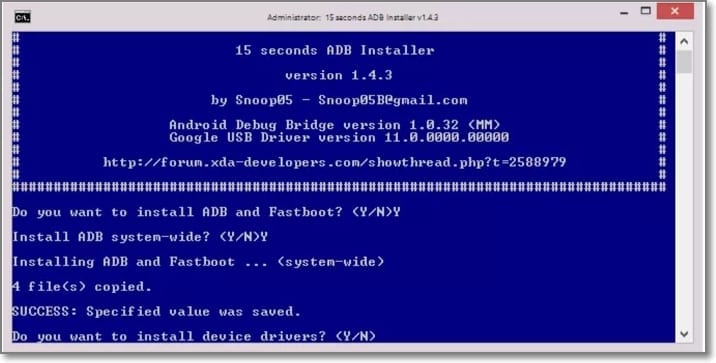
- Run adb.setup.exe next, and then press Y to accept the prompt to install the ADB drivers.
- When the drivers have been successfully installed, type Y once more, and the command window will close.
- Next, please turn on your Android device and connect it to your PC using a USB cord. Ensure your Android device’s USB debugging mode is also on here.
- Then, while holding down the Shift key, right-click somewhere that is empty in the ADB folder and select the Open command window here.
- Then, to delete the FRP, run the following lines one at a time at the command prompt, pressing enter after each line. Below is the code for CMD.
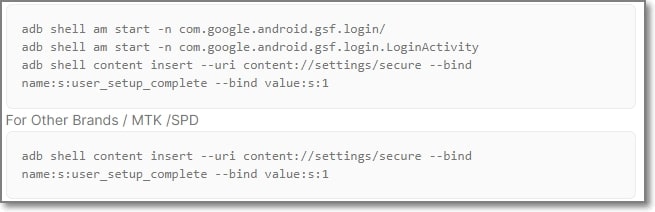
- Your Android device’s FRP lock will be removed following the execution of the commands.
Part 5: How To Disable FRP Nokia C12 Pro?
Disabling FRP on Nokia C12 Pro/Poco devices is relatively simple. Once you’ve removed the Google account from your device, the FRP lock will be disabled, and you’ll no longer need to bypass Nokia FRP.
- Go to “Settings” from the menu.
- Go down the page and click “Accounts & Sync.”
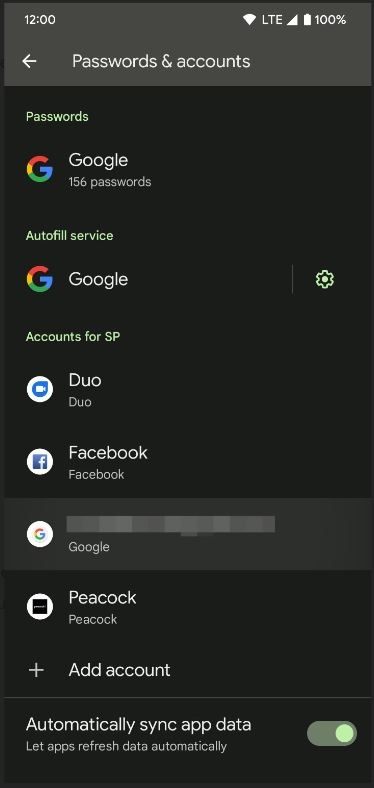
- To delete a Google account, tap on it.
- Confirm your selection of “Remove Account” by clicking.
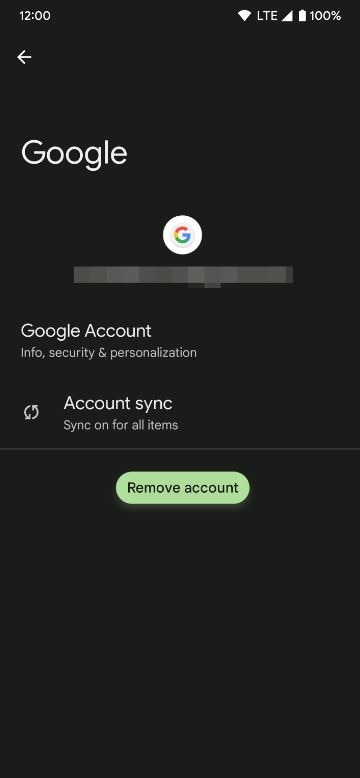
- You might be asked to enter your device password or PIN to finish the process.
Summary
In conclusion, unlocking Nokia C12 Pro FRP can be difficult, but it can be done quickly with the correct tools. You can either use the traditional method, which may prove quite long. We would recommend using the Nokia FRP bypass tool. The top Nokia C12 Pro Google FRP Unlock tools, such as Dr.Fone - Screen Unlock (Android) , have been covered in this article. Since Dr.Fone - Screen Unlock (Android) is an all-in-one solution for Samsung, Xiaomi, Redmi, Oppo, Realme, Vivo FRP unlocking, we advise readers to give it a try.
Full Guide to Bypass Nokia C12 Pro FRP
I updated my Nokia C12 Pro to the latest Android, and now it’s stuck on FRP lock. I don’t know how to Bypass the Pixel FRP lock, which is annoying because I have to finish an assignment. How should I do it?
The FRP lock is one of Google’s security methods for Android devices. It keeps unapproved people from erasing your phone data. However, an update or unidentified issue may sometimes lock your phone without warning. Just like the case above, it can be an unpleasant experience. Therefore, this Nokia C12 Pro FRP bypass article will show you some ways to bypass it.
The Google FRP lock is not a new issue and can occur to almost any Android user. If you neglect to disable the Factory Reset Protection before a reset, Google will lock your phone. Therefore, you will have to bypass the Google account to resolve it.
Part 1: 3 Ways to Bypass Nokia C12 Pro FRP
1. Download FRP Bypass APK (OTG Cable Needed)
The use of OTG for bypassing the Google FRP lock on Nokia C12 Pro after a hard reset is a great technique to bypass the Google account lock.
Before we get to the guide, you need an Android OTG cable, fast Wi-Fi, and a PC.
![]()
If you do, follow these steps to start bypassing your Google account:
Step 1. Download the FRP bypass APK on your PC.
Step 2. Move (by copying) the APK document to your flash drive.
Step 3. Utilize the OTG cable to connect your Pixel phone and flash drive.
Step 4. Install the APK document on your Pixel device when the file manager application springs up.
Step 5. The phone Settings will presently be accessible for you to open.
Step 6. Look for and select the “Backup and Reset” choice.
Step 7. Select the “Factory Data Reset and then Reset everything from the phone. That will delete all the phone’s media files, settings, apps, and accounts.
Step 8. Your Pixel phone will reboot, and you won’t see the FRP lock.
![]()
2. Use Pin Lock Sim to Access Chrome
Step 1: Start the cycle by eliminating the SIM card from your Pixel device. Presently connect it to Wi-Fi.
Step 2: Insert the SIM card once more. Mistype your PIN code multiple times.
Step 3: You will be approached to give your PUK code straightaway. Continue to type wrong PUK numbers until the SIM card becomes unusable.
Step 4: Tap the padlock symbol on the lock screen to open another menu choice. You will see the warning setting choice at the top corner of the screen.
Step 5: Select the See All options. Search for the YouTube App and afterward go to Settings and open History and Privacy to access the Youtube ToS.
![]()
Step 6: This will open the Chrome Browser, where you select Accept and Continue. Then, at that point, pick Next > No Thanks.
Step 7: Find a dependable FRP bypass tool to unlock FRP on the program. Go to Security from Setting and open Pin Windows. Then use the Screen lock type to Unpin the SIM.
Step 8: Restart your device after setting up a PIN code. You can utilize your Pixel without marking into your underlying Google account.
Bonus Tip. Use Dr.Fone-Screen Unlock (For Other Android phones)
We have presented numerous FRP methods in this guide. Nonetheless, they might fail to tackle the issue some of the time. There is no question that a bypass tool will be a lot more straightforward and speedier. Therefore, we strongly recommend you use the Wondershare Dr.Fone Bypass FRP tool for a less complex and quicker strategy. Dr.Fone - Screen Unlock (Android) is a speedy, easy-to-use FRP bypass for you to get rid of the Google issue. It lets you access your home screen once more. Here are the needed steps for bypassing the Google FRP lock:
Step 1: Open the software, connect your phone and PC and pick Screen Unlock. Then click on Screen Unlock > Android > Remove Google FRP Lock.
Step 2: Pick your device’s brand and click Start.
Step 3: Once you choose the Nokia C12 Pro device brand, Dr.Fone will commence the download of the necessary driver.
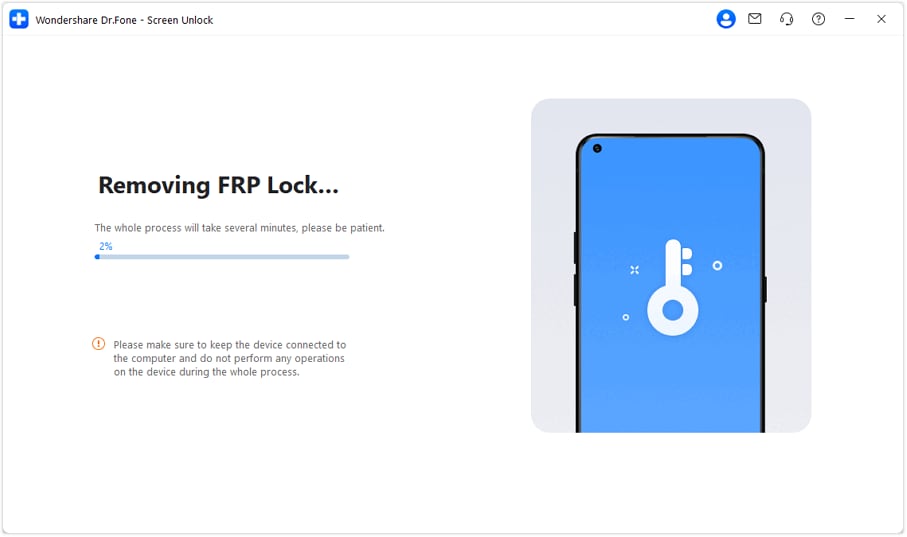
Step 4: After the download is complete, the procedure to eliminate the FRP lock will initiate, requiring a few minutes. Once the lock is successfully removed, tap Done to finalize the process.
 safe & secure
Part 2: Definition of Nokia C12 Pro FRP
Factory Reset Protection (FRP) includes security on Android gadgets with OS Version 5.1 and higher. The FRP gives an underlying security highlight you can utilize that safeguards your gadget and data, including screen locks and data encryptions. The FRP automatically works once a Google account has been logged in on the phone. However, it will stop working when the Google account is removed from the Pixel phone preceding the Factory Data Reset. When the FRP has been enacted, it will not let others use your phone after a Factory Reset in an untrusted environment. It implies that the FRP Lock will come into play if your Pixel gets Factory Reset in an unrecognized way.
![]()
Part 3: Can factory reset really remove FRP?
To remove FRP, you must remove all Google accounts from your Pixel phone. After doing so, you can factory reset it to clear all your data. So technically, you need to remove all the accounts, and yes, a factory reset will work.
The Bottom Line
This Nokia C12 Pro FRP bypass article gives an insight into the methods you can use to remove the FRP lock. However, if you have a other Android brand phone, the best one of all methods is using Dr.Fone - Screen Unlock (Android) . It delivers solutions for those who don’t know the OS variant of their phone. Its interface is easy to understand and has clear instructions. Moreover, bypassing the FRP lock is just a matter of a few minutes for it.
How Can We Bypass Nokia C12 Pro FRP?
After you hard reset your Nokia smartphone, you must open the FRP lock before using it. If you can’t pass the FRP lock, Google will block your device for privacy and security. You can easily pass the Nokia FRP lock with your Google account and password. You will get stuck there if you don’t know your account and password. Although it seems like a big problem, there is no need to panic because you can bypass it using other methods.
One of the fastest ways to remove the FRP lock is to use the Nokia FRP code. If you don’t want to use this method, you can also use the talkback method to bypass FRP. Both of these methods work perfectly every time, so the choice is up to you. Here, we will give you an easy guide to bypass FRP on your Nokia .
Part 1: What is Nokia FRP Bypass Code?
Factory reset protection is a Google security feature that protects your phone from unauthorized access. The FRP activates when you log in with a Google account on your smartphone. When you reset your device, the FRP asks for Google verification. The FRP lock doesn’t allow device access without your Google account and password. You can enter the Nokia FRP bypass code to open the FRP lock on your device without your Google account and password.
Even for smartphones from the same brand, the method to bypass FRP varies for each model. Instead of using complex methods to bypass FRP on your device, you can use the bypass code to remove the lock in seconds. The English Nokia FRP code is *#813#, and the Chinese code is *#812#. You can learn how to use these codes from our step-by-step guide.
Part 2: Efficient Ways to Bypass Nokia FRP
In this part, we will explore three efficient methods to bypass Nokia FRP and weigh the advantages and disadvantages of each.
A Comprehensive Comparison of Three Methods to Bypass Nokia FRP
| Method | Advantages | Disadvantages |
|---|---|---|
| Wondershare Dr.Fone [Fast & Easy] | 1. Efficiency: Wondershare Dr.Fone offers a fast and efficient FRP bypass process, ensuring quick access to your Nokia device. | |
| 2. User-Friendly: The software comes with an intuitive interface, making it accessible to both novice and experienced users. | ||
| 3. Comprehensive Solution: Beyond FRP bypass, Wondershare Dr.Fone provides additional features for data recovery and device optimization. | Cost: While the software may require a purchase, the cost is justified by its effectiveness and additional functionalities. | |
| Nokia Emergency FRP Code | 1. Official Solution: This method is officially supported by Nokia , ensuring compatibility and reliability. | |
| 2. No Additional Software: The Emergency FRP Code doesn’t require third-party software installations, simplifying the process. | 1. Limited Accessibility: Obtaining the Emergency FRP Code may involve contacting Nokia support, leading to potential delays. | |
| 2. Complexity: The process might be more complex for users unfamiliar with official support channels. | ||
| Talkback Method to Bypass | No External Software: This method doesn’t require additional software installations, making it a straightforward option. | 1. Technical Skill Required: The Talkback Method involves navigating through device settings, which might be challenging for users without technical expertise. |
| 2. Time-Consuming: Compared to software solutions, this method may take longer to complete. |
1: Recommended: Use a powerful software-Wondershare Dr.Fone [Fast & Easy]
Facing the FRP (Factory Reset Protection) lock on your Nokia phone can be a roadblock, but with the right tools, the process becomes seamless. In this step-by-step guide, we’ll walk you through the easy and effective steps to bypass the FRP lock on your Nokia phone using the reliable Dr.Fone - Screen Unlock (Android) .
![]()
Dr.Fone - Screen Unlock (Android)
The Best FRP Lock Removal Tool for Nokia
- Pattern, PIN, password, fingerprints & face screen lock can all be unlocked.
- Bypass Android FRP lock without a PIN or Google account.
- Unlock mainstream Android brands like Samsung, Nokia , Xiaomi, etc.
- No tech knowledge required, Simple, click-through, process.
4,008,671 people have downloaded it
Step-by-Step Guide to bypassing Nokia Frp Lock
Follow these straightforward steps to bypass the FRP lock on your Nokia phone using Dr.Fone:
- Step 1. Launch Wondershare Dr.Fone and select Toolbox > Screen Unlock.
- Step 2. Choose Android and then click Remove Google FRP Lock button on the next page.
- Step 3. Then you will see various device brands and select OPPO among the options.
- Step 4. Once you have selected the Nokia C12 Pro device brand, Dr.Fone will initiate the downloading process of FRP.
- Step 5. When it finished downloading, please turn off your device and connect it to the computer. Press the Volume Up and Down buttons for about 3 seconds during the connecting process.
- Step 6. Wait for a few minutes until the FRP is unlocked.
Wondershare Dr.Fone is a reliable software to bypass Nokia FRP with a high success rate. Its easy-to-use feature makes it popular among users. We recommend it as your first choice.
safe & secure
2: Use Nokia Emergency FRP Code
The Nokia Emergency FRP Code is an alternative method to bypass FRP, relying on a unique code provided by the Nokia C12 Pro device manufacturer. After you do a factory reset on your Nokia smartphone, don’t rush to set it up. If you set up your device, the FRP lock will appear on the screen. When you go to the language selection screen, tap on the emergency call option to open the dialer. That’s where you will be entering the Nokia FRP bypass code. Follow these steps to remove the FRP lock from your smartphone.

- Step 1. Power on your Nokia device after the factory reset.
- Step 2. Start the Nokia C12 Pro device set up and connect it to a Wi-Fi network.
- Step 3. After you enable the Wi-Fi connection, return to the welcome screen.
- Step 4. Tap on the “Emergency Call” option at the bottom left of the language selection page.
- Step 5. Type one of the FRP bypass codes (*#813# or *#812#) on the dialer and tap on the “Dial” button.
- Step 6. Next, don’t do anything and wait for the home screen of your Nokia device to appear. You might see some alerts, but you don’t have to touch the screen.
- Step 7. Once you enter your phone, open “Settings” and go to “About phone”.
- Step 8. Enable Developer options by tapping on the android version between seven to ten times.
- Step 9. From the Developer Options, enable USB debugging.
- Step 10. Now, go back to “Settings” and reset your Nokia device from the “Factory Data Reset” option.
- Step 11. Once the reset is complete, you can set up your device and enter it without FRP.
3: By Talkback Method to Bypass
For those seeking a manual approach, the Talkback Method involves leveraging the accessibility feature on the Nokia C12 Pro device. Before using the Talkback method, ensure that your phone has more than 50% battery backup and an internet connection. The Talkback method will not work on devices with the latest Android operating system. Here are the steps to bypass Nokia FRP lock with the Talkback method.

- Step 1. Power on your Nokia smartphone and hold the volume up + down buttons at the same time to enable the Talkback feature.
- Step 2. Select “Turn on” to open the Talkback shortcut. Once you enable this feature, you can long press the volume up + down buttons to enable it anytime.
- Step 3. Now, double tap on the close button on the screen twice.
- Step 4. Next, draw the letter “L” on the hello screen and double-tap on the “Talkback Settings”.
- Step 5. In the menu, swipe down with two fingers to navigate to the “Braille Keyboard”. Double-tap to select it and go to “keyboard settings”.
- Step 6. Now, open the “Talkback Braille Keyboard” and return to the add network screen. Also, turn off the Talkback feature by long pressing the volume down + up buttons together.
- Step 7. Click on the keyboard icon to open the “Talkback Braille Keyboard” again. Enable accessibility settings and swipe right to enter the “General” option.
- Step 8. Navigate to “Help & Feedback” from the accessibility menu.
- Step 9. Tap on the “Control Your Nokia C12 Pro Device with Switch Access” and tap on the “Play” icon. Next, tap on the three dots in the video corner.
- Step 10. elect the “Share” option and tap on the three dots next to the Twitter icon this time.
- Step 11. Go to “Settings” from the “Profile” icon and select “YouTube Terms and Services” from “History & Privacy”.
- Step 12. Next, tap on the “Accept and Continue” option. Select “Next” and tap on “No Thanks” on the next page.
Which Method is Best to Bypass Nokia FRP Lock?
Choosing the right method to bypass Nokia FRP depends on your preferences, technical proficiency, and urgency. Wondershare Dr.Fone - Screen Unlock (Android) offers a swift and user-friendly solution, the Nokia Emergency FRP Code provides an official route, while the Talkback Method caters to those who prefer a manual approach. Consider the advantages and disadvantages outlined above to make an informed decision and regain access to your Nokia device efficiently.
safe & secure
Part 3: FAQ for Bypassing Nokia FRP (Factory Reset Protection)
Below you’ll find answers to some of the most common questions regarding bypassing Factory Reset Protection (FRP) on Nokia devices.
1. What is the FRP skip code for Nokia ?
Currently, there is no universally applicable “FRP skip code” for Nokia devices. FRP is a security feature, designed to prevent unauthorized access to your device after a factory reset. If you are the legitimate owner and need to bypass FRP, you may need to contact Nokia customer support or follow authorized methods for FRP bypass, which usually involve verifying your Google account credentials.
2. What is the emergency code for FRP bypass?
There is no official emergency code for bypassing FRP on Nokia or other Android devices. FRP is a critical security feature implemented by device manufacturers to protect users’ data. To bypass FRP, you must follow the legitimate procedure provided by Nokia or seek professional assistance.
3. How to remove screen lock in Nokia mobile?
Unlocking your Nokia mobile’s screen with Dr.Fone - Screen Unlock (Android) is a seamless solution. Unlike hard resetting, which often leads to FRP lock issues, Dr.Fone provides a faster and safer alternative. This Nokia Unlock Tool swiftly bypasses the lock screen without requiring a password, ensuring a secure and efficient process.
safe & secure
4. How to remove an admin in Nokia ?
To remove an admin, or a device administrator:
- Step 1. Go to ‘Settings’ on your Nokia device.
- Step 2. Scroll down and tap on ‘Security’.
- Step 3. Then, select ‘Device Administrators’ or ‘Device Admin Apps’.
- Step 4. You will see a list of apps with administrator privileges. Find the admin you want to remove and toggle off its access.
- Step 5. Confirm by tapping ‘Deactivate’ when prompted.
5. How to disable Nokia security?
Disabling security features like passwords, PINs, pattern locks, or biometric scans can be done through settings:
- Step 1. Open ‘Settings’ and go to ‘Security’.
- Step 2. Tap on ‘Passcode’, ‘Biometrics & Passcode’, or a similar option depending on your device model.
- Step 3. Choose the lock method currently in use and select ‘None’ or ‘Disable’.
Note: Disabling security features makes your device more vulnerable to unauthorized access.
Conclusion
Let’s conclude our guide on how to bypass the Nokia FRP lock. You can remove the FRP lock from your Nokia device with various methods. The fastest and easiest way is to use the Nokia FRP code, which lets you bypass the FRP lock within seconds. You can also use the Talkback method if you have an older Nokia device. In addition to the FRP lock, you can bypass the screen lock on any Nokia device with Dr.Fone - Screen Unlock (Android) . Dr.Fone enables users to unlock any android device without a password. It is a one-stop solution with features like WhatsApp transfer, data backup and restore, data eraser, and system repair.
Also read:
- 2024 Approved Infinite Quit Strategy for YouTube Short Video Clips
- Edge It All Out The Finest Frame Options for Social Media Photography for 2024
- FRP Hijacker by Hagard Download and Bypass your Oppo A38 FRP Locks
- In 2024, Hassle-Free Ways to Remove FRP Lock from Oppo Find N3 Flip Phones with/without a PC
- In 2024, Hassle-Free Ways to Remove FRP Lock from Samsung Galaxy M14 5G Phones with/without a PC
- In 2024, Hassle-Free Ways to Remove FRP Lock on Realme Phones with/without a PC
- In 2024, How to Bypass Google FRP Lock from Oppo A78 5G Devices
- In 2024, Ultimate Guide on Nubia Red Magic 8S Pro+ FRP Bypass
- Instagram Interruption: New Rules for Young User Engagement?
- Optimizing Performance: Tips to Increase FPS on Rainbow Six Extraction
- Overcoming Windows Projection Failure Issue
- Resolving Win 11 Discord JS Catastrophe: Practical Solutions
- Step-By-Step Creation of Gamers' Channel Graphics for 2024
- The Complete Guide to Samsung Galaxy S24 FRP Bypass Everything You Need to Know
- Younow Review and Alternative
- Title: In 2024, The Updated Method to Bypass Nokia C12 Pro FRP
- Author: Liam
- Created at : 2025-01-01 17:47:12
- Updated at : 2025-01-05 23:14:02
- Link: https://android-frp.techidaily.com/in-2024-the-updated-method-to-bypass-nokia-c12-pro-frp-by-drfone-android/
- License: This work is licensed under CC BY-NC-SA 4.0.