
In 2024, How to Bypass FRP from Nokia C12 Pro?

How to Bypass FRP on Nokia C12 Pro?
Learning how to FRP bypass on Nokia C12 Pro is vital in many ways. For instance, you might want to hard reset your phone to clear data and remove a bug or virus. Or, you may want to remove every bit of information before gifting or selling the phone. Whichever the case, learning how to bypass FRP on Nokia C12 Pro is a cakewalk with this 3-minute read. We’ll know how to do that with or without a PC.
Part 1: Is it possible to bypass FRP Nokia C12 Pro on Samsung?
FRP (Factory Reset Protection) is an Activation Lock system introduced by Google in 2015 on Android 5.1 (Lollipop) or newer. This security feature is meant to prevent unauthorized Factory Resetting of your phone. In other words, you’ll need to enter the correct Google Account details to bypass FRP. Because FRP or Activation Lock is available on Android 5.1 or later, it will automatically activate on your Nokia C12 Pro device after adding your Gmail account. Some Samsung Nokia C12 Pro devices include S8, S8 Plus, Note 8, Note 9, J6, J7, M1, and other Galaxy phones launched before 2018.
Meanwhile, you must be asking if it’s possible to bypass FRP on Nokia C12 Pro without a PC? The answer is yes! There are multiple methods to bypass FRP on Nokia C12 Pro, including via YouTube.
Below are the quick steps for Galaxy S8 or S8 Plus:
Step 1: Dial an emergency number and save it
- 1. Fire up your locked phone and connect it to a Wi-Fi network.
- 2. Navigate back to the “Let’s go” screen and tap Emergency call. Dial and call 112.
- 3. Go back to the “Let’s go” screen and click Next until you reach the Wi-Fi connection screen. Here, tap Add network and then click the Settings icon on the Samsung keyboard.
- 4. Click Keyboard layout and feedback > Key-tap feedback. Then, choose Sound and vibration on the Tip section.
- 5. Next, click Answering and ending calls > Answer automatically. Now enable the toggle before using your two fingers to select “10 seconds” and “Customize.” You’ll see a pop-up dialog where you’ll click App Info > Call settings > Block numbers.
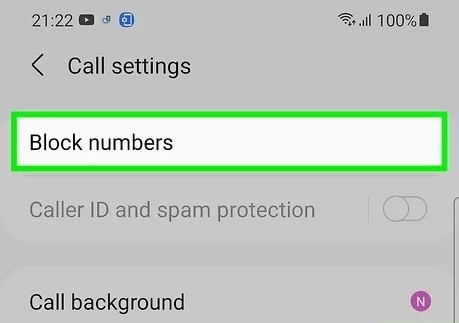
- 6. Click Recent > Emergency number > Message icon.
- 7. Tap the Ellipsis icon and click Add or remove people. Enter random numbers before clicking the “+” button.
- 8. Click the number you’ve just entered and tap Add. Then, tap Create contact and name it. Scroll down and add an email address with a password that you’ll remember easily if prompted. Click Save.
Step 2: Open Chrome and install Bypass FRP APK
- 9. Now open a Message chat and type www.youtube.com before sending it to the number. Then, tap the YouTube link and open any video.
- 10. Click any link on the video description to launch Google Chrome. Search, download, and install Apex Launcher APK from frpfile.com.
- 11. After installing Apex Launcher, open it and then click Settings > Biometrics and security > Other security settings > Device admin apps > Find my Device > Deactivate.
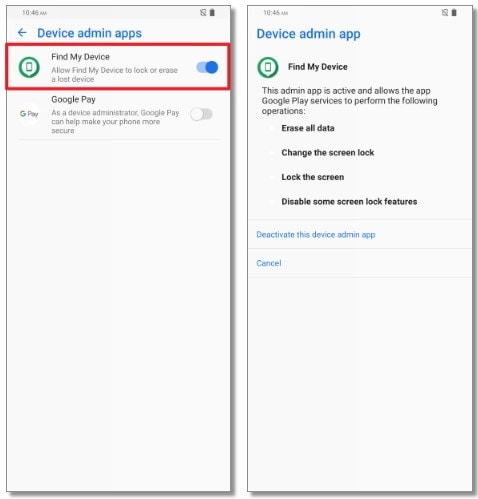
- 12. Go back to the Settings screen, click Apps > Google Play Services > Disable. Also, disable Google Account Manager.
- 13. Open Chrome and install Bypass FRP APK from the same website.
Step 3: FRP Bypass Nokia C12 Pro
- 14. Go to Settings > Accounts and backup > Accounts > Add account > Google. Sign in with any Gmail account.
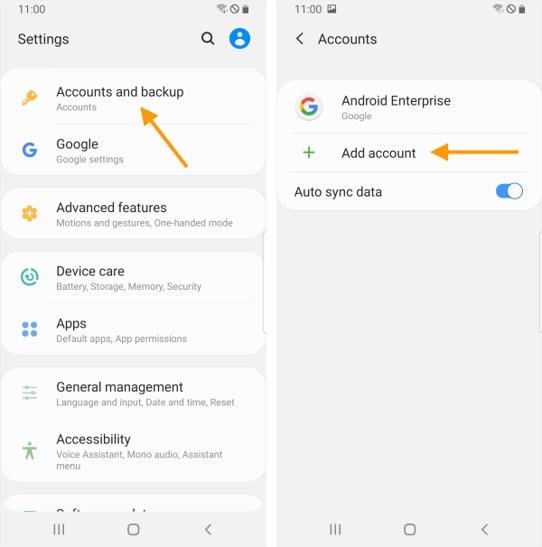
- 15. Navigate back to Settings and enable Google Play Services. Also, activate Find My Device. Now restart your phone and access it without FRP.
Although this method can yield the desired results, it can be time-consuming and confusing if you’re not a techie. So, read on to learn the easiest way to bypass FRP on any Samsung Nokia C12 Pro device.
Part 2: How to bypass FRP Nokia C12 Pro with Dr.Fone – Screen Unlock (Android)?
This method will teach us how to bypass FRP on Nokia C12 Pro devices like Galaxy S8 or S8 Plus. Here, you’ll need a Wi-Fi internet, Mac or Windows PC, and a USB wire. You require a computer to install Dr.Fone - Screen Unlock (Android) and connect the program to your locked phone. Don’t worry; it’s a free FRP bypass program without those unwanted programs or malware. Besides Nokia C12 Pro, Dr.Fone can also bypass Samsung FRP on Android 6/7/8/10/11/12/13.

Dr.Fone - Screen Unlock (Android)
The Best Tool to Bypass FRP on Nokia C12 Pro and Solve Your Screen Locks!
- Completely unlinked from the previous Google account, it won’t be traced or blocked by it anymore.
- Remove all Android screen locks (PIN/pattern/fingerprints/face ID) in minutes.
- Supported Android brands: Samsung, Xiaomi, Redmi, Oppo, Realme, Vivo.
- Provide specific removal solutions to promise good success rate.
4,008,670 people have downloaded it
Follow these steps to bypass FRP on Nokia C12 Pro with Dr.Fone:
Step 1: Install and run Dr.Fone on your PC and open the Screen Unlock feature. On the Screen Unlock window, tap Android before clicking Remove Google FRP Lock.

Step 2: Next, choose the Android operating system for your device. In this case, select Android 6/9/10. Now connect the locked Android phone to your PC using a USB cable and click Confirmed once the connection is successful.
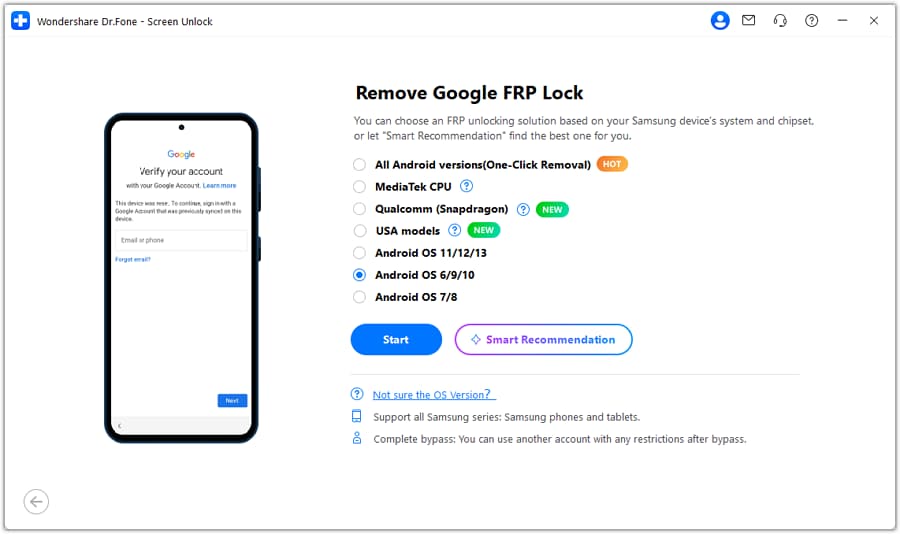
Step 3: On your phone, you’ll see a Dr.Fone Unlock pop-up dialog. Click View and then install and launch Samsung Internet Browser. Now enter and search for https://drfonetoolkit.com . Click Android 6/9/10 and then tap Open Settings. After that, tap PIN > Do not require > Continue. Now set a PIN code that you can easily remember before clicking Skip.
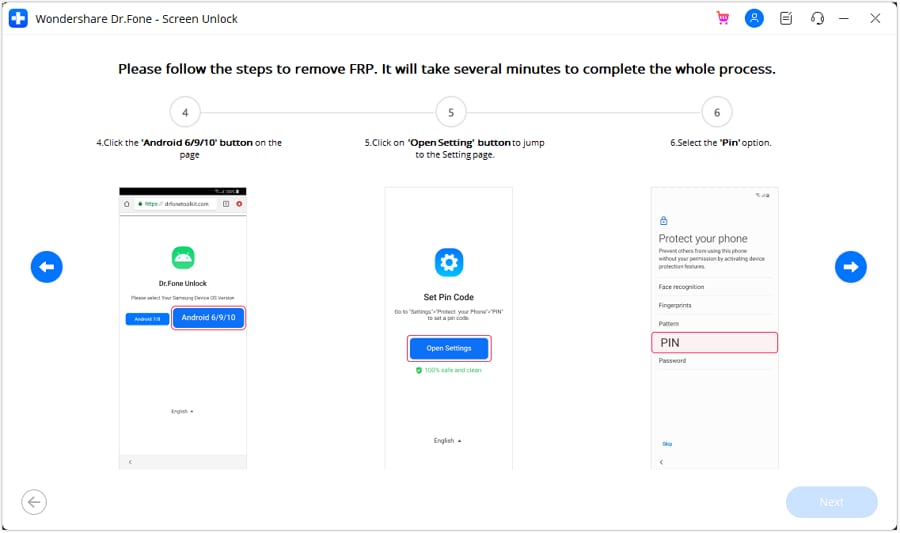
Step 5: Click the “<” button to navigate back to the Wi-Fi connection screen before clicking Next. Enter the PIN you can set earlier before clicking Continue.

Step 6: Hit the Skip button on the Google Sign-In page to successfully bypass FRP on your Samsung Nokia C12 Pro phone. And there it that!
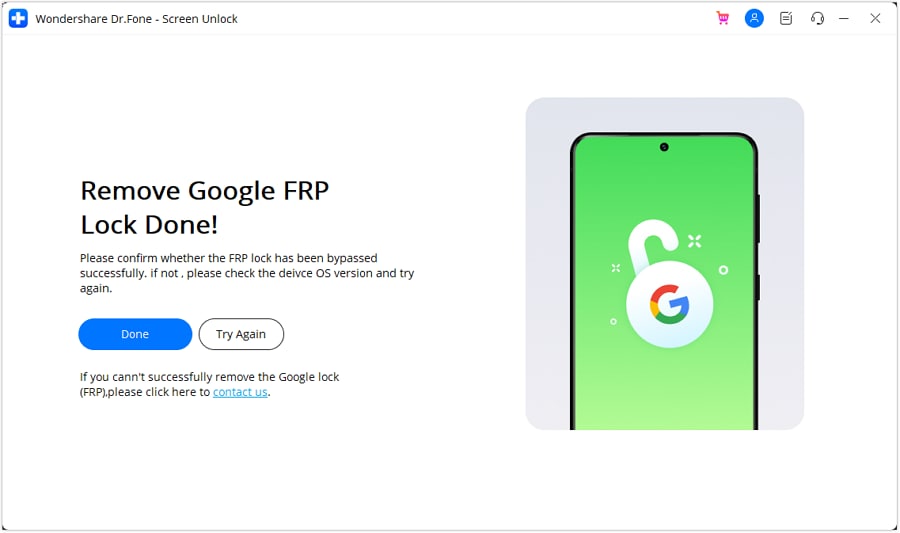
Note: Bypassing FRP on your Samsung phone using Dr.Fone is undoubtedly quick and easy. However, only use this software to bypass FRP on your Samsung phone or if you have consent from the original owner. Don’t bypass FRP if you’re not sure about the original owner of the phone.
You can watch the video below to get your FRP bypassed with Wondershare Dr.Fone
Part 3: How to Disable FRP lock on Samsung Nokia C12 Pro?
To avoid the stress of bypassing FRP on your Samsung phone in the future, you may have to disable Android Lock altogether. This is a relatively straightforward procedure on any Android phone you use. But be guided that turning off FRP on your Nokia C12 Pro phone is not recommended.
Follow these steps:
- Step 1: Search for the Settings app and open it.
- Step 2: Next, click Accounts and backup before clicking Accounts.
- Step 3: You’ll see all the linked email accounts. Choose the one that you want to delete.
- Step 4: Click Remove Account and then click Remove Account once again to confirm. That’s it!
Conclusion
See, you can quickly bypass FRP on Nokia C12 Pro with these methods. But remember that disabling FRP will leave your phone without security protection. Also, bypassing FRP using the YouTube method can be lengthy and complex. So, use Wondershare Dr.Fone to skip FRP on Android 6/7/8/9/10/11/12/13. Give it a try!
A Quick Guide to Nokia C12 Pro FRP Bypass Instantly
FRP locks are a security feature that prevents unauthorized access after a factory reset. While these locks protect user data, they can become a hindrance when trying to regain access to the Nokia C12 Pro device. Likewise, bypassing FRP locks provides users with the flexibility to overcome these restrictions.
In this article, we’ll learn about the Nokia C12 Pro FRP bypass process. We will also list out the things that you must keep in mind before trying this process. Read this guide till the end to find the best Nokia C12 Pro FRP unlock tool.

Part 1. Things To Keep in Mind Before Bypassing Nokia C12 Pro
Bypassing the security measures on a Nokia C12 Pro should be approached with caution. There are many considerations that users should keep in mind before the Nokia C12 Pro FRP bypass. Below, we have listed some considerations to help users avoid any hassle:
1. Legal Implications
Bypassing device security could potentially breach the terms of service and warranty agreements. Moreover, it may even be illegal in certain jurisdictions. It is recommended to avoid bypassing unless users are certain it is legally permissible in their region.
2. Data Loss
When resetting the Nokia C12 Pro device, bypassing security measures often comes into play. This sometimes results in the loss of stored data. Prioritize data backup before attempting Nokia C12 Pro FRP bypass. If data preservation is a top priority, exploring alternative solutions is preferable.
3. Security Risks
Your device might be exposed to potential vulnerabilities due to security FRP bypass. This makes it more susceptible to unauthorized access. Users should prioritize safeguarding their data and personal information.
4. Manufacturer Support
Nokia C12 Pro FRP bypass can void the manufacturer’s warranty and limit future support options. You should know that bypassing security could result in losing access to updates. It is advisable to explore other solutions before considering bypassing.
5. Technical Skill Requirements
Technical knowledge and skills are highly demanded when bypassing FRP locks. Only users possessing advanced technical skills should attempt a bypass. For those lacking expertise, seeking professional assistance is advisable to avoid consequences.
6. Device Functionality
Bypassing security measures may impact the Nokia C12 Pro device’s normal functionality. Users should be prepared for potential device performance or functionality issues post-bypass.
Part 2. Bypass FRP Lock Nokia C12 Pro Using SIM Card Method
Using the SIM card process for Nokia C12 Pro FRP bypass is a viable option for many users. Still, proceeding with caution and adhering to the specific instructions is necessary. Users only need to insert a PUK-enabled SIM card and set up their device. Consider using the steps guided below to carefully bypass your Nokia C12 Pro without any risks:
- Step 1. Power on your Nokia C12 Pro device, set it up, and connect it to the Wi-Fi network. Agree to any terms or policies and wait until your phone gets ready. When you reach the verification screen, tap the “Use my Google Account Instead” option.

- Step 2. Once you are required to sign in to your Google account, return to the screen where you have to select the language. Then, insert the SIM card into your phone and ensure you have saved a contact. To enter the SIM PIN, tap on the “Emergency” option. Next, tap “Emergency Information” and click the “Edit” icon at the top-right corner.

- Step 3. Enter the PIN for the SIM card to proceed further. Under the “Emergency Information” section, tap on the “Add Contact” option and access it. Dial the call to that number, and once the call timer appears, choose the “Contacts” option on the dialer screen.

- Step 4. Tap on “three-dots” at the top-right corner and select the “Share” option followed by “Send as text.” On the following screen, send via XShare MI and allow the necessary permission. Download Google Account Manager and Account Login/FRP Bypass APKs on your other device. Also, download the Activity Launcher app from the Play Store.

- Step 5. Set up XShare on another device and allow all the permissions. Choose the “Receive” option to receive the contact from your Nokia C12 Pro device via a QR code scan. Afterward, disconnect and exit the current connection. On the main screen, tap the “Receive” option on your Nokia C12 Pro and scan the QR code using the Nokia C12 Pro device. You are required to share all three of the apps that you just downloaded.

- Step 6. As soon as the apps are received, install them and “Open” the Account Login/FRP Bypass tool. When it requires a password for sign-in, hit the “three-dots” and choose the “Browse Sign-In” option. Provide your Email and Password to sign in to your Google account.

- Step 7. After Google signs in, “Open” the Activity Launcher app and wait until the package is loaded. From the appearing menu, select “Android Setup” and then choose the following option:
Android Setup (com.google.android.setupwizard/.predeferred.PreDeferredSetupWizardActivity)
Once setup ends, the Nokia C12 Pro FRP bypass Android 11 process will be completed successfully.

Part 3. How to Easy Nokia C12 Pro FRP Bypass With Wondershare Dr.Fone
Facing FRP lock on your Nokia C12 Pro can be daunting, especially when you need to access your phone urgently. In this case, using the above-discussed SIM card method can be time-consuming. Users looking for an alternative and quick option can use Wondershare Dr.Fone – Screen Unlock (Android). This tool can help bypass FRP lock on your Android without requiring any PIN or Google account.
Moreover, users don’t need technical knowledge as this tool offers one-click removal. Dr.Fone also adopts a user-friendly interface, ensuring accessibility for every user. Apart from Nokia C12 Pro FRP bypass Android 11, this tool also unlocks Samsung and LG devices without data loss.
Salient Features of Wondershare Dr.Fone
- Fone supports over 2000 Android devices across 18+ brands for screen unlock.
- This tool extends the opportunity to recover data from Android devices with broken screens.
- When it comes to recovering device data, Dr.Fone offers a dedicated Data Recovery tool to recover all important lost files.
Steps To Perform Nokia C12 Pro FRP Bypass Using Wondershare Dr.Fone
By bypassing the FRP lock, Dr.Fone allows users to gain access to their devices promptly. To start learning about using this tool, follow the steps below for Nokia C12 Pro FRP bypass:
Here is a video for you to learn how to bypass FRP:
- Step 1. Connect the Nokia C12 Pro device and Navigate to the Toolbox
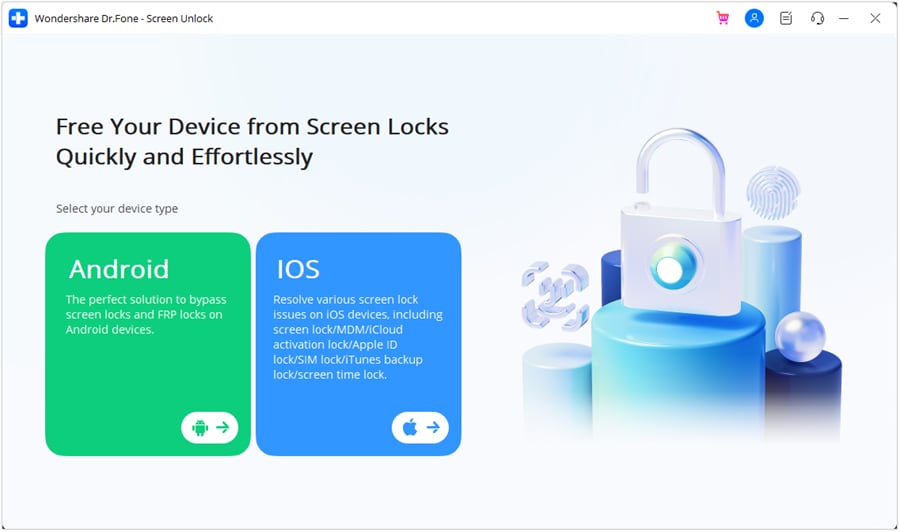
Connect your Nokia device to your computer and launch Wondershare Dr.Fone. Within the toolkit window, navigate to “Toolbox” and select “Screen Unlock.” This will open a new window; choose the “Android” option to access the FRP Lock function.
- Step 2. Choose the Required Device and Android Version
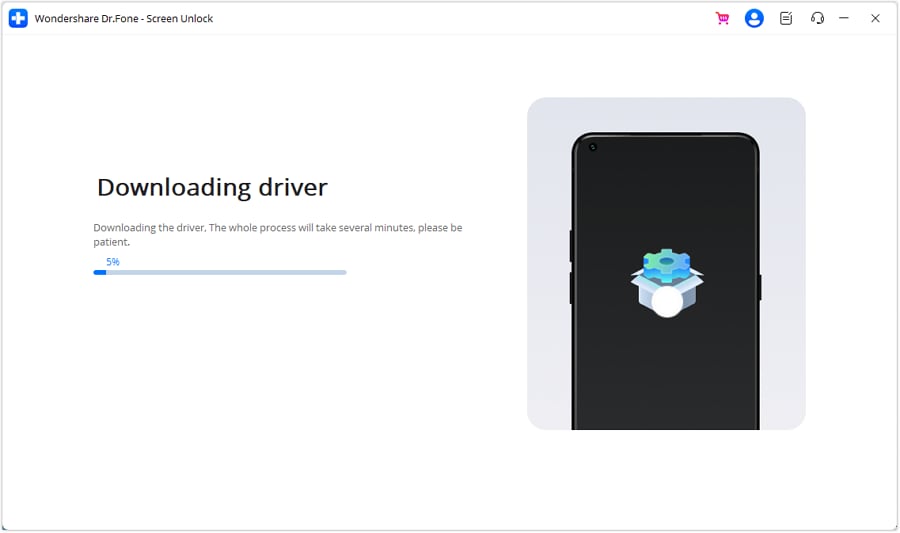
Afterward, click “Remove Google FRP Lock” and select your appropriate device brand from the options. This will trigger Dr.Fone to download the relevant driver for the selected brand.
- Step 3. Access Emergency Call and Enable USB Debugging
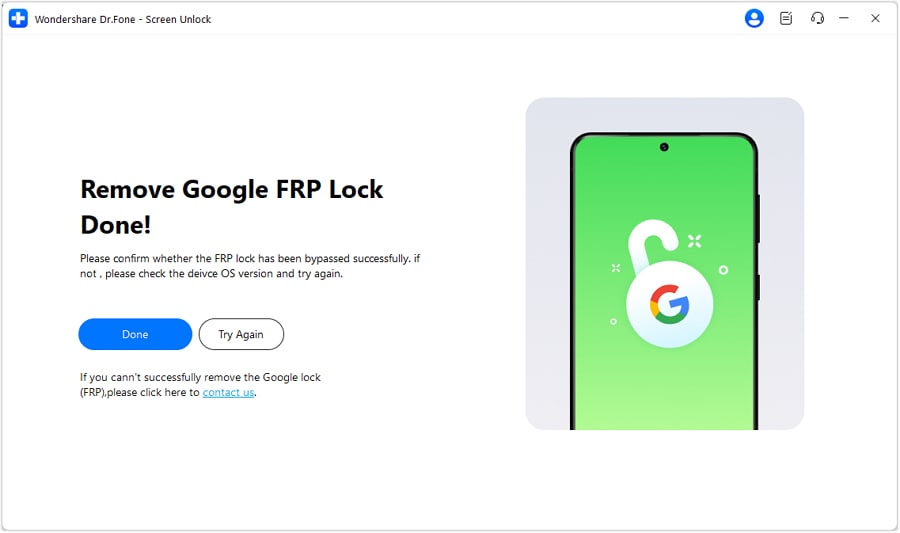
After downloading the necessary drivers, power off your smartphone and connect it to the computer. Press the “Volume Up” and “Volume Down” buttons simultaneously for almost 3 seconds as it connects. This initiates the FRP unlocking process. If everything went smoothly with the unlocking, click “Done.”
Read More About Tecno:
Nokia Master Reset Code: The Ultimate Guide to Restoring Factory Settings
Ultimate Guide on Nokia Spark FRP Bypass
How can I Unlock Nokia Network by Myself?
Conclusion
We can conclude that bypassing the FRP lock can be difficult if one does not follow the proper steps. This guide has provided users with two of the best Nokia C12 Pro FRP bypass methods. Overall, Wondershare Dr.Fone offers the most advanced methods to let users bypass FRP locks easily. Its ability to support a wide range of Android devices makes it more recommended.
Tips: Are you searching for a powerful FRP Bypass tool? No worries as Dr.Fone is here to help you. Download it and start a seamless unlock experience!
5 Quick Methods to Bypass Nokia C12 Pro FRP
Google Factory Reset Protection, a.k.a FRP, is developed by Google for all Android phones. It adds an extra layer of security to your phone and the data on it. It is aimed at making it difficult for the illegal holder of your phone to factory reset your phone and remove tracking information. Then why do we need to discuss the Nokia C12 Pro FRP bypass?
Though the protection is meant for you, sometimes you may forget the password and want your Nokia C12 Pro FRP removed. Also, if you bought a used phone and the previous user has set up FRP with her password, you need to bypass it.
Part 1: In what cases does the Nokia C12 Pro FRP bypass works?
How and why should I bypass Nokia C12 Pro FRP? Let us look at the valid reasons.
1. Buy a locked second-hand Nokia
When you buy a second-hand phone, ideally, the previous user must format and hard reset the Nokia phone to remove all locks and password requirements. However, if it doesn’t happen, you cannot use some options on your phone and configure security because of FRP. Here, your savior is the option of the Nokia C12 Pro FRP bypass.
2. Forget Google account ID and password
Even if you have locked your Nokia phone yourself, you are stuck when you forget your Google username and password. So, you can only recover your phone using the Nokia C12 Pro FRP bypass.
3. The person with a Nokia from his company no longer works for it
Some employees also receive official phones from their company which they have to return when they leave the company. Now, it becomes a horror story for the new employee if he gets the same phone locked with the previous user’s ID.
Part 2: 5 quick methods to bypass Nokia C12 Pro FRP
Ok, now this is established that there are certain situations when you need to conduct a Nokia C12 Pro FRP bypass. So how do you do the Nokia C12 Pro FRP bypass?
Method 1. Retrieve your Google account from another device
If your phone is locked with a Google account whose password you do not know or have forgotten, then you can use this method to Nokia C12 Pro FRP bypass. In this method, you can try to retrieve your Google account from another device. It is a simple step-by-step process tha can be completed from a PC or another mobile device.
If you have forgot the email address but remember the password, then follow these steps.
- Navigate to Google’s Find My Email page in your browser.
When you can’t remember the email address that was configured, go to the Find My Email page and start account recovery process.
- Enter your recovery email or phone number
On the next screen, provide a recovery email or phone number and click Next.

- Provide your first and last name
Enter your first and last name in the given form and click Next.
- Verification code
Google will send a verification code to the setup recovery email or phone number, click Send.
- Verification code entry
Check your email inbox or phone messages depending on the recovery method and find the verification code. Enter it in the given form. If it is correct, you can go to the next final step.
- Choose an account
From the list of accounts showing on the screen, select the account you want to recover.
- Enter your password
Enter the password in the text box and you are done.
If you remember the email but not the password, then the Nokia C12 Pro FRP bypass method will go like this.
- Google’s Account Recovery page
Navigate to the Account Recovery page from the browser on your PC or other mobile devices.
- Enter your email address
Fill in the form with your Google account and click Next.

- Enter the last password you remember
The next form will ask you to enter the last password you remember and that worked
Now, you will receive a message to your registered device, to verify it’s you. Open it and click , Yes, it is me.
Now, wait for six hours for Google to verify it’s you and then they will send a password reset link to your email.
Now, what if you can’t remember your last password, then use the next method.
- Click on “Try another way”
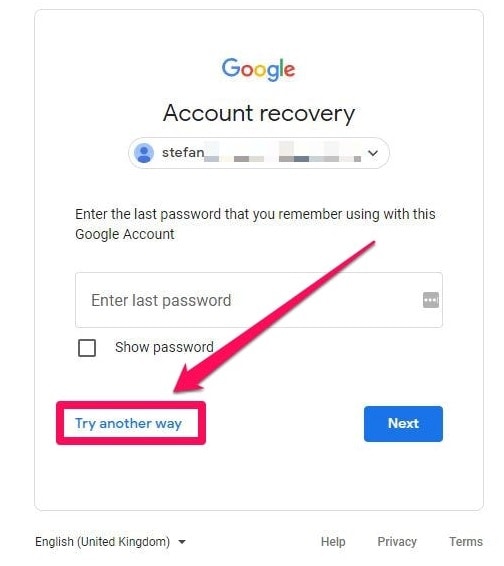
Now Google will send a message to your phone to verify it’s you. On your phone, open the message and click Yes, it’s me.
After verification, Google will send you a password reset link after six hours.
If your phone is not registered in your Google account then, try the next method.
- Click on “Try another way” again

If your phone is enabled to check for the code, click Try another way again.
Google will then ask you to send a verification code to your registered phone number. Click Send.
Find the code from your messages, enter it, and click Next.
Now again, you will wait for six hours till Google sends the password reset link to your email.
Method 2. Use FRP Bypass APK
FRP bypass APK is another tool you can use to Nokia C12 Pro FRP bypass easily. Let us see how it works step by step.
- Download FRP Bypass APK for Nokia C12 Pro FRP bypass android 11.
- Once it’s downloaded, open the File Manager using the Open Files app
- Find the suitable Apk and click on it
- Install & open the APK.
- Open the browser on your phone.
- Launch any of these two below URL.
- Go to the FRP bypass APK >FRP APPS section
- Open Settings leading to the Nokia C12 Pro device Settings>System Settings> Backup & Reset >Reset Phone
- Now click on Reset System Settings Only, and confirm Reset System Settings Only.
- Select Erase All data and confirm.
- Your device will be rebooted.
- Wait till the factory reset process completes.
Now, reboot your device and set it up according to your requirements.
Method 3. Deactivate FRP
Another way to come around Nokia C12 Pro FRP bypass is to deactivate FRP. Let us follow the step-by-step process.
- Launch the “Settings” app and scroll to the Apps.
- Click on the “Manage apps” (applications) and then the “All” tab.
- Open “Google App.”
- Click on the “Clear cache” to remove the Google account cache.

- Also, clear all data to erase data stored.
- Click the “Back” button, and go to “Gmail.”
- Click on the “Clear cache” and “Clear data.”

- In the Nokia C12 Pro device Settings menu and click “Data synchronization.” When your device asks you to enter your Google account, enter your new Gmail account.
You have successfully completed the Nokia C12 Pro FRP bypass process.
Method 4. Bypass with SideSync
You can use SideSync to share the screen and data between your computer and mobile phone. How can we use this for FRP bypass?
- Download the SideSync from the official site and install the SideSync application on your computer.

- Connect your phone and computer to the Google account verification screen.
- Now plug in the first end of your OTG adapter with your phone and connect another end to the flash drive with APK.
- Your phone will launch the file explorer automatically, showing the root directory of the flash drive.
- Now click on the APK file.
- Click Settings and allow to install from Unknown sources, and click OK.
- After installation, open SideSync.
- Disconnect the OTG cable from your Samsung phone.
- Now access the Settings menu and go to the Backup & reset option and conduct a factory reset.
Method 5. 3 Steps to Bypass Nokia FRP Bypass
Dr.Fone - Screen Unlock (Android) is a reliable and efficient tool designed to help users bypass FRP (Factory Reset Protection) locks on Android devices, including Nokia smartphones. This powerful software provides a hassle-free solution for those locked out of their Nokia devices due to FRP lock. With its user-friendly interface and advanced features, Dr.Fone makes FRP bypassing a straightforward process, even for users with limited technical knowledge.
Dr.Fone - Screen Unlock (Android)
Remove Google Lock (FRP) from Nokia Devices
- Pattern, PIN, password, fingerprints & face screen lock can all be unlocked.
- Bypass Android FRP lock without a PIN or Google account.

- Unlock mainstream Android brands like Samsung, Nokia, Xiaomi, etc.
- No tech knowledge required, Simple, click-through, process.
3,981,454 people have downloaded it
3 Steps to Bypass Nokia FRP Lock with Dr.Fone - Screen Unlock (Android)
- Step 1. After installing Dr.Fone - Screen Unlock (Android), launch the program and select the “Screen Unlock” option from the main menu. Continue to Android > Remove Google FRP Lock.

- Step 2. Then select Nokia and click the Start button to continue. Then, connect your locked Nokia device to the computer using a USB cable. Ensure that USB debugging is enabled on your Nokia device before proceeding with the next steps.
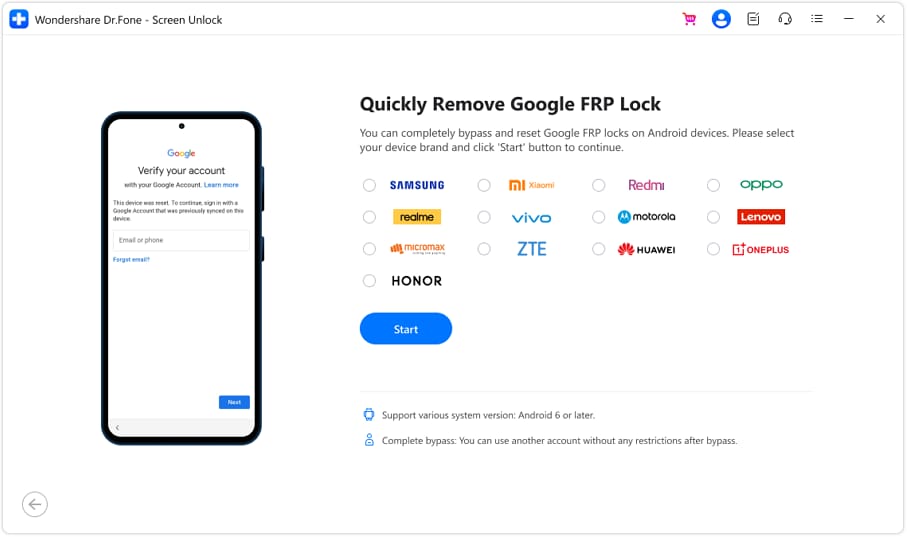
- Step 3. Once your Nokia device is successfully connected, Dr.Fone - Screen Unlock (Android) will automatically detect it. Follow the on-screen instructions to put your Nokia device into specic mode. Once in the correct mode, Dr.Fone will start downloading the necessary firmware to bypass the FRP lock.

During the process, it’s crucial to keep your device connected to the computer and refrain from disconnecting it until the bypass is complete. After the firmware download is finished, Dr.Fone will initiate the FRP lock bypass process. Once completed, your Nokia device will restart, and you’ll regain access to it without encountering the FRP lock.

The Bottom Line
FRP is a great feature to add security to Android phones. However, sometimes it is necessary to bypass it to fully use your phone. When you are stuck with an FRP lock, it is a frustrating situation, especially when you want to factory reset your phone. We have described various methods so that you choose the best solution according to your requirements for the Nokia C12 Pro FRP bypass. Among them, bypassing Nokia FRP lock is made simple and efficient with Dr.Fone - Screen Unlock (Android). Say goodbye to FRP lock frustrations and regain access to your Nokia device swiftly with Dr.Fone - Screen Unlock (Android) .

Also read:
- [New] Get Noticed on YouTube The Ultimate List of FreeFire Tag Tips
- A Step-by-Step Guide on Using ADB and Fastboot to Remove FRP Lock from your Gionee F3 Pro
- A Step-by-Step Guide on Using ADB and Fastboot to Remove FRP Lock on your Asus ROG Phone 8
- Explore the Resurgence of Video in Email Campaigns - Elevate Engagement Using MassMail Tools!
- Hassle-Free Ways to Remove FRP Lock on Samsung Galaxy S24+ Phones with/without a PC
- How to Boost PC Speed Efficiently: Proven Strategies by YL Software Experts
- How to Easily Hard reset my Infinix Note 30 VIP Racing Edition | Dr.fone
- In 2024, Easy Guide to Honor X50 FRP Bypass With Best Methods
- In 2024, Hassle-Free Ways to Remove FRP Lock on Samsung Galaxy A34 5G Phones with/without a PC
- In 2024, Is GSM Flasher ADB Legit? Full Review To Bypass Your Oppo Reno 9A Phone FRP Lock
- In 2024, The Monetary Side of Podcasting Success
- Master Class Skew Your Pictures for 2024
- New Release! Try the Updated Karaoki Software Version 0.8.abetes for FREE!
- Resident Evil Village - Tackling the Notorious Mouse Malfunctions for a Seamless Experience
- Speedy Conversion of Insta Videos to Audio Files (Mp3) for 2024
- Title: In 2024, How to Bypass FRP from Nokia C12 Pro?
- Author: Liam
- Created at : 2025-01-02 22:06:22
- Updated at : 2025-01-05 21:01:56
- Link: https://android-frp.techidaily.com/in-2024-how-to-bypass-frp-from-nokia-c12-pro-by-drfone-android/
- License: This work is licensed under CC BY-NC-SA 4.0.
