
In 2024, FRP Hijacker by Hagard Download and Bypass your Sony Xperia 1 V FRP Locks
FRP Hijacker by Hagard: Download and Bypass your Sony Xperia 1 V FRP Locks
If you find yourself locked out of your Android device after a factory reset, chances are your device is locked and protected by factory reset protection (FRP). FRP is a security feature devised by Google to deter unauthorized usage of a device after it undergoes a reset to its factory settings.
For those seeking a reliable solution, FRP Hijacker by Hagard emerges as a popular choice. This tool provides a streamlined approach to bypass FRP and regain control of your Android device. But before you start using it, we’ll provide you with all the essential information you need before utilizing this tool.

Part 1. Bypass FRP Using FRP Hijacker by Hagard: An Overview
FRP Hijacker by Hagard is a specialized tool designed to help users in bypassing the Factory Reset Protection (FRP) on Samsung phones. The app works with rooted and unrooted Android devices, taking advantage of system vulnerabilities.
Bypassing FRP with FRP Hijacker by Hagard is seamless and user-friendly—no tech skills needed. Just connect your phone to a computer, follow the on-screen steps, and within minutes, you’ll have access to your phone again. FRP Hijacker by Hagard is a quick and simple solution for anyone who forgot their Google account password.

List of features
- Dial Pad Bypass
By using the phone’s dial pad, this tool offers a special way to bypass FRP locks and makes the unlocking process more flexible.
- Hijack FRP with ADB Odin mode
FRP Hijacker offers the capability to bypass FRP in ADB Odin mode or download mode. ADB Odin mode is a dedicated pre-boot mode found on Samsung Galaxy smartphones and tablets.
- Easy ADB activation
The FRP Hijacker tool v1.0 simplifies the process of enabling ADB, allowing users to effortlessly activate Android Debug Bridge for seamless communication between devices to bypass the FRP.
Is It Safe to Use FRP Hijacker?
Using FRP Hijacker involves potential risks such as voiding the Sony Xperia 1 V device warranty, legal implications, and compromising data security. Before proceeding, consider official alternatives from the Sony Xperia 1 V device manufacturer, back up your data, and be aware of potential compatibility issues with updates.
Part 2. Download Link and How to Install FRP Hijacker by Hagard
To begin the FRP Hijacker installation process, start by downloading FRP Hijacker here. Then, make sure that your computer is equipped with the latest Microsoft .NET Framework.
Once both FRP Hijacker and Microsoft .NET Framework are ready, proceed with the following steps:
- Step 1: After the FRP Hijacker download, check the downloaded file. It will be in the form of a RAR file. Extract its contents and locate the .exe file.
- Step 2: Upon running the .exe file, you’ll be prompted to enter a password. The required password for FRP Hijacker can be found within the RAR file.
- Step 3: Follow the provided guidelines to finalize the installation process.

Part 3. How To Use FRP Hijacker by Hagard
Following the successful installation of FRP Hijacker by Hagard, proceed with the following steps to effectively use the tool and bypass the FRP in your device.
- Step 1: Once the installation is complete, connect your Android phone to the computer and run the FRP Hijacker application. Then, you will see a menu offering various options for managing your Samsung device.
- Step 2: From the menu, choose the specific Samsung device model you own.
- Step 3: Now, you will encounter two key options: ‘Remove FRP’ and ‘SoftBrick Fixer.’ To bypass FRP, select the ‘Remove FRP’ option.
- Step 4: After selecting ‘Remove FRP,’ click on the ‘HIJACK IT’ button. This action will trigger the tool to start the FRP removal process on your connected Samsung device.


As the tool progresses through the removal process, follow any additional on-screen prompts or instructions that may be provided. Once completed, your Samsung device should be successfully free from the FRP lock, granting you full access to its functionalities.
Part 4. Alternative Solution to FRP Hijacker by Hagard - Wondershare Dr.Fone
If you’re exploring alternatives to FRP Hijacker by Hagard, especially for non-Samsung Android devices, or if you simply prefer a different approach, Wondershare Dr.Fone provides a reliable and widely trusted solution in Android device management and recovery.
Dr.Fone offers the Screen Unlock tool, which is designed to address various Android device issues, including FRP lock situations. Here are key features that make it a noteworthy alternative:
- Fone supports iOS and 2000+ Android device models, making it versatile for users with different smartphone brands.
- Fone prioritizes data integrity. During the FRP unlocking process, Dr.Fone ensures minimal to no data loss, preserving your important files and information.
- Unlock Android devices with forgotten screen lock credentials
How to bypass FRP with Dr.Fone Screen Unlock feature
- Step 1: Launch Dr.Fone Screen Unlock and connect Android device.
Launch Wondershare Dr.Fone on your computer and connect your Android devices. Go to Toolbox > Screen Unlock.

- Step 2: Select Remove Google FRP Lock.
On the next screen, choose Android as your device type and select Remove Google FRP Lock to proceed.

- Step 3: Select the Android device model.
Pick your Android device model and click Start to proceed.

- Step 4: Choose the Android version.
Now, specify your Android version. If you’re unsure about the Android OS version on your Android or prefer the quickest method to eliminate the Google Lock, select the All Android versions (One-Click Removal) option. Continue by clicking the Start button.

- Step 5: Open emergency call.
Follow on-screen instructions to open Emergency Call on your Android. Tap #0# to open a secret menu and click Next on your computer.
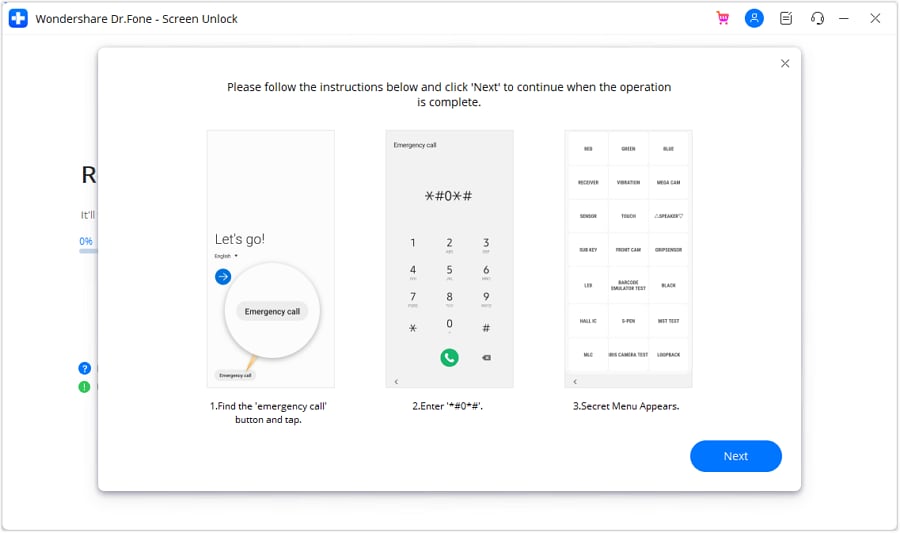
- Step 6: Enable USB debugging.
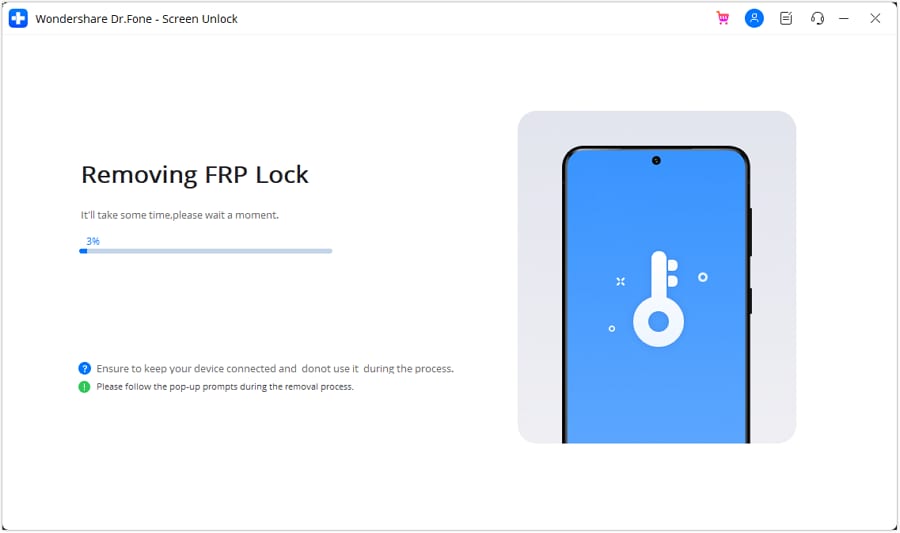
Enable USB Debugging on your Android when prompted. Click Authorized on your computer. The screen will confirm FRP lock removal.

Once you have successfully removed the FRP lock, click Done.
Part 5. FRP Hijacker by Hagard or Wondershare Dr.Fone: Which Is Better?
Now faced with the choice between FRP Hijacker by Hagard and Wondershare Dr.Fone, it becomes important to determine which tool aligns best with your specific requirements. Both options promise FRP bypass capabilities, yet they differ in their costs, ease of use, compatibility, and security measures.
Let’s delve deeper into each tool’s strengths and weaknesses.
| Hijacker by Hagard | Dr.Fone – Screen Unlock | |
|---|---|---|
| Ease of use | Simple and straightforward | Intuitive design with a guided process |
| Security Measures | Using vulnerabilities in the Android operating system to bypass FRP | High encryption and protection measures during the FRP unlocking process |
| Compatibility | Primarily for Samsung devices | Compatible with a wide range of Android and iOS devices. |
| Cost | Generally free | Paid software with a free trial |
| Support and Updates | Limited support; updates may vary | Strong customer support; regular updates |
Conclusion
FRP Hijacker by Hagard presents itself as a targeted solution, particularly effective for Samsung devices. Its simplicity and specialized approach make it an appealing option for users who prioritize ease of use and have Samsung smartphones. However, it’s important to note that its effectiveness is confined to Samsung devices, and users should consider this limitation when making a decision.
For those using Android devices other than Samsung or desiring a more versatile solution, Dr.Fone’s Screen Unlock tool proves effective and easy to use. Just pick the one that matches your device and preferences for a smooth FRP unlocking experience.
Tips: Are you searching for a powerful FRP Unlock tool? No worries as Dr.Fone is here to help you. Download it and start a seamless unlock experience!
A Step-by-Step Guide on Using ADB and Fastboot to Remove FRP Lock on your Sony Xperia 1 V
Factory Reset Protection is one of the security measures available on Android 5.1 and later devices to prevent intruders’ unauthorized factory resetting of the Sony Xperia 1 V device. Among the several ways to fix this issue and remove the lock, one is ADB and Fastboot commands. So, if you are aware of using Android Debug Bridge, the below content will help you understand how it can be used to remove the FRP lock.
You can watch the video below to bypass FRP lock without hassle!
Part 1: Quick Overview of ADB and Fastboot Commands
1. What are ADB and Fastboot?
Standing for Android Debug Bridge, ADB and Fastboots are the methods through which communication with an Android device can be done through a computer. Under this method, the commands and the actions that are sent from the system are performed on your Android device.
Several issues can be resolved, and multiple functions can be performed using the ADB format tool and Fastboots, and this also includes removing the FRP lock on your Android device. To use this method, USB debugging should be enabled on the Sony Xperia 1 V device.
For specific brands of Android phones, specific utility tools are available like the Vivo ADB format tool and the Samsung ADB format tool, which are used explicitly for Vivo and Samsung phones, respectively.
2. How Do ADB and Fastboot Bypass FRP?
Using the versatile ADB command-line tool and Fastboots, the Google FRP lock can be removed using several commands depending on the OS version. This is a client-server program that includes a client who sends the commands, a daemon used to run the commands on the Sony Xperia 1 V device, and a server that facilitates communication between the client and the daemon.
ADB comes included in the Android SDK Platform-Tools package, and this can be downloaded using the SDK manager.
3. What Are the Android Versions that ADB and Fastboot Command Support?
The Android versions on which ADB and Fastboot commands can be used are as follows:
_Android 5 – Lollipop__Android 6- Marshmellow__Android 7 – Nougat__Android 8- Oreo__Android 9- Pie__Android 10 – Q (expected to work though not tested as yet)_
Part 2: How to Set Up ADB and Fastboot Commands to Remove FRP Lock on Android?
To remove FRP lock using ADB, you first need to install and set up ADB and then remove them using the command. The steps for the same are enlisted below.
Steps to remove FRP using ADB

Step 1. Firstly, download the ADB installed setup file and then extract the files from the toolkit on your system in a folder.
Step 2. Next, you need to run adb.setup.exe and then type Y for installing the drivers for ADB and Fastboot.
Step 3. Again, enter Y for installing the drivers and when done successfully, the command window will close.
Step 4. Next, power on your Android device and connect it to your PC using a USB cable. Here also ensure that USB debugging mode is enabled on your Android device.
Step 5. Next, hold down the Shift key and then right-click at any place blank in the ADB folder, and then choose the Open command window here option.
Step 6. Now to remove the FRP you need to enter the following commands at the command prompt one by one where enter needs to be clicked after every line.
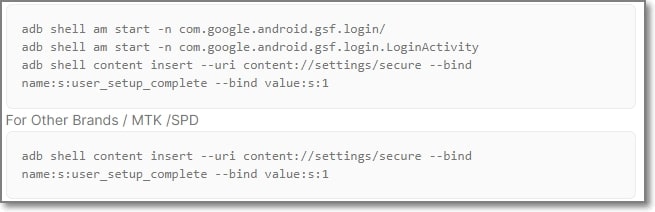
_Adb shell am start -n com.google.android.gsf.login/__adb shell am start -n com.google.android.gsf.login.LoginActivity__adb shell content insert –uri content://settings/secure –bind name:s:user_setup_complete –bind value:s:1_Step 7. The above commands are for Samsung devices. If you want to remove the FRP on other brands, enter the following commands:
_Adb shell content insert –uri content://settings/secure –bind__name:s:user_setup_complete –bind value:s:1_
After the execution of the commands, the FRP lock will be removed from your Android device.
Steps to remove FRP using Fastboot
Step 1. Put the Android device into the bootloader or fastboot mode. (depending on the model and brand of your Android device, the process of entering into the fastboot will differ).
Step 2. Connect your phone to your PC using a USB cable.
Step 3. Next, depending on the system, enter the following command in the CMD window:
_Lenovo FRP command__fastboot erase config__fastboot reboot__XIAOMI FRP command__fastboot -w__MICROMAX YU YUPHORIA FRP__Fastboot -i 0x2a96 erase configFastboot -i 0x2a96 reboot__DEEP/HTC/Other Brands FRP__fastboot erase configfastboot reboot_
Part 3: Limitations of Using ADB and Fastboot Command Method
The ADB and Fastboots command is a workable solution for removing the FRP lock on your Android device, the drawback is that the method is quite complicated and requires thorough technical know-how of ADB and its working. There are several limitations associated with this method as enlisted below.
- Requires technical know-how
To remove FRP using the ADB command you need to have a thorough knowledge of using the tool. The tool has a deep learning curve which makes this method little for the majority of the users.
- Might not unlock the phone
You can try the ADB method for removing the FRP lock but there is no guarantee that the results will be positive and your device will be unlocked.
- Issues with the drivers
Several times while using this method, you might encounter driver issues when your device is not detected as proper drivers are not installed.
- Unexpected issues and errors
ADB is a command-based method, and thus it is important that the commands are entered right. If there is a slight error in the typing of the command, it might lead to major issues and can even be the Sony Xperia 1 V device damaged.
- The process is not user-friendly
ADB is a technical process aimed toward the geeks, and thus the overall process is not user-friendly and complicated.
Part 4: The Best ADB Alternative to Bypass FRP Lock on Android Phones
Considering the several limitations of the ADB and Fastboot command method, the need for a simple, user-friendly, and workable solution for removing FRP lock on Android devices arises. One of the best software here that we recommend is Dr.Fone - Screen Unlock (Android) which helps in removing and bypassing many Android phone screen locks including the one appearing due to FRP lock.
Dr.Fone - Screen Unlock (Android)
Remove Google FRP on Samsung without PIN code or Google accounts.
- Pattern, PIN, password, fingerprints & face screen lock can all be unlocked.
- Bypass Google FRP on Samsung without pin code or Google accounts.
- No tech knowledge asked, everybody can handle it.
- Work for Samsung, Xiaomi, Redmi, OPPO, etc.
4,005,551 people have downloaded it
The process of using the software is user-friendly and thus can also be used by non-techy users.
Steps for removing FRP lock on Android using Dr.Fone Screen Unlock
- Step 1. Launch the installed software and choose the Screen Unlock option from the main interface. Choose Android and then select the Remove Google FRP Lock option.
- Step 2. Select the model brans from the options shown on the interface, and then connect your phone to your PC using a USB cable. The connected device details will appear on the interface.
- Step 3. Follow the next steps as they appear. Once the FRP lock is successfully removed, the prompt window will show its completion. Click Done if you have successfully executed the process.
The above is the brief steps for the process. You can check the bypass Samsung FRP lock guide in detail.
Conclusion
If you are well versed with the commands of ADB and Fastboots you can go ahead and use the ADB bypass FRP tool for removing the FRP lock but if this command line method seems complicated for you, Dr.Fone Screen Unlock is the best tool to use.
About Sony Xperia 1 V FRP Bypass
To ensure that your phone data and details do not leak to unauthorized people, several security features on Android devices are set and one of them is Factory Reset Protection. Under this feature, the Google Account ID and password have to be entered for factory resetting your device. If you are an authorized owner, this should not be an issue in an ideal situation, but what if you have forgotten your Google details? How will your factory reset now? No need for panic as there are workarounds available.
So, for Sony FRP bypass when you have forgotten your Google details or have purchased a second-hand device with a lock, we will help you with the best possible solution.
Part 1. Can I Solve Sony google Locked?
If you know the Google ID and the password of your device, the Sony google locked can be easily opened. But if you have forgotten the details or do not have them, you will have to look for the methods that can let you bypass this lock and have access to the Sony Xperia 1 V device. For process FRP bypass for Sony, we have listed the best methods for bypassing the Google lock in the following parts of the topic.
Part 2. How to Get Sony FRP Bypass without OTG
One of the most widely used methods to bypass the Sony FRP lock is Swift Key and this is a free solution that does not require any software download or installation.
Steps for Sony bypass google account
Step 1. First of all, reset your Sony device and then turn it on.
Step 2. Choose your preferred language and then click on the Start.
Step 3. Connect your device to a WIFI network and start the configuration.
Step 4. Next, keep skipping the steps till you arrive at the Verify Account screen.
Step 5. Click on the email address that will activate the keyboard and now to get access to the Swift Key keyboard, click on the menu icon on the keyboard.
Step 6. Next, select Settings > Languages. If you are asked for the Google Account sign-in choose the No, Thanks option.

Step 7. At the Google search bar, type Settings and then choose the Settings option.
Step 8. If the Swift Key menu appears, choose Got it > Not Now > Back-Up Reset.
Step 9. Now choose the Factory Data Reset option for resetting your device.
Finally, when you switch on your phone again, the FRP lock will not appear, and you’ve got FRP Sony disabled.
Part 3. How to Bypass Google Verification on Sony Without SwiftKey
If the SwiftKey method is not working for removing the FRP lock, another way is to use the APK tools. There are several APK files available to get this task done like FRP Bypass APK, Pangu FRP bypass, and more. Depending on the model of your device, you can choose a free or a premium version as available.
To bypass FRP lock using this method, you would need an APK file, OTG cable, USB stick, and an internet connection that is stable.
Steps Sony FRP Bypass Tool APK
- Step 1. Restart your device and choose Language > English > Next.
- Step 2. Skip the option of Insert SIM card and then connect your Sony Xperia 1 V to a stable WiFi network.
- Step 3. Transfer the downloaded APK file to the USB drive.
- Step 4. Connect the SUB drive to the Sony Xperia 1 V device using an OTG cable.
- Step 5. Transfer and install the APK file to your Sony device. During the APK installation process, security certification permission needs to be provided.
- Step 6. After the APK installation is done successfully, access to the phone settings will be provided after which you can find the synced Google Account data and delete the same. Alternatively, you can also delete all the settings of the phone.
With the above steps, the FRP lock will be bypassed and removed.
Part 4. How to Delete a Google Account on Sony after Factory Reset
Removing the FRP lock can put your device at risk if it lands into unauthorized access, but if you find hassle in remembering the Google Account details and doubt you can easily forget it, removing the associated Google account is better as it will also disable the FRP lock.
Also, if you are selling your phone or gifting it to someone, then remove the associated Google Account so that the new owner does not have any issues with the factory reset of the Sony Xperia 1 V device.
Steps for removing the Google Account from Sony Phone
- Step 1. On the phone home screen, click on the Settings icon and then look for the Passwords & Accounts option.
Note: The option can also be looked at Users & accounts section.
- Step 2. Click on the Accounts option and the list of the associated and linked accounts will appear.
- Step 3. Select the Google account that you want to delete and then click on the Remove account option.
- Step 4. Again, click on the Remove account option to confirm deleting the account.
- With the steps above, the synced account will be deleted and thus the FRP lock will be removed.
Part 5. How to Bypass Screen Lock from Sony
Nothing can be more annoying than forgetting the screen lock of your Sony phone as it will prevent you from getting access to the Sony Xperia 1 V device and using any of its functions. So, if you too are in a similar situation when you have forgotten the set password, Dr.Fone –Screen Unlock (Android) is the recommended tool.
 safe & secure
This professional Windows and Mac-based software will let you remove all types of screen locks including password, PIN, pattern as well as fingerprint, in just a few simple steps. The software is simple to use and can remove the screen lock on all popular Android devices in a hassle-free manner.
![]()
Dr.Fone - Screen Unlock (Android)
Get into Locked Sony without Password [Most Efficient]
- Easily remove the lock screen; No need to root your device.
- Bypass Android FRP lock without a PIN or Google account.
- Support 20,000+ mainstream models of Android phones & tablets.
- Provide specific removal solutions to promise good success rate

4,008,669 people have downloaded it
Steps to remove screen lock from Sony using Dr. Fone-Screen Unlock (Android)
Step 1. Launch the Dr. Fone software on your system and choose the Screen Unlock option on the main page.
Step 2. Using a USB cable, connect your phone to your PC, and then on the software interface choose Unlock Android Screen option.
Step 3. Next, choose the phone model from the given list so that the right recovery package can be downloaded.

Step 4. Next, you need to put your phone into specific. Dr.Fone will start to unlock Android screen after getting into the specific mode.
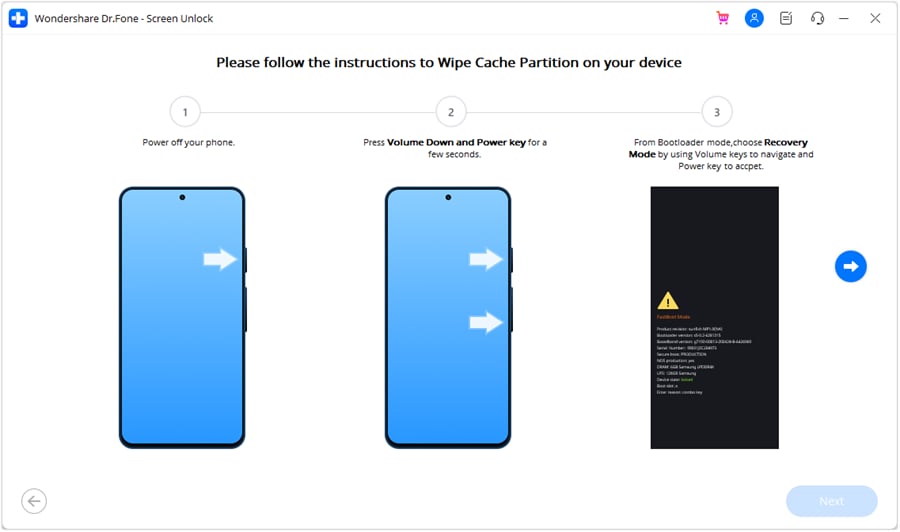
Step 4. Wait for the unlock process to complete, the screen lock will be removed and the Sony Xperia 1 V device can be now accessed.

safe & secure
Conclusion
Above we have listed different tools for Sony Google bypass. Depending on the model of the phone and requirements, you can choose the best suitable solution. Also, for removing screen lock on Sony and other devices, Dr.Fone - Screen Unlock (Android) works as an excellent tool.
- Title: In 2024, FRP Hijacker by Hagard Download and Bypass your Sony Xperia 1 V FRP Locks
- Author: Liam
- Created at : 2024-08-02 08:34:25
- Updated at : 2024-08-03 08:34:25
- Link: https://android-frp.techidaily.com/in-2024-frp-hijacker-by-hagard-download-and-bypass-your-sony-xperia-1-v-frp-locks-by-drfone-android/
- License: This work is licensed under CC BY-NC-SA 4.0.