In 2024, A Step-by-Step Guide on Using ADB and Fastboot to Remove FRP Lock on your Sony Xperia 1 V
A Step-by-Step Guide on Using ADB and Fastboot to Remove FRP Lock on your Sony Xperia 1 V
Factory Reset Protection is one of the security measures available on Android 5.1 and later devices to prevent intruders’ unauthorized factory resetting of the Sony Xperia 1 V device. Among the several ways to fix this issue and remove the lock, one is ADB and Fastboot commands. So, if you are aware of using Android Debug Bridge, the below content will help you understand how it can be used to remove the FRP lock.
You can watch the video below to bypass FRP lock without hassle!
Part 1: Quick Overview of ADB and Fastboot Commands
1. What are ADB and Fastboot?
Standing for Android Debug Bridge, ADB and Fastboots are the methods through which communication with an Android device can be done through a computer. Under this method, the commands and the actions that are sent from the system are performed on your Android device.
Several issues can be resolved, and multiple functions can be performed using the ADB format tool and Fastboots, and this also includes removing the FRP lock on your Android device. To use this method, USB debugging should be enabled on the Sony Xperia 1 V device.
For specific brands of Android phones, specific utility tools are available like the Vivo ADB format tool and the Samsung ADB format tool, which are used explicitly for Vivo and Samsung phones, respectively.
2. How Do ADB and Fastboot Bypass FRP?
Using the versatile ADB command-line tool and Fastboots, the Google FRP lock can be removed using several commands depending on the OS version. This is a client-server program that includes a client who sends the commands, a daemon used to run the commands on the Sony Xperia 1 V device, and a server that facilitates communication between the client and the daemon.
ADB comes included in the Android SDK Platform-Tools package, and this can be downloaded using the SDK manager.
3. What Are the Android Versions that ADB and Fastboot Command Support?
The Android versions on which ADB and Fastboot commands can be used are as follows:
_Android 5 – Lollipop__Android 6- Marshmellow__Android 7 – Nougat__Android 8- Oreo__Android 9- Pie__Android 10 – Q (expected to work though not tested as yet)_
Part 2: How to Set Up ADB and Fastboot Commands to Remove FRP Lock on Android?
To remove FRP lock using ADB, you first need to install and set up ADB and then remove them using the command. The steps for the same are enlisted below.
Steps to remove FRP using ADB


Step 1. Firstly, download the ADB installed setup file and then extract the files from the toolkit on your system in a folder.
Step 2. Next, you need to run adb.setup.exe and then type Y for installing the drivers for ADB and Fastboot.
Step 3. Again, enter Y for installing the drivers and when done successfully, the command window will close.
Step 4. Next, power on your Android device and connect it to your PC using a USB cable. Here also ensure that USB debugging mode is enabled on your Android device.
Step 5. Next, hold down the Shift key and then right-click at any place blank in the ADB folder, and then choose the Open command window here option.
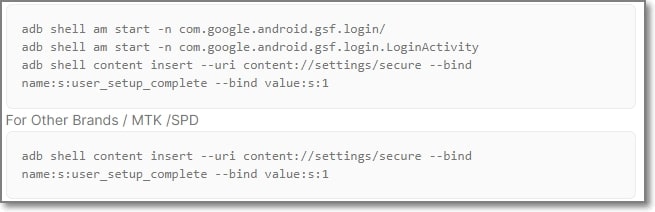
Step 6. Now to remove the FRP you need to enter the following commands at the command prompt one by one where enter needs to be clicked after every line.
_Adb shell am start -n com.google.android.gsf.login/__adb shell am start -n com.google.android.gsf.login.LoginActivity__adb shell content insert –uri content://settings/secure –bind name:s:user_setup_complete –bind value:s:1_Step 7. The above commands are for Samsung devices. If you want to remove the FRP on other brands, enter the following commands:
_Adb shell content insert –uri content://settings/secure –bind__name:s:user_setup_complete –bind value:s:1_
After the execution of the commands, the FRP lock will be removed from your Android device.
Steps to remove FRP using Fastboot
Step 1. Put the Android device into the bootloader or fastboot mode. (depending on the model and brand of your Android device, the process of entering into the fastboot will differ).
Step 2. Connect your phone to your PC using a USB cable.
Step 3. Next, depending on the system, enter the following command in the CMD window:
_Lenovo FRP command__fastboot erase config__fastboot reboot__XIAOMI FRP command__fastboot -w__MICROMAX YU YUPHORIA FRP__Fastboot -i 0x2a96 erase configFastboot -i 0x2a96 reboot__DEEP/HTC/Other Brands FRP__fastboot erase configfastboot reboot_
Part 3: Limitations of Using ADB and Fastboot Command Method
The ADB and Fastboots command is a workable solution for removing the FRP lock on your Android device, the drawback is that the method is quite complicated and requires thorough technical know-how of ADB and its working. There are several limitations associated with this method as enlisted below.
- Requires technical know-how
To remove FRP using the ADB command you need to have a thorough knowledge of using the tool. The tool has a deep learning curve which makes this method little for the majority of the users.
- Might not unlock the phone
You can try the ADB method for removing the FRP lock but there is no guarantee that the results will be positive and your device will be unlocked.
- Issues with the drivers
Several times while using this method, you might encounter driver issues when your device is not detected as proper drivers are not installed.
- Unexpected issues and errors
ADB is a command-based method, and thus it is important that the commands are entered right. If there is a slight error in the typing of the command, it might lead to major issues and can even be the Sony Xperia 1 V device damaged.
- The process is not user-friendly
ADB is a technical process aimed toward the geeks, and thus the overall process is not user-friendly and complicated.
Part 4: The Best ADB Alternative to Bypass FRP Lock on Android Phones
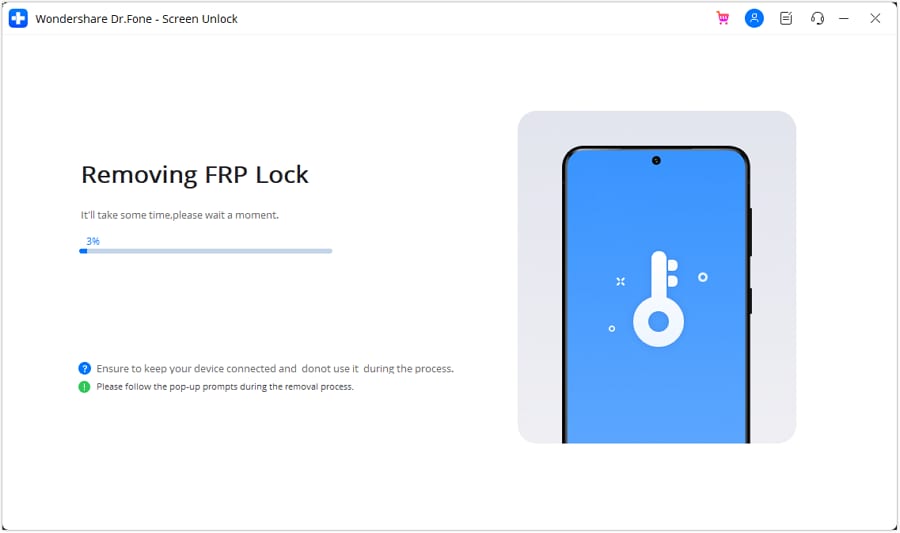
Considering the several limitations of the ADB and Fastboot command method, the need for a simple, user-friendly, and workable solution for removing FRP lock on Android devices arises. One of the best software here that we recommend is Dr.Fone - Screen Unlock (Android) which helps in removing and bypassing many Android phone screen locks including the one appearing due to FRP lock.
Dr.Fone - Screen Unlock (Android)
Remove Google FRP on Samsung without PIN code or Google accounts.
- Pattern, PIN, password, fingerprints & face screen lock can all be unlocked.
- Bypass Google FRP on Samsung without pin code or Google accounts.
- No tech knowledge asked, everybody can handle it.
- Work for Samsung, Xiaomi, Redmi, OPPO, etc.
4,005,551 people have downloaded it
The process of using the software is user-friendly and thus can also be used by non-techy users.
Steps for removing FRP lock on Android using Dr.Fone Screen Unlock
- Step 1. Launch the installed software and choose the Screen Unlock option from the main interface. Choose Android and then select the Remove Google FRP Lock option.

- Step 2. Select the model brans from the options shown on the interface, and then connect your phone to your PC using a USB cable. The connected device details will appear on the interface.

- Step 3. Follow the next steps as they appear. Once the FRP lock is successfully removed, the prompt window will show its completion. Click Done if you have successfully executed the process.
The above is the brief steps for the process. You can check the bypass Samsung FRP lock guide in detail.
Conclusion
If you are well versed with the commands of ADB and Fastboots you can go ahead and use the ADB bypass FRP tool for removing the FRP lock but if this command line method seems complicated for you, Dr.Fone Screen Unlock is the best tool to use.
How to Bypass FRP on Sony Xperia 1 V?
Learning how to FRP bypass on Sony Xperia 1 V is vital in many ways. For instance, you might want to hard reset your phone to clear data and remove a bug or virus. Or, you may want to remove every bit of information before gifting or selling the phone. Whichever the case, learning how to bypass FRP on Sony Xperia 1 V is a cakewalk with this 3-minute read. We’ll know how to do that with or without a PC.
Part 1: Is it possible to bypass FRP Sony Xperia 1 V on Samsung?
FRP (Factory Reset Protection) is an Activation Lock system introduced by Google in 2015 on Android 5.1 (Lollipop) or newer. This security feature is meant to prevent unauthorized Factory Resetting of your phone. In other words, you’ll need to enter the correct Google Account details to bypass FRP. Because FRP or Activation Lock is available on Android 5.1 or later, it will automatically activate on your Sony Xperia 1 V device after adding your Gmail account. Some Samsung Sony Xperia 1 V devices include S8, S8 Plus, Note 8, Note 9, J6, J7, M1, and other Galaxy phones launched before 2018.
Meanwhile, you must be asking if it’s possible to bypass FRP on Sony Xperia 1 V without a PC? The answer is yes! There are multiple methods to bypass FRP on Sony Xperia 1 V, including via YouTube.
Below are the quick steps for Galaxy S8 or S8 Plus:
Step 1: Dial an emergency number and save it
- 1. Fire up your locked phone and connect it to a Wi-Fi network.
- 2. Navigate back to the “Let’s go” screen and tap Emergency call. Dial and call 112.
- 3. Go back to the “Let’s go” screen and click Next until you reach the Wi-Fi connection screen. Here, tap Add network and then click the Settings icon on the Samsung keyboard.
- 4. Click Keyboard layout and feedback > Key-tap feedback. Then, choose Sound and vibration on the Tip section.
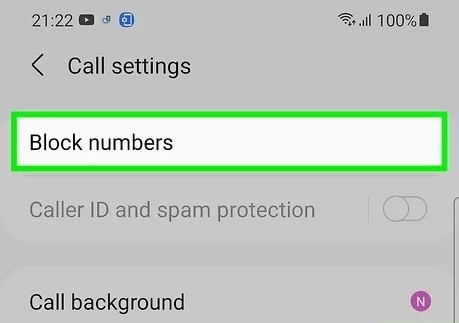
- 5. Next, click Answering and ending calls > Answer automatically. Now enable the toggle before using your two fingers to select “10 seconds” and “Customize.” You’ll see a pop-up dialog where you’ll click App Info > Call settings > Block numbers.
- 6. Click Recent > Emergency number > Message icon.
- 7. Tap the Ellipsis icon and click Add or remove people. Enter random numbers before clicking the “+” button.
- 8. Click the number you’ve just entered and tap Add. Then, tap Create contact and name it. Scroll down and add an email address with a password that you’ll remember easily if prompted. Click Save.
Step 2: Open Chrome and install Bypass FRP APK
- 9. Now open a Message chat and type www.youtube.com before sending it to the number. Then, tap the YouTube link and open any video.
- 10. Click any link on the video description to launch Google Chrome. Search, download, and install Apex Launcher APK from frpfile.com.
- 11. After installing Apex Launcher, open it and then click Settings > Biometrics and security > Other security settings > Device admin apps > Find my Device > Deactivate.
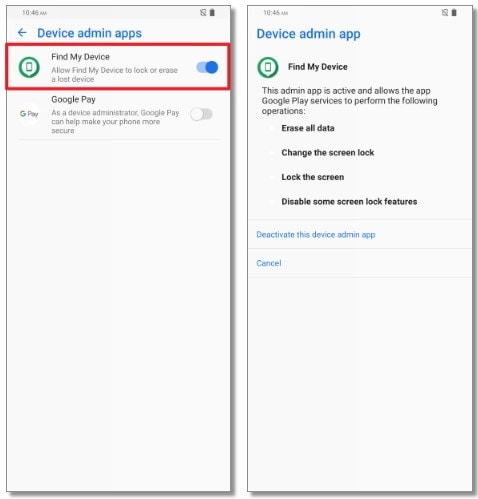
- 12. Go back to the Settings screen, click Apps > Google Play Services > Disable. Also, disable Google Account Manager.
- 13. Open Chrome and install Bypass FRP APK from the same website.
Step 3: FRP Bypass Sony Xperia 1 V
- 14. Go to Settings > Accounts and backup > Accounts > Add account > Google. Sign in with any Gmail account.
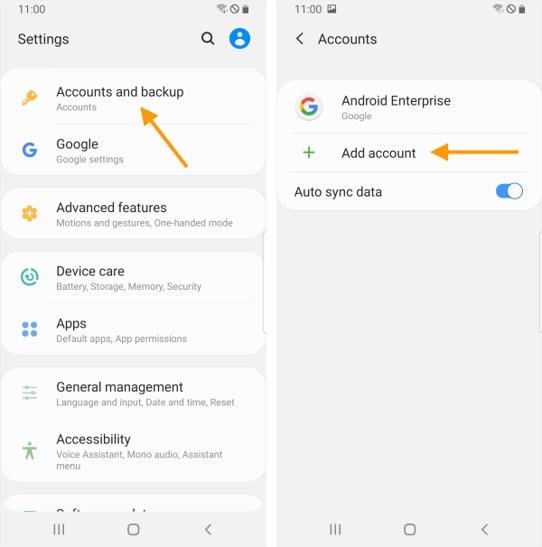
- 15. Navigate back to Settings and enable Google Play Services. Also, activate Find My Device. Now restart your phone and access it without FRP.
Although this method can yield the desired results, it can be time-consuming and confusing if you’re not a techie. So, read on to learn the easiest way to bypass FRP on any Samsung Sony Xperia 1 V device.
Part 2: How to bypass FRP Sony Xperia 1 V with Dr.Fone – Screen Unlock (Android)?
This method will teach us how to bypass FRP on Sony Xperia 1 V devices like Galaxy S8 or S8 Plus. Here, you’ll need a Wi-Fi internet, Mac or Windows PC, and a USB wire. You require a computer to install Dr.Fone - Screen Unlock (Android) and connect the program to your locked phone. Don’t worry; it’s a free FRP bypass program without those unwanted programs or malware. Besides Sony Xperia 1 V, Dr.Fone can also bypass Samsung FRP on Android 6/7/8/10/11/12/13.
![]()
Dr.Fone - Screen Unlock (Android)
The Best Tool to Bypass FRP on Sony Xperia 1 V and Solve Your Screen Locks!
- Completely unlinked from the previous Google account, it won’t be traced or blocked by it anymore.
- Remove all Android screen locks (PIN/pattern/fingerprints/face ID) in minutes.
- Supported Android brands: Samsung, Xiaomi, Redmi, Oppo, Realme, Vivo.
- Provide specific removal solutions to promise good success rate.
4,008,670 people have downloaded it
Follow these steps to bypass FRP on Sony Xperia 1 V with Dr.Fone:
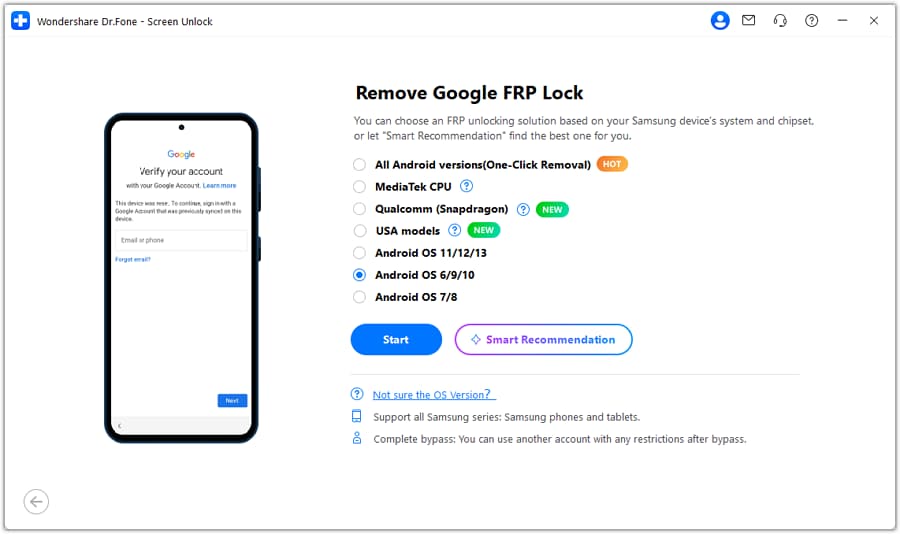
Step 1: Install and run Dr.Fone on your PC and open the Screen Unlock feature. On the Screen Unlock window, tap Android before clicking Remove Google FRP Lock.
Step 2: Next, choose the Android operating system for your device. In this case, select Android 6/9/10. Now connect the locked Android phone to your PC using a USB cable and click Confirmed once the connection is successful.
Step 3: On your phone, you’ll see a Dr.Fone Unlock pop-up dialog. Click View and then install and launch Samsung Internet Browser. Now enter and search for https://drfonetoolkit.com . Click Android 6/9/10 and then tap Open Settings. After that, tap PIN > Do not require > Continue. Now set a PIN code that you can easily remember before clicking Skip.
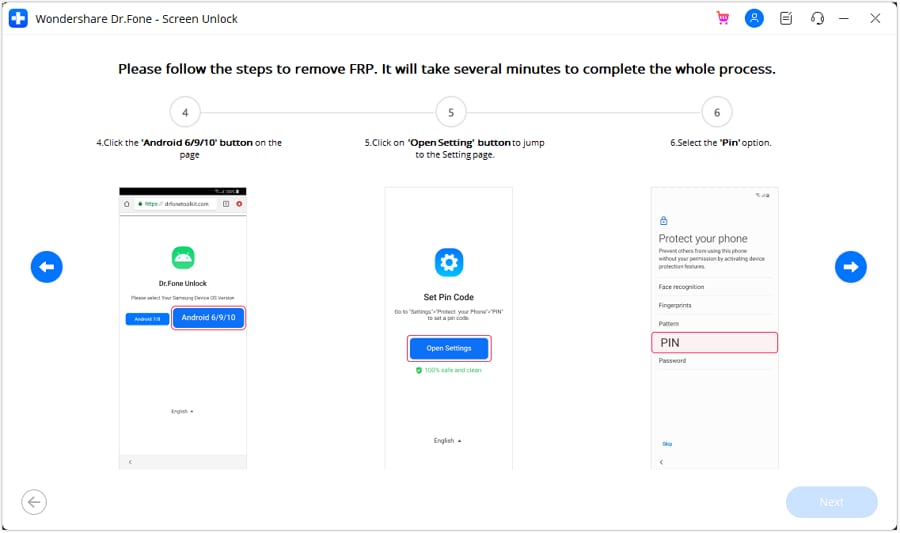
Step 5: Click the “<” button to navigate back to the Wi-Fi connection screen before clicking Next. Enter the PIN you can set earlier before clicking Continue.

Step 6: Hit the Skip button on the Google Sign-In page to successfully bypass FRP on your Samsung Sony Xperia 1 V phone. And there it that!

Note: Bypassing FRP on your Samsung phone using Dr.Fone is undoubtedly quick and easy. However, only use this software to bypass FRP on your Samsung phone or if you have consent from the original owner. Don’t bypass FRP if you’re not sure about the original owner of the phone.
You can watch the video below to get your FRP bypassed with Wondershare Dr.Fone
Part 3: How to Disable FRP lock on Samsung Sony Xperia 1 V?
To avoid the stress of bypassing FRP on your Samsung phone in the future, you may have to disable Android Lock altogether. This is a relatively straightforward procedure on any Android phone you use. But be guided that turning off FRP on your Sony Xperia 1 V phone is not recommended.
Follow these steps:
- Step 1: Search for the Settings app and open it.
- Step 2: Next, click Accounts and backup before clicking Accounts.
- Step 3: You’ll see all the linked email accounts. Choose the one that you want to delete.
- Step 4: Click Remove Account and then click Remove Account once again to confirm. That’s it!
Conclusion
See, you can quickly bypass FRP on Sony Xperia 1 V with these methods. But remember that disabling FRP will leave your phone without security protection. Also, bypassing FRP using the YouTube method can be lengthy and complex. So, use Wondershare Dr.Fone to skip FRP on Android 6/7/8/9/10/11/12/13. Give it a try!
Full Guide to Bypass Sony Xperia 1 V FRP
I updated my Sony Xperia 1 V to the latest Android, and now it’s stuck on FRP lock. I don’t know how to Bypass the Pixel FRP lock, which is annoying because I have to finish an assignment. How should I do it?
The FRP lock is one of Google’s security methods for Android devices. It keeps unapproved people from erasing your phone data. However, an update or unidentified issue may sometimes lock your phone without warning. Just like the case above, it can be an unpleasant experience. Therefore, this Sony Xperia 1 V FRP bypass article will show you some ways to bypass it.
The Google FRP lock is not a new issue and can occur to almost any Android user. If you neglect to disable the Factory Reset Protection before a reset, Google will lock your phone. Therefore, you will have to bypass the Google account to resolve it.
Part 1: 3 Ways to Bypass Sony Xperia 1 V FRP
1. Download FRP Bypass APK (OTG Cable Needed)
The use of OTG for bypassing the Google FRP lock on Sony Xperia 1 V after a hard reset is a great technique to bypass the Google account lock.
Before we get to the guide, you need an Android OTG cable, fast Wi-Fi, and a PC.
![]()
If you do, follow these steps to start bypassing your Google account:
Step 1. Download the FRP bypass APK on your PC.
Step 2. Move (by copying) the APK document to your flash drive.
Step 3. Utilize the OTG cable to connect your Pixel phone and flash drive.
Step 4. Install the APK document on your Pixel device when the file manager application springs up.
Step 5. The phone Settings will presently be accessible for you to open.
Step 6. Look for and select the “Backup and Reset” choice.
Step 7. Select the “Factory Data Reset and then Reset everything from the phone. That will delete all the phone’s media files, settings, apps, and accounts.
Step 8. Your Pixel phone will reboot, and you won’t see the FRP lock.
![]()
2. Use Pin Lock Sim to Access Chrome
Step 1: Start the cycle by eliminating the SIM card from your Pixel device. Presently connect it to Wi-Fi.
Step 2: Insert the SIM card once more. Mistype your PIN code multiple times.
Step 3: You will be approached to give your PUK code straightaway. Continue to type wrong PUK numbers until the SIM card becomes unusable.
Step 4: Tap the padlock symbol on the lock screen to open another menu choice. You will see the warning setting choice at the top corner of the screen.
Step 5: Select the See All options. Search for the YouTube App and afterward go to Settings and open History and Privacy to access the Youtube ToS.
![]()
Step 6: This will open the Chrome Browser, where you select Accept and Continue. Then, at that point, pick Next > No Thanks.
Step 7: Find a dependable FRP bypass tool to unlock FRP on the program. Go to Security from Setting and open Pin Windows. Then use the Screen lock type to Unpin the SIM.
Step 8: Restart your device after setting up a PIN code. You can utilize your Pixel without marking into your underlying Google account.
Bonus Tip. Use Dr.Fone-Screen Unlock (For Other Android phones)
We have presented numerous FRP methods in this guide. Nonetheless, they might fail to tackle the issue some of the time. There is no question that a bypass tool will be a lot more straightforward and speedier. Therefore, we strongly recommend you use the Wondershare Dr.Fone Bypass FRP tool for a less complex and quicker strategy. Dr.Fone - Screen Unlock (Android) is a speedy, easy-to-use FRP bypass for you to get rid of the Google issue. It lets you access your home screen once more. Here are the needed steps for bypassing the Google FRP lock:
Step 1: Open the software, connect your phone and PC and pick Screen Unlock. Then click on Screen Unlock > Android > Remove Google FRP Lock.
Step 2: Pick your device’s brand and click Start.
Step 3: Once you choose the Sony Xperia 1 V device brand, Dr.Fone will commence the download of the necessary driver.
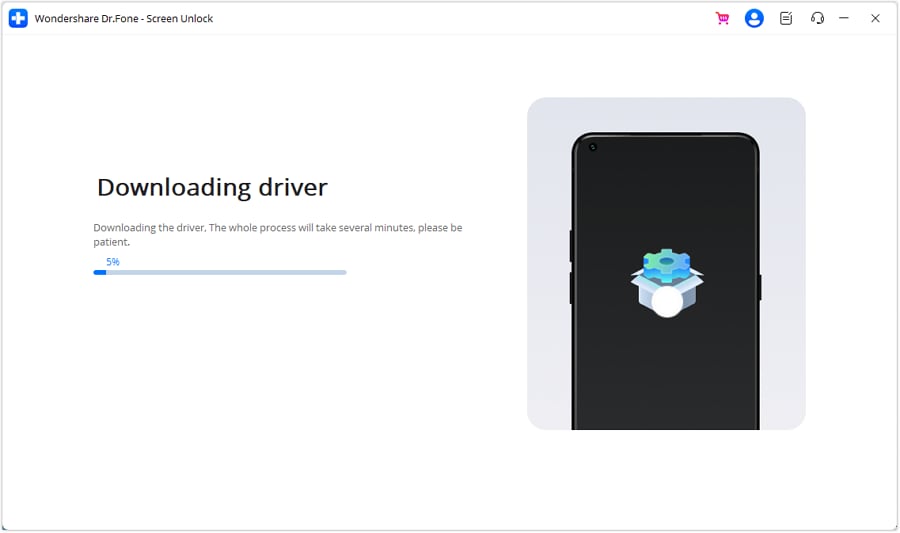
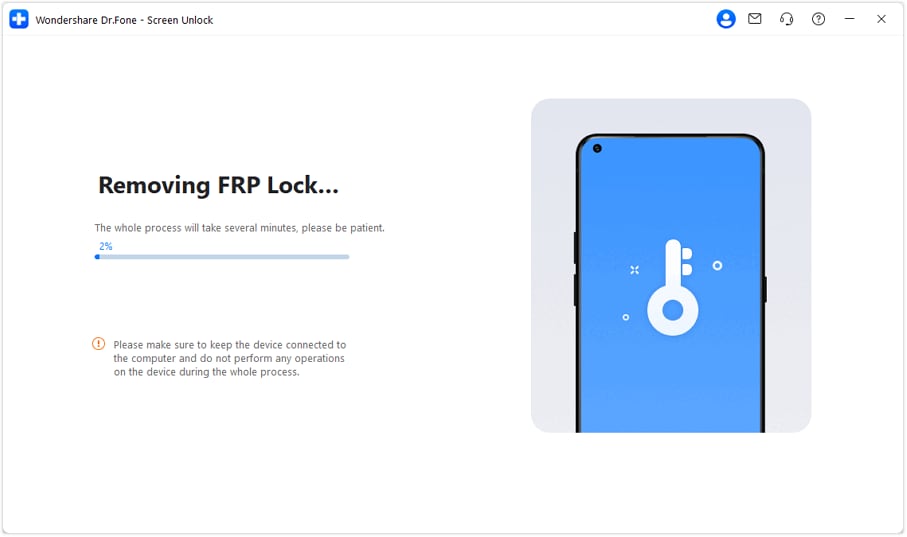
Step 4: After the download is complete, the procedure to eliminate the FRP lock will initiate, requiring a few minutes. Once the lock is successfully removed, tap Done to finalize the process.
 safe & secure
Part 2: Definition of Sony Xperia 1 V FRP
Factory Reset Protection (FRP) includes security on Android gadgets with OS Version 5.1 and higher. The FRP gives an underlying security highlight you can utilize that safeguards your gadget and data, including screen locks and data encryptions. The FRP automatically works once a Google account has been logged in on the phone. However, it will stop working when the Google account is removed from the Pixel phone preceding the Factory Data Reset. When the FRP has been enacted, it will not let others use your phone after a Factory Reset in an untrusted environment. It implies that the FRP Lock will come into play if your Pixel gets Factory Reset in an unrecognized way.
![]()
Part 3: Can factory reset really remove FRP?
To remove FRP, you must remove all Google accounts from your Pixel phone. After doing so, you can factory reset it to clear all your data. So technically, you need to remove all the accounts, and yes, a factory reset will work.
The Bottom Line
This Sony Xperia 1 V FRP bypass article gives an insight into the methods you can use to remove the FRP lock. However, if you have a other Android brand phone, the best one of all methods is using Dr.Fone - Screen Unlock (Android) . It delivers solutions for those who don’t know the OS variant of their phone. Its interface is easy to understand and has clear instructions. Moreover, bypassing the FRP lock is just a matter of a few minutes for it.
- Title: In 2024, A Step-by-Step Guide on Using ADB and Fastboot to Remove FRP Lock on your Sony Xperia 1 V
- Author: Liam
- Created at : 2024-08-02 08:34:33
- Updated at : 2024-08-03 08:34:33
- Link: https://android-frp.techidaily.com/in-2024-a-step-by-step-guide-on-using-adb-and-fastboot-to-remove-frp-lock-on-your-sony-xperia-1-v-by-drfone-android/
- License: This work is licensed under CC BY-NC-SA 4.0.