How to Bypass FRP from Nokia G42 5G?
How to Bypass FRP on Nokia G42 5G?
Learning how to FRP bypass on Nokia G42 5G is vital in many ways. For instance, you might want to hard reset your phone to clear data and remove a bug or virus. Or, you may want to remove every bit of information before gifting or selling the phone. Whichever the case, learning how to bypass FRP on Nokia G42 5G is a cakewalk with this 3-minute read. We’ll know how to do that with or without a PC.
Part 1: Is it possible to bypass FRP Nokia G42 5G on Samsung?
FRP (Factory Reset Protection) is an Activation Lock system introduced by Google in 2015 on Android 5.1 (Lollipop) or newer. This security feature is meant to prevent unauthorized Factory Resetting of your phone. In other words, you’ll need to enter the correct Google Account details to bypass FRP. Because FRP or Activation Lock is available on Android 5.1 or later, it will automatically activate on your Nokia G42 5G device after adding your Gmail account. Some Samsung Nokia G42 5G devices include S8, S8 Plus, Note 8, Note 9, J6, J7, M1, and other Galaxy phones launched before 2018.
Meanwhile, you must be asking if it’s possible to bypass FRP on Nokia G42 5G without a PC? The answer is yes! There are multiple methods to bypass FRP on Nokia G42 5G, including via YouTube.
Below are the quick steps for Galaxy S8 or S8 Plus:
Step 1: Dial an emergency number and save it
- 1. Fire up your locked phone and connect it to a Wi-Fi network.
- 2. Navigate back to the “Let’s go” screen and tap Emergency call. Dial and call 112.
- 3. Go back to the “Let’s go” screen and click Next until you reach the Wi-Fi connection screen. Here, tap Add network and then click the Settings icon on the Samsung keyboard.
- 4. Click Keyboard layout and feedback > Key-tap feedback. Then, choose Sound and vibration on the Tip section.
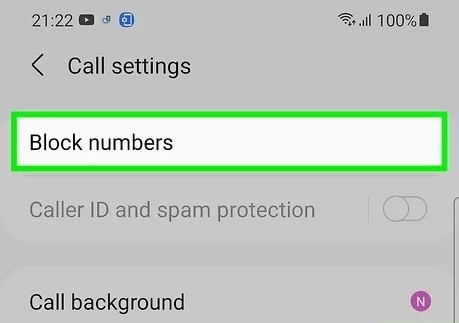
- 5. Next, click Answering and ending calls > Answer automatically. Now enable the toggle before using your two fingers to select “10 seconds” and “Customize.” You’ll see a pop-up dialog where you’ll click App Info > Call settings > Block numbers.
- 6. Click Recent > Emergency number > Message icon.
- 7. Tap the Ellipsis icon and click Add or remove people. Enter random numbers before clicking the “+” button.
- 8. Click the number you’ve just entered and tap Add. Then, tap Create contact and name it. Scroll down and add an email address with a password that you’ll remember easily if prompted. Click Save.
Step 2: Open Chrome and install Bypass FRP APK
- 9. Now open a Message chat and type www.youtube.com before sending it to the number. Then, tap the YouTube link and open any video.
- 10. Click any link on the video description to launch Google Chrome. Search, download, and install Apex Launcher APK from frpfile.com.
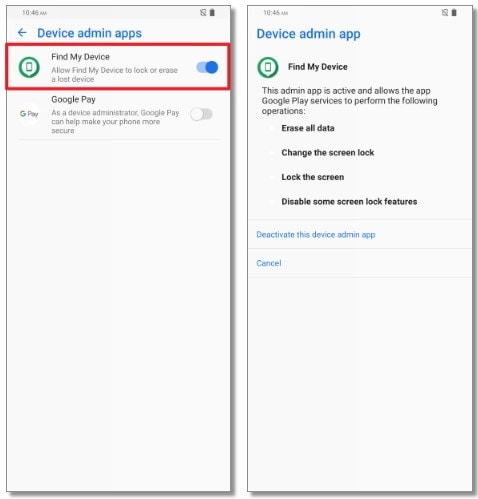
- 11. After installing Apex Launcher, open it and then click Settings > Biometrics and security > Other security settings > Device admin apps > Find my Device > Deactivate.
- 12. Go back to the Settings screen, click Apps > Google Play Services > Disable. Also, disable Google Account Manager.
- 13. Open Chrome and install Bypass FRP APK from the same website.
Step 3: FRP Bypass Nokia G42 5G
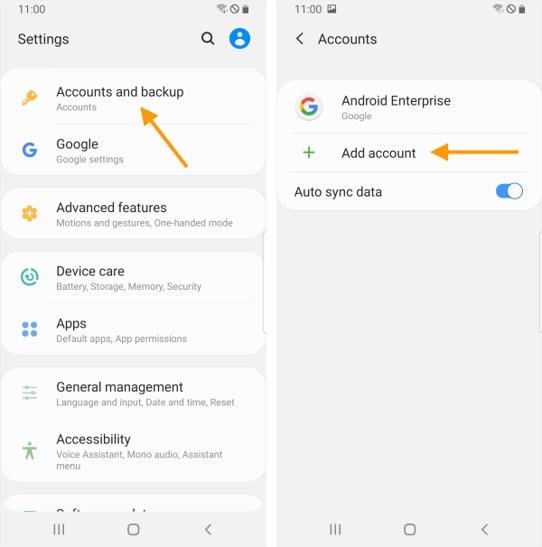
- 14. Go to Settings > Accounts and backup > Accounts > Add account > Google. Sign in with any Gmail account.
- 15. Navigate back to Settings and enable Google Play Services. Also, activate Find My Device. Now restart your phone and access it without FRP.
Although this method can yield the desired results, it can be time-consuming and confusing if you’re not a techie. So, read on to learn the easiest way to bypass FRP on any Samsung Nokia G42 5G device.
Part 2: How to bypass FRP Nokia G42 5G with Dr.Fone – Screen Unlock (Android)?
This method will teach us how to bypass FRP on Nokia G42 5G devices like Galaxy S8 or S8 Plus. Here, you’ll need a Wi-Fi internet, Mac or Windows PC, and a USB wire. You require a computer to install Dr.Fone - Screen Unlock (Android) and connect the program to your locked phone. Don’t worry; it’s a free FRP bypass program without those unwanted programs or malware. Besides Nokia G42 5G, Dr.Fone can also bypass Samsung FRP on Android 6/7/8/10/11/12/13.
![]()
Dr.Fone - Screen Unlock (Android)
The Best Tool to Bypass FRP on Nokia G42 5G and Solve Your Screen Locks!
- Completely unlinked from the previous Google account, it won’t be traced or blocked by it anymore.
- Remove all Android screen locks (PIN/pattern/fingerprints/face ID) in minutes.
- Supported Android brands: Samsung, Xiaomi, Redmi, Oppo, Realme, Vivo.
- Provide specific removal solutions to promise good success rate.
4,008,670 people have downloaded it
Follow these steps to bypass FRP on Nokia G42 5G with Dr.Fone:
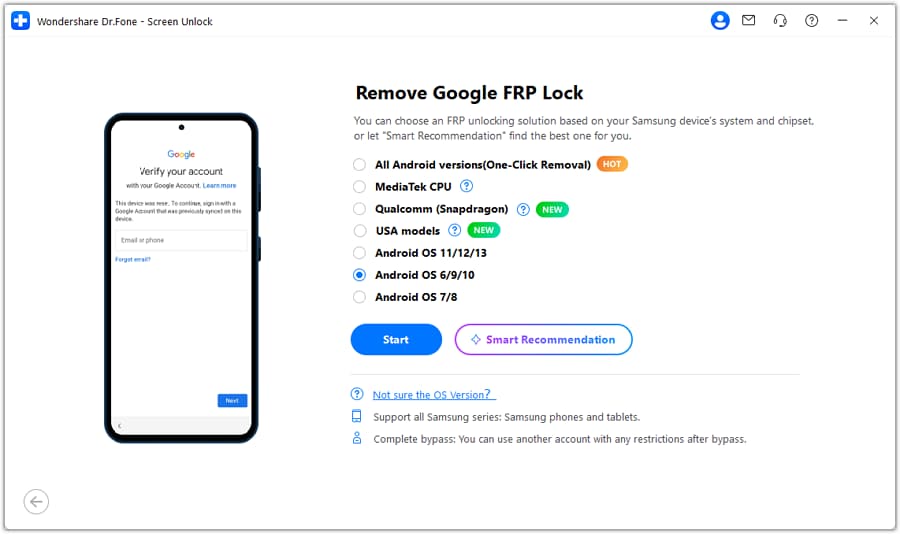
Step 1: Install and run Dr.Fone on your PC and open the Screen Unlock feature. On the Screen Unlock window, tap Android before clicking Remove Google FRP Lock.

Step 2: Next, choose the Android operating system for your device. In this case, select Android 6/9/10. Now connect the locked Android phone to your PC using a USB cable and click Confirmed once the connection is successful.
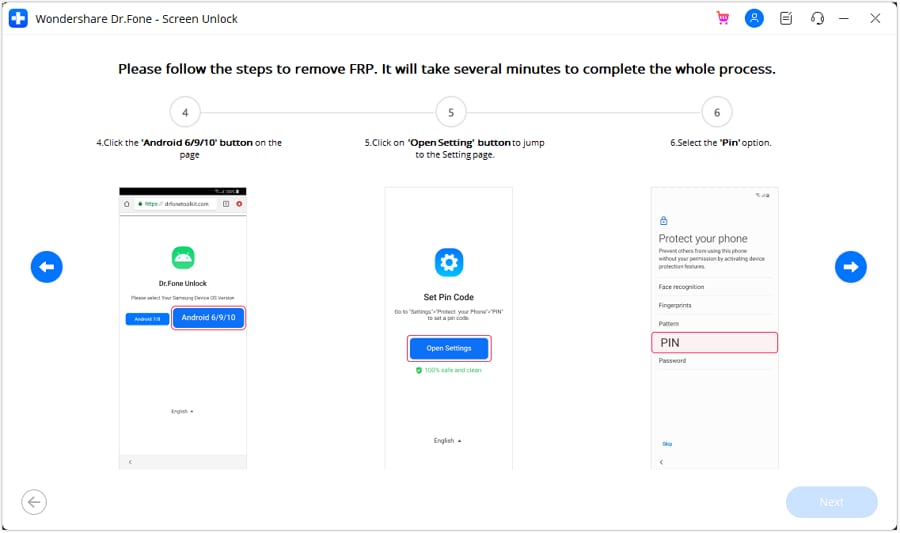
Step 3: On your phone, you’ll see a Dr.Fone Unlock pop-up dialog. Click View and then install and launch Samsung Internet Browser. Now enter and search for https://drfonetoolkit.com . Click Android 6/9/10 and then tap Open Settings. After that, tap PIN > Do not require > Continue. Now set a PIN code that you can easily remember before clicking Skip.
Step 5: Click the “<” button to navigate back to the Wi-Fi connection screen before clicking Next. Enter the PIN you can set earlier before clicking Continue.

Step 6: Hit the Skip button on the Google Sign-In page to successfully bypass FRP on your Samsung Nokia G42 5G phone. And there it that!

Note: Bypassing FRP on your Samsung phone using Dr.Fone is undoubtedly quick and easy. However, only use this software to bypass FRP on your Samsung phone or if you have consent from the original owner. Don’t bypass FRP if you’re not sure about the original owner of the phone.
You can watch the video below to get your FRP bypassed with Wondershare Dr.Fone
Part 3: How to Disable FRP lock on Samsung Nokia G42 5G?
To avoid the stress of bypassing FRP on your Samsung phone in the future, you may have to disable Android Lock altogether. This is a relatively straightforward procedure on any Android phone you use. But be guided that turning off FRP on your Nokia G42 5G phone is not recommended.
Follow these steps:
- Step 1: Search for the Settings app and open it.
- Step 2: Next, click Accounts and backup before clicking Accounts.
- Step 3: You’ll see all the linked email accounts. Choose the one that you want to delete.
- Step 4: Click Remove Account and then click Remove Account once again to confirm. That’s it!
Conclusion
See, you can quickly bypass FRP on Nokia G42 5G with these methods. But remember that disabling FRP will leave your phone without security protection. Also, bypassing FRP using the YouTube method can be lengthy and complex. So, use Wondershare Dr.Fone to skip FRP on Android 6/7/8/9/10/11/12/13. Give it a try!
How to Bypass Google FRP Lock on Nokia G42 5G Devices
Technological advancements in the IT and telecommunication industry simplify your tasks and provide security against cyber malpractices. The advantages are numerous and appealing, but there are downsides too. One such inconvenience is caused by Google FRP lock in Nokia G42 5G smartphones. The facility keeps your device information safe against unauthorized access. However, users often report issues like lockouts not being removed due to several causes. Such scenarios raise the demand for Nokia G42 5G Nord FRP bypass solutions for seamless device access.
Part 1. What Is Google FRP and How Does It Work?
Google Factory Reset Protection (FRP) is an in-built security function in Android 5.1 and later versions. The feature protects these devices against intentional data loss on unauthorized access. The utility does not allow a factory reset of your device in case it is lost or stolen. Your data is hence, safe from unwanted mishandling. The feature also protects the Nokia G42 5G device’s data encryptions and screen locks. The functionality gets enabled when you register a Google account on your Android device. As is obvious, the feature gets disabled when the Google account is removed before beginning the Factory Data Reset process.
If your device is under untrusted access and the FRP lock is enabled, the latter will prevent the factory reset of your phone. It is because; the active FRP lock requires entering the Google account credentials registered with the Nokia G42 5G device. Therefore, unwanted users will not be possible to factory reset the Nokia G42 5G phone. However, there may be instances when you need to factory reset your FRP-enabled device to its default settings. Ensure that the registered Google account credentials are available to you under such circumstances.
Part 2. How to Remove Google FRP Lock on Any Nokia G42 5G Phone?
To remove the Google FRP lock on your Nokia G42 5G device, you can follow any of the methods discussed below:
1. Bypass Google FRP Lock on Your Nokia G42 5G Phone
- Switch on the Wi-Fi network of the Nokia G42 5G phone and head to the ‘Hello’ screen.
- Take the following path:
Emergency Call> Emergency Rescue> Add Contact

- When the permission prompt pops up, click on ‘Deny’ and tap “Go to Settings”.
- Hit the ‘Permission’ tab and tap the ‘Search’ button.
- Enter ‘Settings’ in the search field, choose the ‘Settings App Info’ option, and tap the ‘Open’ button.
- Take the path given below to enable the system shortcuts:
System> Accessibility> Accessibility Menu> Toggle the Button to Turn it On> Allow> Got it
- Head to the “Settings” app and tap “Apps and Notifications”. Next, click on “See All Apps”.
- Find and disable the ‘Android Setup’ and ‘Google Play Service’ within the application list.

- Navigate back to the ‘Hello’ screen to completely disable the setup by taking the following path:
Start> Agree> Agree> Skip> Don’t Copy> Ok> Agree
- Skip the ‘Set Screen Lock’ task for completing the setup.
2. Using FRP Bypass APK
This is a quick and smart way to address the FRP lock removal issue within several minutes. Here’s what you need to do:
- Download the FRP Bypass APK to a PC or some other smartphone from the latter’s official website, followed by copying it into a pen drive.
- Use an OTG to connect the pen drive to the FRP-locked device.
- Head to the destination folder of the downloaded APK in the “File Manager” application.
- Install the APK in the FRP-locked phone by allowing the app permissions.
- Navigate to ‘Settings’ and enable the ‘Install from Unknown Source’ option.
- Reinstall and open the APK.
- The ‘Settings’ menu will pop up. Head to the “Backup and Reset” option.
- Click on ‘Factory Data Reset’, followed by “Erase Everything”.
- Tap ‘Confirm’ to erase all the Nokia G42 5G device data.
- Register with a new Google account to use the phone.

3. Deactivate FRP in Your Nokia G42 5G Phone
Removing the Google FRP lock using a computer is impossible in some instances. Deleting your registered Gmail account from the Nokia G42 5G device can help you in these circumstances. The downside of this method is that your device’s data will lose protection from Google. Here’s how you can delete your Gmail account from the FRP-locked phone:
- Launch the “Settings” app on your Nokia G42 5G device.

- In the app’s opening interface, click on the ‘Accounts’ tab to open the section.

- A list of all the accounts linked to your Nokia G42 5G device will be displayed. Tap on the desired Gmail account to unlink it from your phone.

- The device data linked with the selected account will appear on the screen. Click on ‘Remove Account’ to proceed further.

- A confirmation prompt will pop up to ensure a willful deletion of the account from the Nokia G42 5G device. Tap on ‘Remove Account’ to confirm the action. This will cause all data linked with the account to get deleted from the phone.

FAQs about Google Lock Bypass
1. Does Factory Reset Remove Google Account?
There may be instances when you require wiping out smartphone data to keep it safe against unauthorized access. Maybe you wish to pass on your device to another user or migrate to a different device. It is important to make sure that all accounts linked to the phone are deleted from the Nokia G42 5G device. It should be understood here that a factory reset will not remove Google or other accounts from the Nokia G42 5G device. The process restores the default factory settings of the phone that you got at the first purchase.
2. How to Enable Factory Reset Protection?
Enabling the Factory Reset protection feature is a smart way to protect the important data on your phone. However, issues of unethical access in cases of theft or loss are quite prominent. You can enable the FRP functionality by taking the following steps:
- When using a new device, sign in to the phone with your Google account. You can use an existing account or create a new one.
- Set a pattern or password screen lock on your device. It is not advisable to use swipe unlock or leave the phone unlocked at all. If you forget the pattern or password, Google credentials can be used to unlock the Nokia G42 5G device.
These steps will cause the automatic configuration of the Factory Reset Protection feature. The invader will be prompted to enter the registered Google account credentials on every attempt to access the phone.
Conclusion
Developments in electronic technology have brought a series of benefits, covering easy access, security, and everything in between. One such feature is the Google Factory Reset Protection to protect your device data against untrusted access. The feature is undoubtedly credible, but there may be situations that require bypassing the FRP lock. For affordable solutions to address the concern on Nokia G42 5G phones, pick the one that corresponds to your specific situation.
Dr.Fone - Screen Unlock (Android)
Unlock Your Nokia G42 5G Phone in a Flash
- Remove 5 screen lock types: pattern, PIN, password, ingerprints & Face ID.
- Bypass Android FRP lock without a PIN or Google account.

- Unlock mainstream Android brands like Samsung, Huawei, LG, Xiaomi, etc.
- No tech knowledge required, Simple, click-through, process.

3,981,454 people have downloaded it
Easy Guide How To Bypass Nokia G42 5G FRP Android 10/11/12/13
Security measures have become increasingly robust nowadays to protect user data. One such security feature is Factory Reset Protection (FRP). This feature is designed to prevent unauthorized access to a device after a factory reset. FRP serves its purpose of safeguarding personal information. At times it can pose a challenge for users who find themselves locked out of their own devices.
This tutorial will guide you through a step-by-step Nokia FRP bypass Android 10, 11, 12, and 13 processes. By following these instructions carefully, you’ll regain access to your Nokia smartphone even if you’ve forgotten the associated Google account credentials.
Part 1: Basic Understanding of FRP
Before going after Nokia FRP bypassing Android 12, it is important to understand what FRP is. Knowing what it is and how it works will help you bypass this lock. Factory Reset Protection (FRP) is a powerful security feature developed and implemented by Google for all Android smartphone companies. It works on Android devices starting from Android 5.1 Lollipop and above.
Working of FRP
The primary purpose of FRP is to prevent unauthorized access to a device after it has been factory reset. It acts as a safeguard against theft or misuse of personal data. Moreover, FRP ensures only the original owner can access the Nokia G42 5G device data and applications. When FRP is enabled on an Android, it becomes tied to the Google account that was previously used on the Nokia G42 5G device.
After a factory reset, the Nokia G42 5G device will need the user to enter the Google account credentials. It is the same account associated with the Nokia G42 5G device. This prevents someone who doesn’t know the account details from gaining access to the Nokia G42 5G device.
Significance of FRP
FRP plays a crucial role in protecting personal data stored on Android devices. It acts as a strong deterrent against unauthorized access. This ensures that the data remains inaccessible even if a device falls into the wrong hands. This security measure is particularly important in cases of device theft or loss. It helps prevent sensitive information from being accessed by unauthorized individuals.
By implementing FRP, Google aims to enhance the overall security of Android devices. This also greatly helps in protecting user privacy. It adds an additional layer of protection for your device. FRP makes it more difficult for unauthorized users to bypass the Nokia G42 5G device’s security measures.
Part 2. Preparing for FRP Bypass
It is crucial to make sure you’re prepared before you go after the Nokia FRP bypass the Android 13. This section will guide you through the essential steps to ensure a successful bypass process. Following these measures will reduce the chances of encountering any obstacles. So, let’s get started by taking care of a few key aspects before proceeding with the FRP bypass.
Ensuring Device Compatibility
First, verify that your Nokia smartphone is running one of the supported Android versions, specifically Android 11, 12, or 13. This tutorial is specifically tailored to these versions. Attempting to bypass FRP on incompatible devices may lead to unexpected results. Confirming device compatibility will ensure that the provided instructions are relevant. It will also ensure the given instructions are applicable to your specific situation.
Backup Important Data
Backing up data can be possible even in this case; however, you should not have factory reset your Nokia before backing up your data. This is because the FRP lock gets enabled after factory resetting the Nokia G42 5G device. While using your Nokia with a Google account logged in, you will have to take the services of a third-party tool.
Wondershare Dr.Fone – Phone Backup turns out to be an assistance in this case. The service can be utilized to back up all necessary data before the FRP lock is removed from the Vivo.
Charging the Nokia G42 5G device Adequately
Ensure that your phone has enough charge to avoid any complications during the FRP bypass process. It is recommended to charge your Nokia device to at least 50%. The ideal way is to connect it to a power source during the procedure. This will prevent any unexpected shutdowns that could potentially disrupt the bypass process.
Connecting to Stable Internet
A stable and reliable internet connection is crucial for a successful FRP bypass. Ensure your phone is connected to a secure Wi-Fi network or stable cellular data connection. A strong internet connection is required to download necessary files or tools during the FRP bypass process. By ensuring a stable connection, you’ll avoid potential delays or complications.
Part 3. Method 1: Using Official Google Account
The FRP lock on your Nokia smartphone is directly linked to your Google account. The reason you find yourself in this situation is due to the inability to recall your Google account password. However, there is a solution — by recovering your Google account, you can successfully bypass the FRP lock.
This process will only work if you at least remember the Gmail ID. Follow the straightforward steps provided below to reset your Google account password:
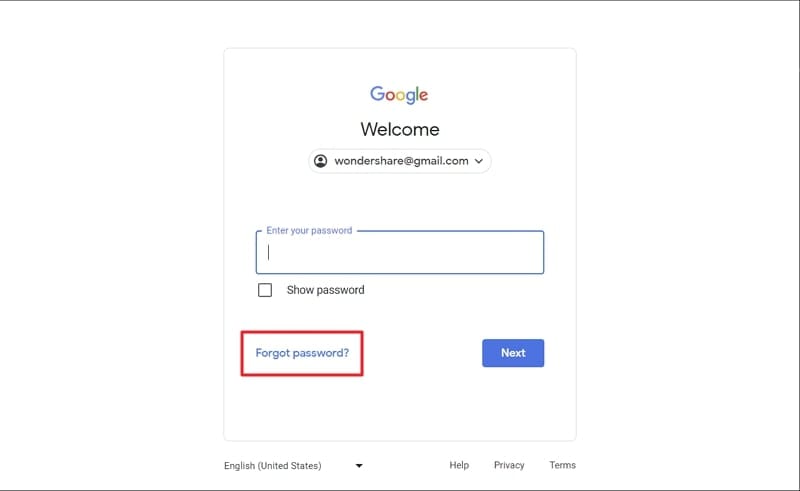
- Step 1: Access the Google Sign-in page on your computer using a web browser. Enter your Google account email address. When asked for the password to add, proceed with the “Forget Password” option.
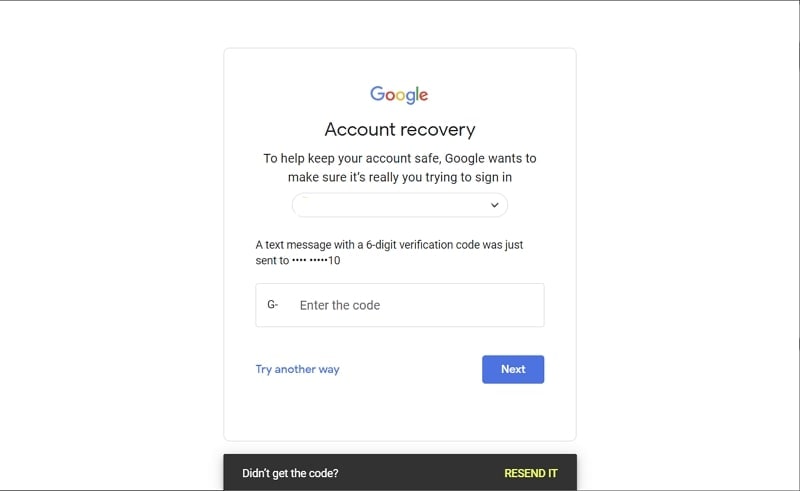
- Step 2: To verify your identity, utilize the phone number or recovery email associated with your Google account. You will receive a verification code on the phone number or recovery email. Once received, enter the code provided.
- Step 3: After completing the verification process, you can create a new password for your Google account. Take note that it may take approximately 24 hours for Google to synchronize the new password across all your devices. Once the new password has been synced, you can sign into your Google account on your Nokia smartphone, successfully bypassing the FRP lock.

Part 4. Method 2: Using FRP Bypass Tools
One way to Nokia Y20 FRP bypass Android 12 is to use a specialized FRP bypass tool. Among the various tools available, we highly recommend using Wondershare Dr.Fone . It is a reputable and reliable tool for FRP bypass on Android devices from all major brands. These include over 15 brands with 2000+ Android devices where Dr.Fone can do its magic.
Dr.Fone - Screen Unlock (Android)
Bypass Nokia Google FRP in a Flash
- Pattern, PIN, password, fingerprints & face screen lock can all be unlocked.
- Bypass Android FRP lock without a PIN or Google account.
- Unlock mainstream Android brands like Samsung, Vivo, Xiaomi, etc.
- No tech knowledge required, Simple, click-through, process.
3,981,454 people have downloaded it
Wondershare Dr.Fone is trusted by users worldwide for its effectiveness in bypassing FRP locks. With its intuitive interface and comprehensive features, Dr.Fone simplifies the bypassing process. Its compatibility with Android 10, 11, or 12 Nokia devices makes it an ideal choice. Following are the detailed steps to Nokia FRP bypass the Android 11 process:
- Step 1: Navigate To Remove Google FRP Lock in Wondershare Dr.Fone
Install the latest Wondershare Dr.Fone phone toolkit from the official website on your computer and launch it. Now move the “Toolbox” tab and go for “Screen Unlock”. As Nokia is an Android brand, on the next screen, click “Android”. Among the various available option for screen unlocking, choose “Remove Google FRP Lock”.
- Step 2: Choose Nokia As the Brand
The next step is to choose the targeted phone brand, which in this case is “Vivo”. After selecting the brand, click “Start”. It will begin the process of downloading the related driver for Nokia FRP bypassing.

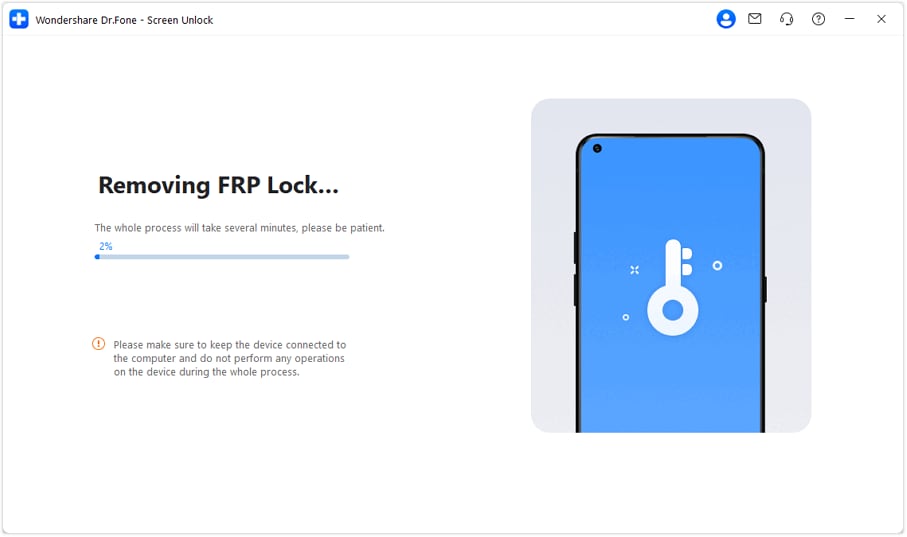
- Step 3: Complete the Nokia FRP Bypassing Process
After downloading the driver, move to your Nokia smartphone and turn it off. Connect the turned-off device to the computer while pressing both volume keys for at least 3 seconds. It will kickstart the Nokia FRP bypassing process , which will take a few minutes.
 safe & secure
Part 5. Method 3: Contacting Nokia Support
In specific scenarios, all methods at hand can be unsuccessful in Nokia FRP bypassing Android 12. Here contacting Nokia Support can be a viable option to bypass FRP on your Nokia smartphone. This section will discuss when it is appropriate to consider contacting Nokia Support. Moreover, it will discuss the available support channels and the steps to follow when seeking their help.

When to Consider Contacting Nokia Support
You may consider contacting Nokia Support in the following situations:
- If you have exhausted all other methods and cannot bypass FRP on your Nokia device.
- If you need specialized help or guidance from Vivo’s technical team.
- If you encounter any difficulties or issues during the FRP bypass process. Now you need expert help to resolve them.
Available Options for Nokia Support Channels
Nokia offers various support channels to cater to the needs of its users. These channels typically include:
- Official Nokia Website: Visit the official Nokia website and navigate to the support section. Here, you can access resources such as FAQs, user manuals, and troubleshooting guides.
- Customer Support Hotline: Contact the Nokia customer support hotline to speak with a representative. They will be able to provide guidance and help over the phone.
- Email Support: Send an email to Vivo’s support team detailing your issue and request for help. They will respond to your inquiry accordingly.
- Live Chat: Nokia websites offer a live chat feature where you can interact with a support agent in real time.
Steps To Follow When Seeking Help From Nokia Support
When contacting Nokia Support for FRP bypass help, follow these general steps:
- Prepare Necessary Details: Before reaching out, gather essential information about your device. These include the model number, IMEI, and a brief description of the FRP bypass issue you are facing.
- Choose a Support Channel: Select the most convenient support channel based on your preferences. It can be the hotline, email, or live chat.
- Provide Accurate Information: Clearly describe your situation, including the steps you have already taken. You should also mention the methods you have attempted to bypass FRP.
- Follow the Instructions: Listen carefully to the guidance provided by the Nokia Support representative. Moreover, follow the instructions provided via email or live chat.
- Provide the Required Information or Documents: If requested by Nokia Support, provide any necessary information or documents. You will need such documents to prove your ownership of the Nokia G42 5G device.
You might also interest:
_ The Complete Guide to Unlock Mi Account Without Password _
_ Ultimate Guide to Bypass FRP with PC _
_ Complete Method: How to bypass Xiaomi FRP _
Part 6. Troubleshooting and Tips
You may encounter certain issues or errors during the FRP bypass process on your Nokia device. This section will address some common problems that users may face and provide ways to help you resolve them:
Common Issues and Their Solutions
Before we lead into an assessment of the tips that one can follow to avoid issues with their Nokia FRP bypass process, it is necessary to guide users with the problems involving the process. However, along with the issues, all the required solutions are associated with them.
1. Faulty USB Connection
During the bypass process, your computer may fail to detect your Nokia device when connected via USB.
Solution: Ensure your Nokia device is properly connected to your computer via a USB cable. Moreover, try using a different laptop port or USB cable but confirm it is original to fix any connection-related issues.
2. Device Compatibility Issue
The FRP bypass tool you are using may not be compatible with your specific Nokia device model or Android version.
Solution: Confirm that the FRP bypass tool you are using supports your Nokia device model and the specific Android version installed on your device. Consider trying an alternative tool if compatibility issues persist.
3. Retry Bypass Methods
The bypass method you have chosen may not be successful in bypassing FRP on your device.
Solution: Attempt the process again by following the instructions meticulously. Double-check that you have entered the correct information and followed each step accurately.
4. Network Connectivity Problems
Instability in your internet can cause issues with the downloading or verification process. As a result, your attempt to bypass FRP fails.
Solution: Ensure you have a stable and high-speed internet connection to avoid interruptions during the FRP bypass. If not, try switching to a different network, such as taking a mobile hotspot from your family member or friend. You can also reset your network settings if connectivity issues persist.
General Tips for a Successful FRP Bypass Process
To increase the likelihood of a successful FRP bypass on your Nokia device, consider the following general tips:
1. Research and Understand the Method
Familiarize yourself with the Viva Y20 FRP bypass Android 12 method you intend to use. Read tutorials, watch videos, and gather information. Ensure that you have a clear understanding of the instructions involved for your selected methods to perform successfully.
2. Ensure Device Compatibility
Verify that the FRP bypass method or tool you plan to use is compatible with your specific Nokia device. It should be compatible with the model and the Android version it is running. Using incompatible methods can lead to errors and unsuccessful bypass attempts.
3. Follow the Instructions Carefully
Pay close attention to each step of the Nokia FRP bypass Android 13 process. Follow the instructions precisely. At times even a minor mistake can hinder the success of the bypass.
4. Stable Internet Connection
Ensure that you have a stable internet connection throughout the FRP bypass process. A stable connection is necessary for downloading required files or using online FRP bypass tools.
5. Seek Professional Help If Needed
If you encounter difficulties during the FRP bypass process, consider seeking professional help. You can seek help from authorized service centers or contact Nokia Support. They can provide guidance and help troubleshoot any issues you may face.
Conclusion
To conclude, we have explored various methods and tools to assist you in Nokia FRP bypassing Android 12. Throughout the journey, one tool has stood out as a reliable solution: Wondershare Dr.Fone. Regarding FRP bypass, Dr.Fone - Screen Unlock (Android) has proven to be a top choice for Nokia devices. It is compatible with a range of Nokia models and Android versions.
This makes Dr.Fone an excellent option for a hassle-free bypass experience. Dr.Fone provides step-by-step instructions for the FRP bypass process. It ensures that you are guided through each stage of the bypass procedure.
Also read:
- [New] Best Practices in YouTube Keyword Selection for 2024
- [New] In 2024, Periscope Essentials Is It Free? Register Now Guide
- [New] In 2024, Transform Slideshow Into Video
- Hassle-Free Ways to Remove FRP Lock on Oppo A56s 5Gwith/without a PC
- How to Bypass FRP on Huawei?
- In 2024, 5 Quick Methods to Bypass Meizu 21 FRP
- Is GSM Flasher ADB Legit? Full Review To Bypass Your OnePlus Ace 2V Phone FRP Lock
- Pro Camera Powerhouse The SJ-CAM S6 Reviewed for 2024
- The Art of Image Enhancement Pivotal Pixlr Insights for 2024
- The Psychological Meaning of the Single Characteristics in Handwriting - A Historical Article on the Analysis and Interpretation of Handwriting | Free Book
- Wiederherstellen Sie Ihr Windows 11-System: Schnelle Lösungen Mit Der Eingabeaufforderung
- Title: How to Bypass FRP from Nokia G42 5G?
- Author: Liam
- Created at : 2024-12-31 20:58:13
- Updated at : 2025-01-06 00:52:04
- Link: https://android-frp.techidaily.com/how-to-bypass-frp-from-nokia-g42-5g-by-drfone-android/
- License: This work is licensed under CC BY-NC-SA 4.0.