
Hassle-Free Ways to Remove FRP Lock on Nokia C12 Pluswith/without a PC
Hassle-Free Ways to Remove FRP Lock on Nokia C12 Plus Phones with/without a PC
“I just bought a used Nokia device from the mobile market without checking the already signed in Google account, and I don’t even know what Gmail ID is added to this device, so I’m looking for FRP Nokia bypass tools. Please help.” A user says so on Quora.
In all such and similar situations when you have authorized access to your Nokia or any other Android device, but not the right Google credentials, the need for a tool that can bypass the lock arises. The content below will take you through these FRP bypass Nokia tools.
Part 1. Can I Bypass Google Lock on Nokia ?
Yes, the Google Lock on Nokia can be bypassed using an FRP bypass tool. Although in case of theft and loss, the FRP lock is a great feature, but on the flip side, in a situation where you forget your Google credentials, the function can be more of a problem than of use. Additionally, if you have got a hand on a second-hand device having an FRP lock, then also you would be in trouble accessing the phone.
You can choose between tools without a computer as well as PC-based programs to bypass and remove the Google Account. Once the account is removed using the tools, the following will be the benefits.
- You will have complete access to your Nokia device and its features.
- Once the lock is removed, it will completely de-link from the previous Google account and hence cannot be blocked or traced by the previous owner.
- You can permanently delete the Google account.
Part 2. How to Bypass Google Lock on Nokia Without Computer? (30 Min & Free)
To remove the Nokia FRP bypass without using a system, the EMERGENCY CALL method can be used. Though this method is free, it is lengthy and complicated.
Steps for Nokia FRP bypass without computer
- Step 1. Connect your Nokia phone to a Wi-Fi and then switch it on for the HELLO screen to appear. Next, select the Emergency Call option and then click on Emergency Information two times.
- Step 2. On the Emergency Information page, tap on the Pencil icon and Name. Next, click o the profile icon and select the option of changing an image.
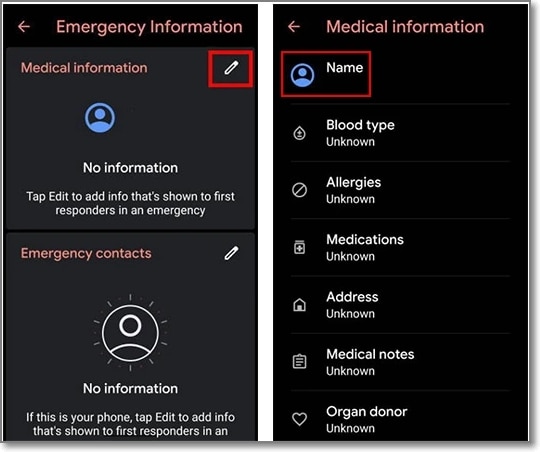
- Step 3. Next click on Menu > Photos > Permissions. Click on the Contacts options and select See All apps with this permission.
- Step 4. Click on the Search > Settings> Settings App Info > Open. With this, you will enter the Settings section of the Nokia C12 Plus device, after which select Accessibility > Accessibility Menu and turn in On.
- Step 5. Go back to the settings and choose Apps & Notifications > App Info. The list of the app will appear, and now you will have to disable some apps for the FRP process.
- Step 6. Choose 3 dots > Show System Apps and then click on Android Setup > Force Stop > OK.
- Step 7. Using the Storage & Cache option, wipe off the Storage and the Cache. Click Disable > Disable App.
- Step 8. Next, click on the blue settings icon of Android Setup and click on Force Stop.
- Step 9. From the Android Setup, remove all the storage and the cache data. Next click on Google Play Services > Disable > Disable App.
- Step 10. Now you need to go to the main Hello homepage by clicking on the back arrow multiple times. Select the Start option and the Nokia C12 Plus device screen will start loading.
- Step 11. When the updates are being checked by the screen, go back to the Wi-Fi connection page.
- Step 12. Open the Shortcut Menu by swiping up from the bottom to the top using 2 fingers.
- Step 13. Click Assistant > Settings > Enable Google Play Services. Move back and select Skip > Continue.
- Step 14. Click on More > Accept.
- Step 15. At the Set Screen Lock, click Skip > Skip > OK > Accept & Continue and then go to the home screen.
- Step 16. Finally, to bypass google lock on Nokia without pc, go to Settings > System > Advanced > Reset Option and here choose to Erase All Data options 3 times.
Part 3. How to Bypass Google Lock on Nokia with Computer? (15 Min but Paid)
If you have access to a computer, Motoreaper is a decent Nokia FRP tool for Nokia FRP bypass with computer. Developed by the Phonlab team, Motoreaper is a Windows-based tool that works on the majority of Nokia devices including Moto E, Moto X, Moto G, Droid Turbo, Droid Maxx2, and others.
Steps for Nokia FRP bypass using Motoreaper
- Step 1. Download and install the Motoreaper software on your system and launch the same.
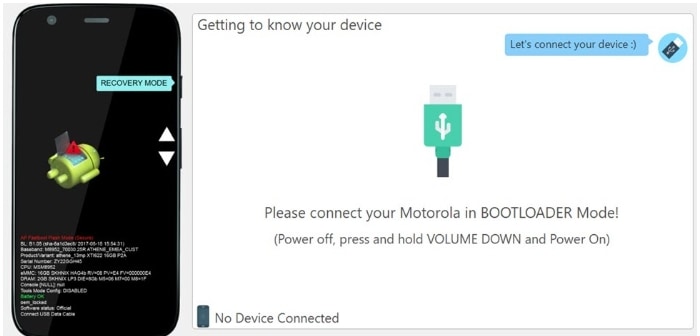
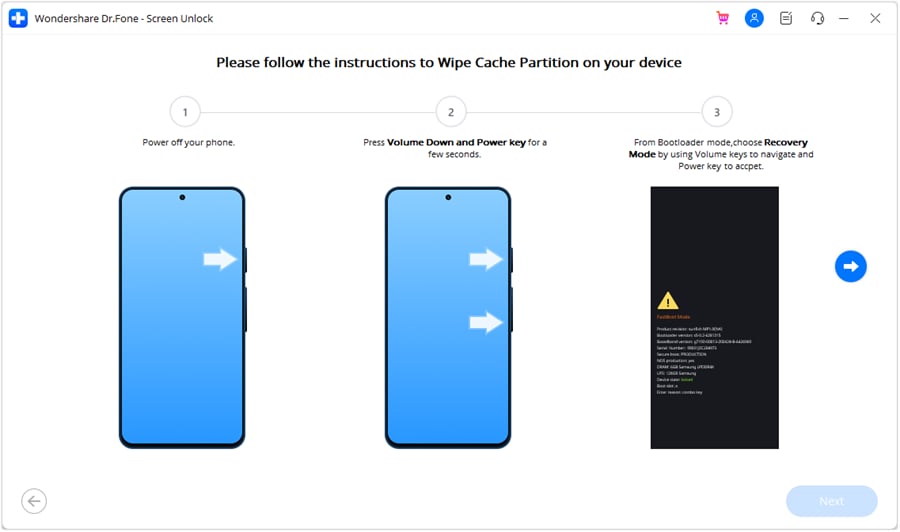
- Step 2. Now you need to get your Nokia phone into bootloader mode and for this, you need to power off your device and then turn it on by pressing and holding the power and volume down buttons together for a few seconds.
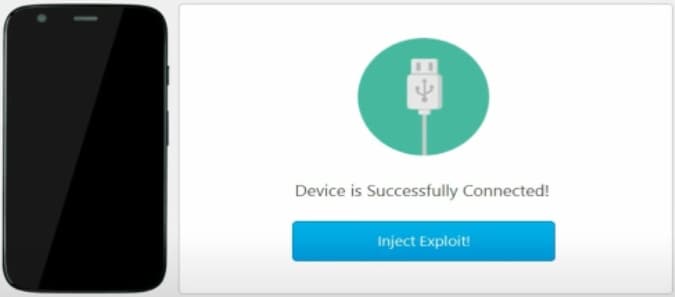
- Step 3. Next, connect your phone to your PC using a USB cable and the software will successfully show the connected device.
- Step 4. Next, unplug your Nokia phone and boot it into the factory model using the bootloader mode by pressing the power and volume down button. When the factory mode appears, use the power button to select it.
- Step 5. Now connect your phone again to your system and let it boot up completely. Next, click on the I have Done option.
- Step 6. Now your device is on the factory mode where you need to click on, the I Confirm option.
- Step 7. Next for Nokia Google bypass, use debugging in your device and then tap on I confirm at Moto Rapersoftware.
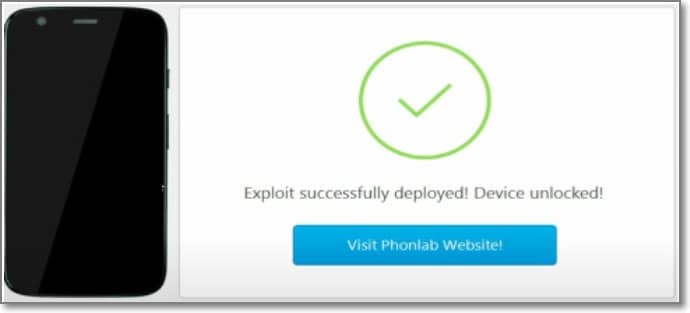
- Step 8. The Unlock No button will appear in the Moto Reaper software which you have to click after which the Google bypass Nokia process will be complete and the FRP lock will be removed.
Part 4. How to Unlock Nokia Phone Passcode? (5 Min)
Besides FRP lock, the screen lock of your Android phones including Nokia is one of the most common situations. So, if to have forgotten your screen lock code or have a device with a locked screen, the best tool we reconned is Dr.Fone - Screen Unlock (Android) . This simple system-based software will let you remove all types of screen locks – PIN, password, pattern, as well as a fingerprint in a few simple and quick steps. The software is reliable and safe without causing any harm to your device.
![]()
Dr.Fone - Screen Unlock (Android)
Get into Locked Nokia within Minutes
- 5 screen lock types are available: pattern, PIN, password, fingerprints & Face ID.
- Easily remove the lock screen; No need to root your device.
- Everybody can handle it without any technical background.
- Provide specific removal solutions to promise good success rate
4,008,671 people have downloaded it
Step 1. Launch the installed software on your system and from the main page, choose the Screen Unlock option.
Step 2. Using a USB cable, connect your phone to your system and then select Unlock Android Screen option on the software interface.

- Step 3. From the supported list on the software interface, select Nokia .

- Step 4. Your Nokia phone will enter into a dedicated mode. Once in this mode, Dr.Fone will initiate the Nokia screen unlock process.
- Step 5. When the process is complete, you can access your Nokia device without any need for a password.

 safe & secure
Conclusion
Nokia FRP lock can be removed using the Emergency Call option or the above-mentioned Motoreaper tool. For removing any type of screen lock without password on your Android devices, Dr.Fone – Screen Unlock (Android) works as the best option.
How To Bypass Nokia C12 Plus FRP In 3 Different Ways
Are you having trouble bypassing Nokia C12 Plus FRP? If so, you’re not alone. A lot of people are struggling with this particular task. But don’t worry - We are here to help.
Since many Nokia C12 Plus users do not need to log in more than once, they commonly forget their Google email and password.
If you have used this device for an extended period, you might have forgotten the password. A factory reset requires you to log in to your Nokia C12 Plus device and use the same Gmail account.
To unlock the Nokia C12 Plus smart 5 FRP, you must use any bypassing tool or method. In this blog post, I’ll walk you through the process of bypassing Nokia C12 Plus FRP. So read on for instructions on how to get the job done.
Let’s get started!
Part 1: Some Common Reasons To Bypass Nokia C12 Plus FRP
Nokia C12 Plus devices are often bypassed for the following reasons:
1. Forgotten Google Account Credentials
One of the most common reasons for needing to bypass FRP is that you simply forgot your Google account login credentials. Whether you have a new phone and are setting it up for the first time, or you’ve had the same phone for a while and are just now adding a Google account, there’s always a chance that you might forget your password.
2. A Second-Hand Phone
Another common reason for wanting to bypass FRP is if you’ve purchased a second-hand phone. If the previous owner of the phone didn’t correctly remove their Google account from the Nokia C12 Plus device before selling it to you, then you’ll be stuck with their account on the phone and won’t be able to use it yourself until you bypass FRP.
3. Factory Reset In An Untrusted Environment
If you’ve performed a factory reset on your phone to try and fix an issue or start fresh, you’ll need to bypass FRP to use the Nokia C12 Plus device again. It is because a factory reset will also remove your Google account from the phone, leaving you locked out unless you can remember the login credentials.
Part 2: Bypass Nokia C12 Plus FRP With 3 Easy Methods
Bypassing FRP can be a bit tricky, but it’s possible to do it if you have the right tools and know-how. If you’re looking for a quick and easy way to bypass FRP on your Nokia C12 Plus device, below are the methods you can use to Nokia C12 Plus Hot 10 FRP bypass.
Method #1: Recover the Google Account Of Your Device
Performing a Factory Reset requires restoring a Google account. It is advisable to recover your email ID or password from another device before attempting Nokia C12 Plus Hot 8 FRP bypass.
You can solve the problem if you have an alternate email address or phone number associated with the account you want to recover. By inserting a verification code, you can easily change the password for your Google account.
After resetting your password, it will take 24 to 72 hours to sync the new password with all devices registered to the account.
Once synced, you can perform a factory data reset by providing an email and a new password. Following this method, you can factory reset your Nokia C12 Plus Hot S without bypassing FRP.
However, if you provide the wrong password in this process, the time will restart for the next 24-72 hours to sync.
So, be careful when entering your email and password on the Nokia C12 Plus device.
Method #2: Bypass Nokia C12 Plus FRP With FRP Bypass APK
Nokia C12 Plus Hot 8 FRP bypass is done using FRP Bypass APK, an Android application. FRP Bypass APK will prove helpful if you cannot retrieve your Google account, which is logged into your Nokia C12 Plus smart 5 FRP bypass.
The APK lets you remove the Google account verification process without a password. You can use this method for free, safely, and quickly.
If you use FRP Bypass APK, you can bypass FRP lock on Nokia C12 Plus Hot 10 FRP bypass and any Android phone running version 5.1 or higher.
Using FRP Bypass APK, you can unlock Google lock on the Nokia C12 Plus Hot 8 FRP bypass:
Step 1: Download the latest FRP Bypass, Following the official website.
Step 2: Copy the APK file to a USB drive.
Step 3: Use an OTG cable to connect the flash drive and Nokia C12 Plus Hot 10 FRP bypass, pulling up a file explorer.
Step 4: After downloading the app, you must install it on your smartphone. You must enable unknown sources before installing.
Step 5: Select the settings menu in the app after completing the installation process.
Step 6: Click on the “Backup and Reset” option.
Step 7: Click the Factory Data Reset button, then select Confirm.
Step 8: The Google account verification will be removed without a password within a few seconds.
Step 9: Restart your device after completing all the procedures.
Step 10: Create a new Google account or skip the option to do so later.
Nokia C12 Plus Hot 8 FRP bypass using FRP Bypass APK is a simple method that a beginner can utilize.
Method #3: Bypass Nokia C12 Plus FRP Without PC Via Settings Menu
Do you want to bypass the Google account verification FRP on the Nokia C12 Plus Smart 5 phone? Using this method, you can bypass the FRP on Nokia C12 Plus Smart 5.
Wait until the Nokia C12 Plus Hot 8 reboots and prompts you to select a language before performing a factory reset.
You can follow the steps below after selecting:
Step 1: Set up Wi-Fi on the Nokia C12 Plus Smart 5.
Step 2: A Google account request page will appear.
Step 3: After tapping the text box, the keyboard will appear.
Step 4: As soon as you click the “@” button, the settings menu will appear.
Step 5: Choose Google keyboard layout from the list. Check it and ensure that the Google keyboard layout is correct.
Step 6: Click on the three dots in the upper right corner of the screen.
Step 7: Select “Help & Feedback” after opening a new page.
Step 8: Click on the search button and send the result from the keyboard once the new dialog box has been opened.
Step 9: Then ignore the guide; it will show you how to do it.
Step 10: Click and hold any word on your screen to highlight it in blue.
Step 11: Click the “Web Search” button on the right-hand side of the screen.
Step 12: A new page guides you through the next step. You can see the web results for the word you just Googled using the Google App.
Step 13: Find the search box in the upper center of the page. Click the search button after typing “setting” in the search bar.
Step 14: You will now see a system settings icon on your home screen. You can reset the factory data by clicking on the following steps: system setting icon > Backup & Reset > Factory Data Reset.
Step 15: Reset the Nokia C12 Plus device to factory settings. After completing the reset, you will see the Nokia C12 Plus Smart 5 welcome page.
Step 16: Reconnect your Nokia C12 Plus to your Wi-Fi network. The phone will instead ask you to add a new Google account if you can do it successfully.
Step 17: Sign up for a Google account, and then the Nokia C12 Plus Smart 5 is ready to use.
Bypassing the FRP on your Nokia C12 Plus Smart 5 is as simple as following these steps.
Conclusion
It is not illegal to bypass Google verification when you are doing a factory reset in case you forget your password or don’t remember your Google account. The Nokia C12 Plus Smart 5 FRP bypass becomes useless if you don’t bypass the FRP lock, so FRP bypass Nokia C12 Plus Hot S matters.
You can bypass the Nokia C12 Plus Hot 8 FRP by using a few practical methods listed above. You can try another whenever one of the above procedures does not work accurately.
5 Quick Methods to Bypass Nokia C12 Plus FRP
Google Factory Reset Protection, a.k.a FRP, is developed by Google for all Android phones. It adds an extra layer of security to your phone and the data on it. It is aimed at making it difficult for the illegal holder of your phone to factory reset your phone and remove tracking information. Then why do we need to discuss the Nokia C12 Plus FRP bypass?
Though the protection is meant for you, sometimes you may forget the password and want your Nokia C12 Plus FRP removed. Also, if you bought a used phone and the previous user has set up FRP with her password, you need to bypass it.
Part 1: In what cases does the Nokia C12 Plus FRP bypass works?
How and why should I bypass Nokia C12 Plus FRP? Let us look at the valid reasons.
1. Buy a locked second-hand Nokia
When you buy a second-hand phone, ideally, the previous user must format and hard reset the Nokia phone to remove all locks and password requirements. However, if it doesn’t happen, you cannot use some options on your phone and configure security because of FRP. Here, your savior is the option of the Nokia C12 Plus FRP bypass.
2. Forget Google account ID and password
Even if you have locked your Nokia phone yourself, you are stuck when you forget your Google username and password. So, you can only recover your phone using the Nokia C12 Plus FRP bypass.
3. The person with a Nokia from his company no longer works for it
Some employees also receive official phones from their company which they have to return when they leave the company. Now, it becomes a horror story for the new employee if he gets the same phone locked with the previous user’s ID.
Part 2: 5 quick methods to bypass Nokia C12 Plus FRP
Ok, now this is established that there are certain situations when you need to conduct a Nokia C12 Plus FRP bypass. So how do you do the Nokia C12 Plus FRP bypass?
Method 1. Retrieve your Google account from another device
If your phone is locked with a Google account whose password you do not know or have forgotten, then you can use this method to Nokia C12 Plus FRP bypass. In this method, you can try to retrieve your Google account from another device. It is a simple step-by-step process tha can be completed from a PC or another mobile device.
If you have forgot the email address but remember the password, then follow these steps.
- Navigate to Google’s Find My Email page in your browser.
When you can’t remember the email address that was configured, go to the Find My Email page and start account recovery process.
- Enter your recovery email or phone number
On the next screen, provide a recovery email or phone number and click Next.

- Provide your first and last name
Enter your first and last name in the given form and click Next.
- Verification code
Google will send a verification code to the setup recovery email or phone number, click Send.
- Verification code entry
Check your email inbox or phone messages depending on the recovery method and find the verification code. Enter it in the given form. If it is correct, you can go to the next final step.
- Choose an account
From the list of accounts showing on the screen, select the account you want to recover.
- Enter your password
Enter the password in the text box and you are done.
If you remember the email but not the password, then the Nokia C12 Plus FRP bypass method will go like this.
- Google’s Account Recovery page
Navigate to the Account Recovery page from the browser on your PC or other mobile devices.
- Enter your email address
Fill in the form with your Google account and click Next.

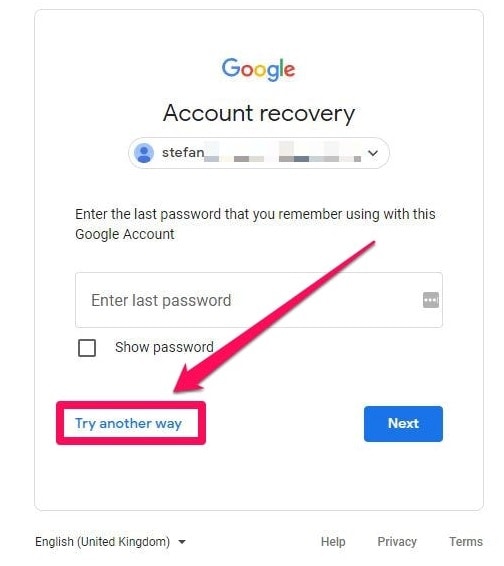
- Enter the last password you remember
The next form will ask you to enter the last password you remember and that worked
Now, you will receive a message to your registered device, to verify it’s you. Open it and click , Yes, it is me.
Now, wait for six hours for Google to verify it’s you and then they will send a password reset link to your email.
Now, what if you can’t remember your last password, then use the next method.
- Click on “Try another way”
Now Google will send a message to your phone to verify it’s you. On your phone, open the message and click Yes, it’s me.
After verification, Google will send you a password reset link after six hours.
If your phone is not registered in your Google account then, try the next method.
- Click on “Try another way” again

If your phone is enabled to check for the code, click Try another way again.
Google will then ask you to send a verification code to your registered phone number. Click Send.
Find the code from your messages, enter it, and click Next.
Now again, you will wait for six hours till Google sends the password reset link to your email.
Method 2. Use FRP Bypass APK
FRP bypass APK is another tool you can use to Nokia C12 Plus FRP bypass easily. Let us see how it works step by step.
- Download FRP Bypass APK for Nokia C12 Plus FRP bypass android 11.
- Once it’s downloaded, open the File Manager using the Open Files app
- Find the suitable Apk and click on it
- Install & open the APK.
- Open the browser on your phone.
- Launch any of these two below URL.
- Go to the FRP bypass APK >FRP APPS section
- Open Settings leading to the Nokia C12 Plus device Settings>System Settings> Backup & Reset >Reset Phone
- Now click on Reset System Settings Only, and confirm Reset System Settings Only.
- Select Erase All data and confirm.
- Your device will be rebooted.
- Wait till the factory reset process completes.
Now, reboot your device and set it up according to your requirements.
Method 3. Deactivate FRP
Another way to come around Nokia C12 Plus FRP bypass is to deactivate FRP. Let us follow the step-by-step process.
- Launch the “Settings” app and scroll to the Apps.
- Click on the “Manage apps” (applications) and then the “All” tab.
- Open “Google App.”
- Click on the “Clear cache” to remove the Google account cache.

- Also, clear all data to erase data stored.
- Click the “Back” button, and go to “Gmail.”
- Click on the “Clear cache” and “Clear data.”

- In the Nokia C12 Plus device Settings menu and click “Data synchronization.” When your device asks you to enter your Google account, enter your new Gmail account.
You have successfully completed the Nokia C12 Plus FRP bypass process.
Method 4. Bypass with SideSync
You can use SideSync to share the screen and data between your computer and mobile phone. How can we use this for FRP bypass?
- Download the SideSync from the official site and install the SideSync application on your computer.

- Connect your phone and computer to the Google account verification screen.
- Now plug in the first end of your OTG adapter with your phone and connect another end to the flash drive with APK.
- Your phone will launch the file explorer automatically, showing the root directory of the flash drive.
- Now click on the APK file.
- Click Settings and allow to install from Unknown sources, and click OK.
- After installation, open SideSync.
- Disconnect the OTG cable from your Samsung phone.
- Now access the Settings menu and go to the Backup & reset option and conduct a factory reset.
Method 5. 3 Steps to Bypass Nokia FRP Bypass
Dr.Fone - Screen Unlock (Android) is a reliable and efficient tool designed to help users bypass FRP (Factory Reset Protection) locks on Android devices, including Nokia smartphones. This powerful software provides a hassle-free solution for those locked out of their Nokia devices due to FRP lock. With its user-friendly interface and advanced features, Dr.Fone makes FRP bypassing a straightforward process, even for users with limited technical knowledge.
Dr.Fone - Screen Unlock (Android)
Remove Google Lock (FRP) from Nokia Devices
- Pattern, PIN, password, fingerprints & face screen lock can all be unlocked.
- Bypass Android FRP lock without a PIN or Google account.

- Unlock mainstream Android brands like Samsung, Nokia, Xiaomi, etc.
- No tech knowledge required, Simple, click-through, process.

3,981,454 people have downloaded it
3 Steps to Bypass Nokia FRP Lock with Dr.Fone - Screen Unlock (Android)
- Step 1. After installing Dr.Fone - Screen Unlock (Android), launch the program and select the “Screen Unlock” option from the main menu. Continue to Android > Remove Google FRP Lock.
- Step 2. Then select Nokia and click the Start button to continue. Then, connect your locked Nokia device to the computer using a USB cable. Ensure that USB debugging is enabled on your Nokia device before proceeding with the next steps.

- Step 3. Once your Nokia device is successfully connected, Dr.Fone - Screen Unlock (Android) will automatically detect it. Follow the on-screen instructions to put your Nokia device into specic mode. Once in the correct mode, Dr.Fone will start downloading the necessary firmware to bypass the FRP lock.
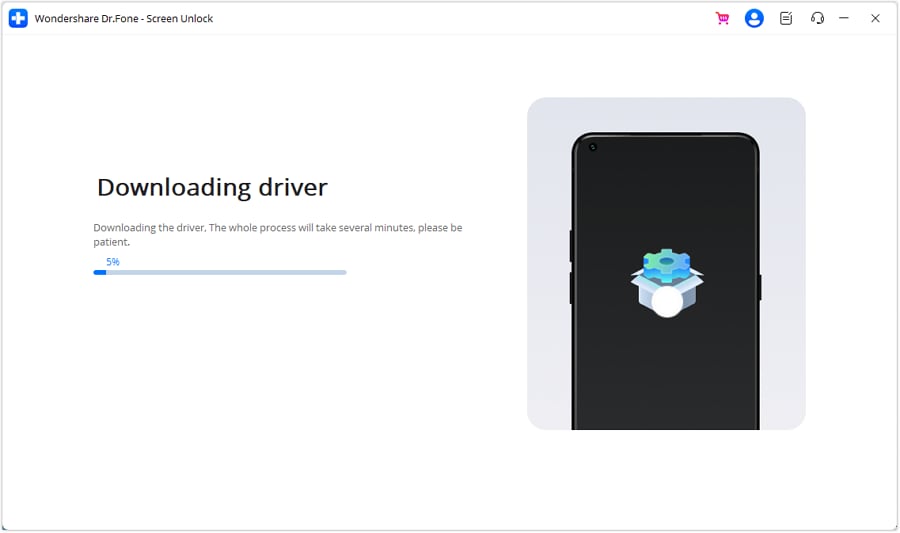
During the process, it’s crucial to keep your device connected to the computer and refrain from disconnecting it until the bypass is complete. After the firmware download is finished, Dr.Fone will initiate the FRP lock bypass process. Once completed, your Nokia device will restart, and you’ll regain access to it without encountering the FRP lock.
safe & secure
The Bottom Line
FRP is a great feature to add security to Android phones. However, sometimes it is necessary to bypass it to fully use your phone. When you are stuck with an FRP lock, it is a frustrating situation, especially when you want to factory reset your phone. We have described various methods so that you choose the best solution according to your requirements for the Nokia C12 Plus FRP bypass. Among them, bypassing Nokia FRP lock is made simple and efficient with Dr.Fone - Screen Unlock (Android). Say goodbye to FRP lock frustrations and regain access to your Nokia device swiftly with Dr.Fone - Screen Unlock (Android) .
safe & secure
Also read:
- [New] 2024 Approved Rapid Revamp Top 8 Video Speed Enhancers for Android
- [New] Ranked Best Voice Change Software Echo Magic Edition for 2024
- [Updated] 2024 Approved Superior Visuals Leading HDMI 2.1 Monitors for PS5 Gaming
- Découvrir Les Spécificités Des Fichiers Images : Clés À La Recherche D'une Partition Ou D'un Volume Existant
- Full Guide to Bypass OnePlus Ace 2 FRP
- In 2024, A Step-by-Step Guide on Using ADB and Fastboot to Remove FRP Lock from your Samsung Galaxy XCover 6 Pro Tactical Edition
- In 2024, About Lava Yuva 3 Pro FRP Bypass
- In 2024, AddROM Bypass An Android Tool to Unlock FRP Lock Screen For your Motorola G54 5G
- In 2024, How to Bypass FRP on Samsung Galaxy A34 5G?
- In 2024, Top 7 Phone Number Locators To Track Honor Magic5 Ultimate Location | Dr.fone
- The Lenovo IdeaPad Laptop Reviewed: Solid Construction Meets Basic Usage
- What is Fake GPS Location Pro and Is It Good On Honor X50i+? | Dr.fone
- Title: Hassle-Free Ways to Remove FRP Lock on Nokia C12 Pluswith/without a PC
- Author: Liam
- Created at : 2025-01-05 00:57:23
- Updated at : 2025-01-05 19:55:55
- Link: https://android-frp.techidaily.com/hassle-free-ways-to-remove-frp-lock-on-nokia-c12-pluswithwithout-a-pc-by-drfone-android/
- License: This work is licensed under CC BY-NC-SA 4.0.